Concrete Vapor Barrier Guide: Types, Thickness, Placement and Installation
Concrete Vapor Barrier Guide
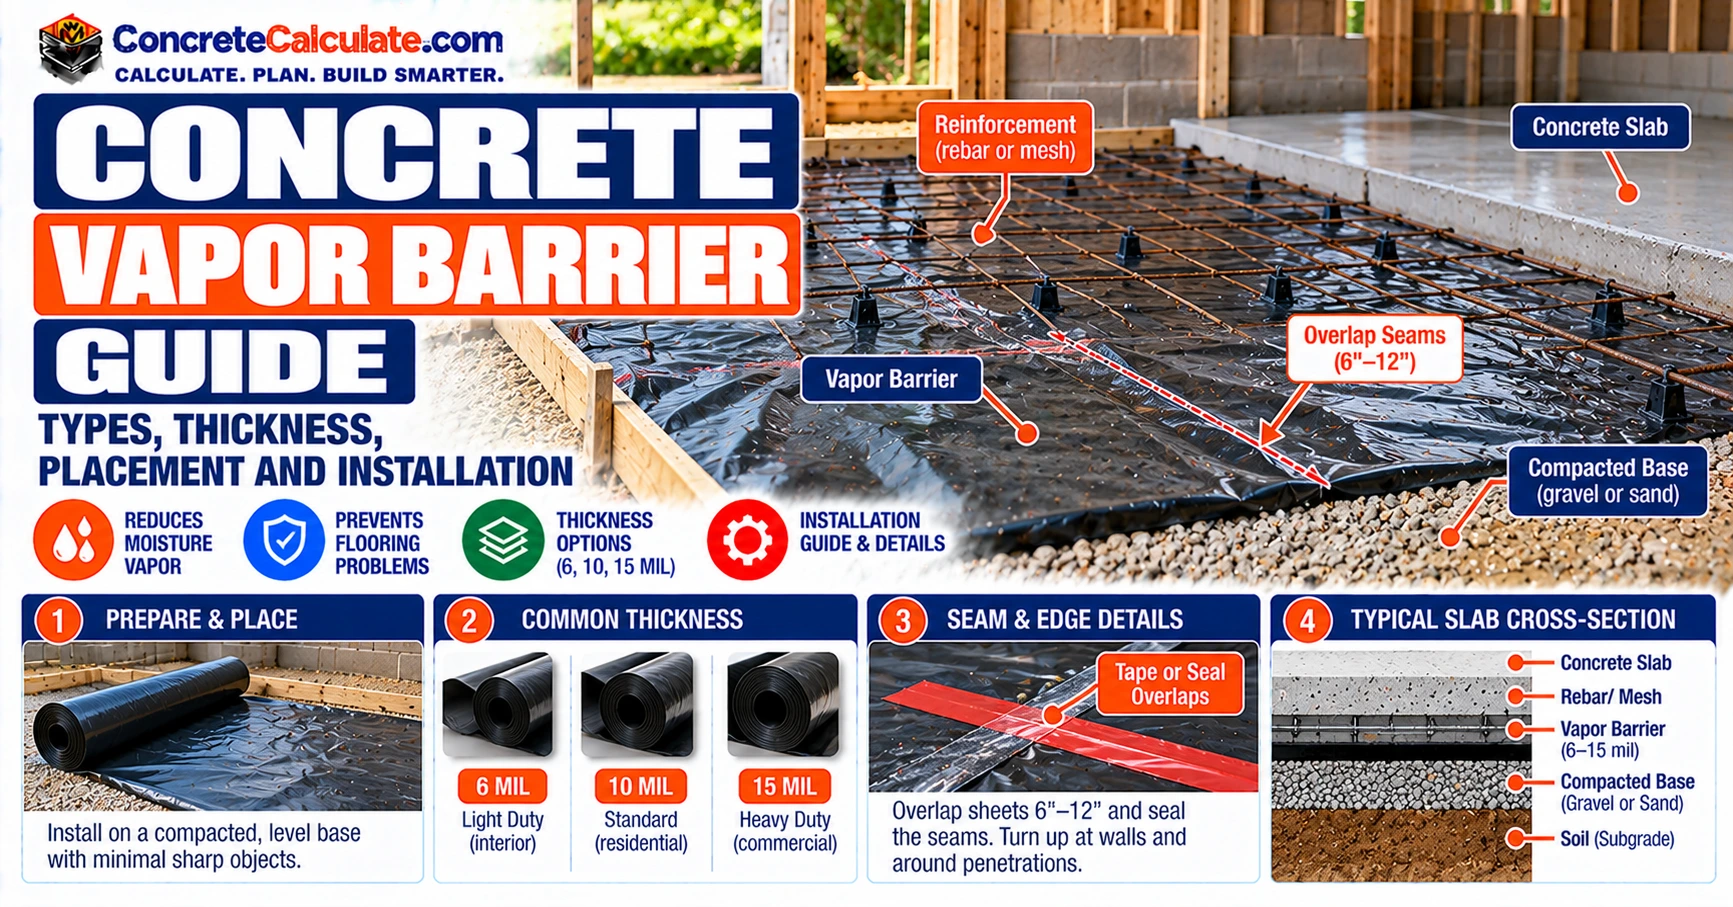
Learn when a slab needs a vapor retarder, how 6, 10 and 15 mil materials and ASTM E1745 and E1643 fit together, where the sheet goes, and how to detail seams and penetrations.
What Is a Concrete Vapor Barrier?
A concrete vapor barrier is a low-permeance sheet placed between a slab and the soil or granular support below it. Its job is to reduce upward water-vapor transmission and capillary moisture movement into the concrete.
It does not stop groundwater under pressure, and it is not a substitute for drainage or waterproofing. The ASTM installation standard says vapor retarders are not intended to provide a waterproofing function.
Quick Reference
Purpose: limit vapor and capillary moisture moving up into a slab on grade.
Not for: hydrostatic pressure or standing groundwater.
Material standard: ASTM E1745. Installation practice: ASTM E1643.
Code minimum (2024 IRC, applicable residential slabs): 6-mil polyethylene or an approved vapor retarder, joints lapped at least 6 inches.
Industry guidance: NRMCA recommends a durable ASTM E1745 product at least 10 mils thick.
Best placement for moisture-sensitive floors: directly beneath the slab.
Vapor Barrier vs. Vapor Retarder: What Is the Difference?
Homeowners search for “vapor barrier,” while the standards use “water vapor retarder.” The two terms overlap, and this guide uses both, keeping the standards’ wording when it discusses specifications.
NRMCA explains that materials with very low after-conditioning permeance, below 0.01 perms, are sometimes called vapor barriers rather than retarders. ASTM E1745 itself sets a maximum permeance of 0.1 perms.
The label on the package matters less than the tested performance. A product sold as a barrier is not automatically better than one that meets the standard.
Why Does Moisture Move Up Through a Concrete Slab?
Soil below a slab is rarely dry. Moisture moves upward by several routes, and concrete is porous enough to let it through.
- Soil moisture from rain, groundwater, and wet fill.
- Capillary action, where water climbs through tiny pores in soil and concrete.
- Vapor pressure differences, since vapor moves from wetter, higher-pressure areas toward drier ones.
- Drying toward the conditioned interior, which pulls moisture up through the slab.
A vapor retarder interrupts the first three at the underside of the slab. It cannot stop moisture that comes from other sources, which have to be addressed separately.
What Problems Can Slab Moisture Cause?
ASTM E1643 explains why vapor retarders exist. Moisture moving up through a slab can harm floor finishes and raise interior humidity.
| Affected item | Possible effect |
|---|---|
| Resilient flooring | Adhesion loss, warping, peeling, and poor appearance |
| Flooring adhesives | Deterioration of the adhesive bond |
| Seamed, continuous flooring | Ripped or separated seams, air bubbles, efflorescence beneath the floor |
| Carpet and carpet tiles | Buckling |
| Coatings | Failure of moisture-sensitive adhesives or coatings |
| Interior environment | Higher humidity, odors, and fungal growth |
| Flat electrical cable systems | Damage |
NRMCA adds trip hazards to the list. Recurring white deposits are covered in the concrete efflorescence guide. NRMCA also notes that low-permeability membranes with sealed joints can help block radon entry where radon is present.
Does Every Concrete Slab Need a Vapor Barrier?
Not every slab needs one, and the answer depends on where the slab is and what goes on it. The 2024 International Residential Code (IRC), section R506.3.3, calls for a minimum 6-mil polyethylene or approved vapor retarder with joints lapped at least 6 inches under applicable residential floor slabs.
The same provision includes exceptions. They cover certain unheated accessory structures, small unheated storage rooms, carports, driveways, walks, patios, and other exterior flatwork not expected to be enclosed and heated. Confirm the exact text and any local amendments.
| Slab/application | Vapor retarder relevance | Main reason |
|---|---|---|
| Interior conditioned floor | High | Protect flooring/interior environment |
| Basement slab | High | Soil moisture below slab |
| Slab receiving vinyl/wood/epoxy | High | Moisture-sensitive finish |
| Heated interior slab | High | Interior moisture control still relevant |
| Unheated detached garage | Code-dependent/possibly exempt | Check local code and future use |
| Exterior driveway | Generally not required | Exterior flatwork |
| Patio/walkway | Generally not required | Exterior exposure |
| Future conditioned conversion | Worth planning for | Retrofit is difficult |
NRMCA goes further. It points out that unfinished areas often get converted to other uses, so including a retarder under every interior slab is sensible planning.
Exterior Slabs vs. Interior Slabs
NRMCA generally describes vapor retarders as useful under interior slabs and generally unnecessary under exterior slabs on grade. Exterior slabs are open to the weather, so moisture can dry from the surface.
- Driveways, patios, and sidewalks: usually no retarder.
- Enclosed garages: treat like interior slabs when they are heated or finished.
- Future conversions: a garage or patio that may become conditioned space is a good candidate for a retarder now.
Adding one later is difficult. If there is any chance a slab will be enclosed, decide before the pour.
What Is ASTM E1745?
ASTM E1745 is the material specification for plastic water vapor retarders used in contact with soil or granular fill under concrete slabs. The edition listed as active is E1745-17(2023).
Materials are tested for water vapor permeance, tensile strength, and puncture resistance, including after conditioning. NRMCA notes that the standard requires permeance no greater than 0.1 US perms by ASTM E96 or ASTM F1249.
Meeting the standard is a better guide than thickness alone.
ASTM E1745 Class A, B and C Explained
ASTM E1745 sorts materials into Class A, B, and C. The classes differ mainly in physical strength, meaning tensile strength and puncture resistance, not in permeance. All three meet the same maximum permeance.
| Property | Why it matters | Reference |
|---|---|---|
| Permeance | Limits vapor transmission | ASTM E1745 |
| Tensile strength | Resists tearing during construction | ASTM E1745 |
| Puncture resistance | Resists chairs, aggregate and traffic | ASTM E1745 |
| Thickness | Improves practical durability in many products | Product-specific |
| Seam compatibility | Maintains system continuity | ASTM E1643/manufacturer |
| Chemical/soil exposure | May affect long-term performance | ASTM E1745 conditioned tests |
Stronger classes may be worth choosing where construction traffic, reinforcement chairs, or rough subgrade raise the puncture risk. The numeric limits for each class are in the standard, which ASTM sells, so check the current text before specifying.
How Thick Should a Concrete Vapor Barrier Be?
Two different numbers get mixed up here. One is a code minimum, and the other is an industry recommendation.
- Code minimum: the 2024 IRC allows minimum 6-mil polyethylene or an approved vapor retarder in applicable residential slabs.
- Industry recommendation: NRMCA recommends a minimum 10 mil thickness, with ASTM E1745 compliance, for reduced vapor transmission and durability during and after installation.
Heavier sheets, such as 10, 15, or 20 mil, may be chosen for demanding construction conditions. Do not read this as a requirement. This guide does not claim that ACI requires 15 mil.
Local codes matter too. The 2021 IRC required a more demanding Class A product, and the 2024 edition went back to the 6-mil option, so check which edition your jurisdiction has adopted.
6-Mil vs. 10-Mil vs. 15-Mil Vapor Barrier
The table compares common sheet thicknesses. Thickness is only one part of the picture, so it does not replace ASTM performance verification.
| Nominal thickness | General context | Advantage | Limitation |
|---|---|---|---|
| 6 mil | Current 2024 IRC minimum option in applicable residential slabs | Low cost/code-prescriptive option | Lower construction durability |
| 10 mil | NRMCA minimum practical recommendation | Better tear/puncture durability | Performance still depends on actual product |
| 15 mil | Common higher-durability specification | Better construction resistance | Higher material cost |
| 20 mil | Heavy-duty/high-risk projects | Maximum practical robustness among common sheets | May be unnecessary for simple residential work |
A thicker generic sheet is not automatically equal to a product tested to ASTM E1745.
Is Ordinary Polyethylene Sheeting Good Enough?
Sometimes, but it is the minimum. Ordinary polyethylene at 6 mil is permitted by the 2024 IRC in applicable residential construction.
NRMCA points out that the low-density polyethylene sheets commonly used in the past have been replaced by stronger, less permeable materials that conform to ASTM E1745. Those products give better controlled performance.
Think about construction durability and the floor you plan to install. A thin sheet is easier to puncture, and a punctured retarder loses much of its value.
Does Perm Rating Matter?
Perm rating describes how easily water vapor passes through a material. A lower number means less vapor gets through. NRMCA notes that ASTM E1745 materials must not exceed 0.1 US perms.
Permeance should not be judged on its own. A low-perm sheet with unsealed seams or punctures will leak vapor where it counts, so seam integrity and puncture resistance matter as much.
Where Should a Vapor Barrier Go Under a Concrete Slab?
For slabs that will get a moisture-sensitive floor covering or coating, place the vapor retarder directly beneath the slab. ACI 302.1R says experience has shown this gives the greatest protection for floor coverings, coatings, and building environments.
NRMCA lists the same practice as its first rule: provide a vapor retarder directly under and in contact with all interior floor slabs. ACI also advises considering curling, crusting, and cracking when concrete sits directly on the retarder.
Vapor Barrier Directly Under Slab vs. Under a Sand or Gravel Layer
Putting a layer of sand or gravel above the retarder used to be common, mainly to help finishing. The fill can then soak up water from rain, saw-cutting, curing, cleaning, and compaction.
ACI points out that moisture can enter the fill through voids, tears, or punctures. That fill can become a moisture reservoir, and an earlier edition of the ACI guide notes that wet fill can significantly increase the time a slab takes to dry.
| Assembly | Moisture-control advantage | Construction consideration |
|---|---|---|
| Concrete directly on vapor retarder | Highest floor-covering moisture protection | Bleeding/finishing may be slower |
| Granular fill above membrane | May ease certain finishing practices historically | Fill can become moisture reservoir |
| No membrane | Simplest installation | Soil moisture can migrate into slab |
| Membrane + capillary break below | Controls vapor plus capillary moisture | Requires proper detailing of both layers |
NRMCA allows a blotter layer for an interior slab in a humidity-controlled area that will not have a moisture-sensitive covering. The granular layer must be dry at placement, and ideally the slab is built with a roof in place.
What Is a Capillary Break, and Is It the Same as a Vapor Barrier?
No. A capillary break is a clean granular layer that interrupts liquid water rising through the soil. A vapor retarder is a sheet that limits vapor and some moisture entering the slab.
NRMCA notes that a coarse stone capillary break will not reduce vapor transmission from the support system, so a vapor retarder is still required above it. NRMCA’s typical slab detail shows both layers.
A vapor retarder limits upward moisture transmission while the granular layer below can serve a separate capillary-break and support function.
Gravel and membrane solve different problems. Drainage, the capillary break, and the retarder each play a part.
Does the Vapor Barrier Go Above or Below the Gravel Base?
For moisture-sensitive interiors, the membrane sits on top of the prepared base, directly under the slab. The IRC phrases it as between the concrete slab and the base course, or the prepared subgrade where no base course exists.
NRMCA suggests choking off a coarse stone capillary break with a layer of graded, compactable fine fill, so sharp stone cannot damage the sheet. It advises against concrete sand, which is easily displaced.
Project drawings control the exact assembly. For soil and base preparation, see How to Prepare Soil for a Concrete Slab and How to Level Ground for a Concrete Slab.
Vapor Barrier Placement at Footings, Grade Beams and Thickened Slabs
Edges are where continuity breaks down. NRMCA says the retarder should be overlapped, taped, and sealed around utility or column openings, the face of grade beams, footings, and slab or foundation walls, as ASTM E1643 addresses.
- Turned-down edges and thickened perimeters.
- Grade beams and interior footings.
- Plumbing and conduit penetrations.
- Column and wall interfaces.
Structural details are project-specific. Follow the drawings, and sketch how the sheet will run at each edge before the crew starts.
Vapor Barrier Under Heated Floors and Radiant Slabs
Moisture control still matters under a radiant slab. Heated floors dry the slab from below and are often covered with moisture-sensitive finishes.
Insulation and tubing layers add fasteners and penetrations that can damage the membrane. The thermal design is outside the scope of this guide, so follow the system designer’s details and keep the retarder continuous.
What Is ASTM E1643?
ASTM E1643 is the practice for selecting, designing, installing, and inspecting water vapor retarders in contact with earth or granular fill under concrete slabs. The edition listed as active is E1643-24.
It is the main installation reference. It also states that conditions with frost and heave or hydrostatic pressure are beyond its scope, which is why a retarder cannot replace drainage or waterproofing.
How to Install a Concrete Vapor Barrier Step by Step
Follow the product’s installation instructions and ASTM E1643 over any general guide. This sequence shows the typical order of work.
Step 1: Prepare a smooth, stable support surface
Compact the base and trim it smooth. NRMCA recommends a well-draining, stable base that can carry construction traffic. Remove sharp stones that could puncture the sheet.
Step 2: Roll out the membrane without unnecessary wrinkles
Unroll the sheet over the base and keep it as flat as practical so it does not bridge or fold.
Step 3: Overlap adjacent sheets according to the applicable standard or product requirements
Use the lap your standard, code, or manufacturer states. The IRC minimum for its residential provision is 6 inches.
Step 4: Seal seams with compatible tape or adhesive
Use the manufacturer’s recommended tape, adhesive, or both, and press the seam down firmly along its entire length.
Step 5: Seal pipe and conduit penetrations
Fit boots, collars, or cut patches tightly around each penetration, and seal all edges.
Step 6: Extend and terminate the membrane according to the project details
Carry the sheet to the edges, footings, and walls as the drawings show, and seal it there as well.
Step 7: Repair holes and punctures
Patch any damage before reinforcement and concrete go in. Walk the area again after the steel is placed.
Step 8: Inspect before reinforcement and concrete placement
Look for gaps, open laps, and cuts, and fix them before the pour. Rebar chairs and construction traffic are frequent sources of damage.
How Much Should Vapor Barrier Seams Overlap?
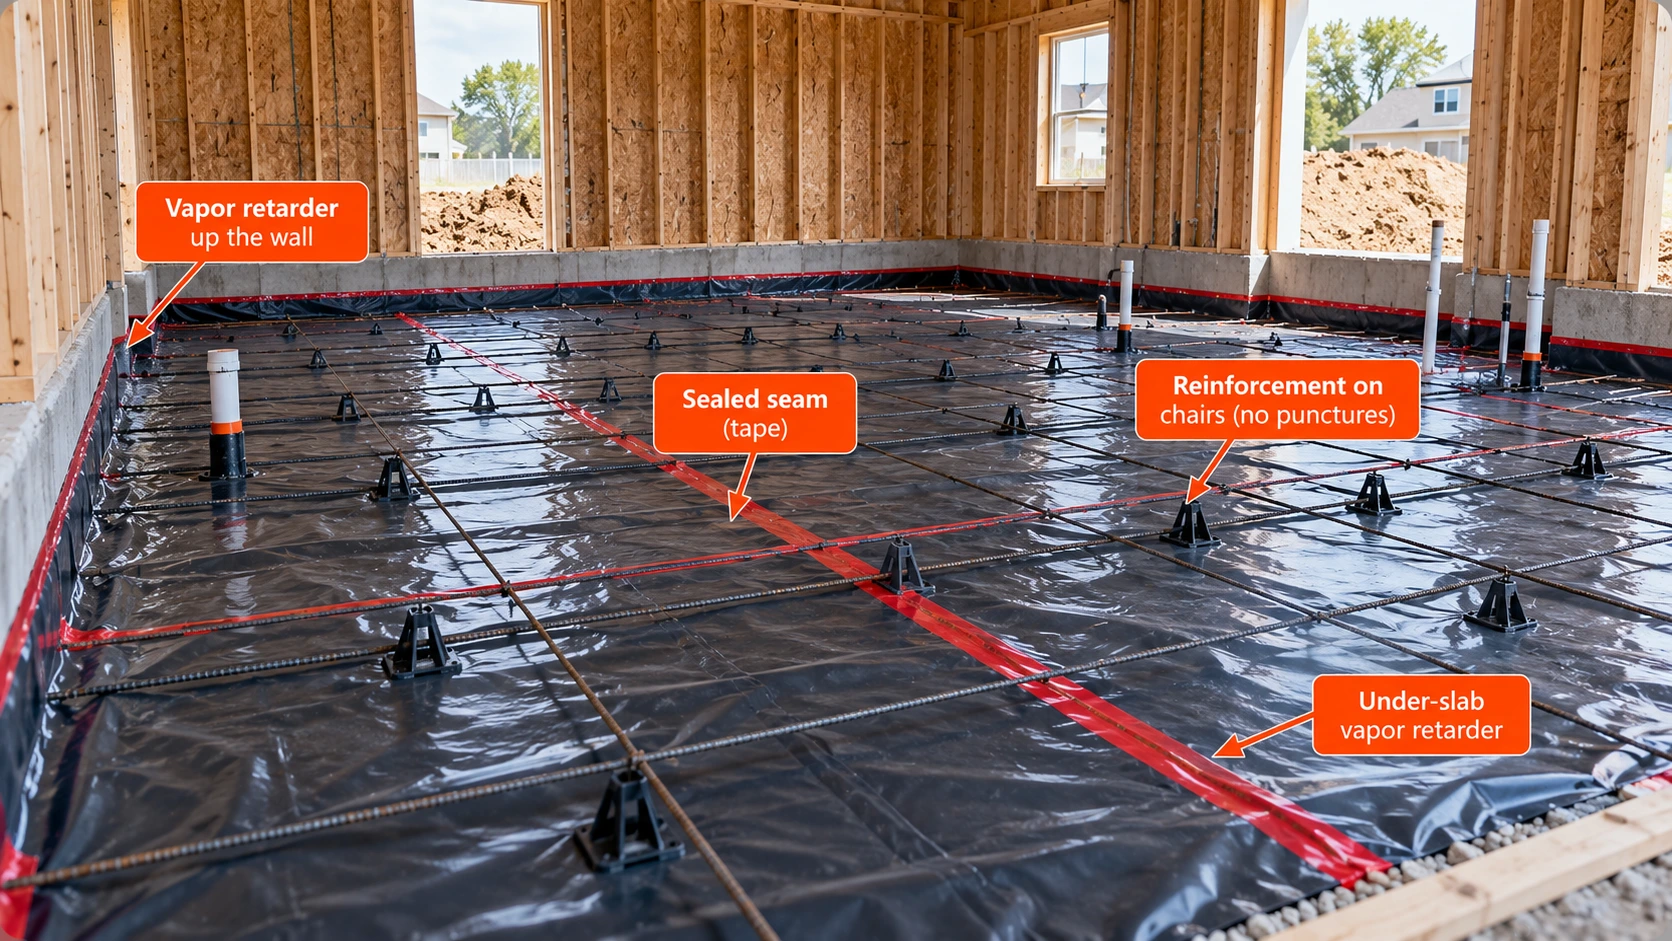
The overlap depends on the governing document. The 2024 IRC requires joints lapped not less than 6 inches in its residential provision, and ACI 302.1R and NRMCA both describe a 6-inch overlap with ASTM E1643 or as the manufacturer instructs.
Follow the strictest applicable requirement, which may be a project specification. An overlap that is not sealed can still let moisture move through, so lap and seal together.
The worksheet below shows why roll quantity is not simply slab area divided by roll area. Laps, cuts, and penetrations all add material.
| Item | Example |
|---|---|
| Slab area | 1,200 ft² (30 × 40 ft) |
| Base membrane area | 1,200 ft² |
| Lap/waste allowance | Enter project allowance |
| Penetration patches | Add separately |
| Perimeter/edge detailing | Add per design |
| Roll coverage | Enter selected product |
| Number of rolls | Round up |
Add allowances for laps, edge turn-ups, and patches, then round up to whole rolls.
Estimate Slab and Base Quantities
The Foundation Calculator can help with slab, base, and vapor-barrier area once you know your layout.
Open the Concrete Foundation CalculatorHow to Seal Seams Correctly
ACI 302.1R says joints and penetrations should be sealed with the manufacturer’s recommended adhesive, pressure-sensitive tape, or both. Use the products made for the sheet you bought.
- Clean and dry the laps so tape sticks.
- Apply tape along the full length of the seam.
- Press it down firmly with no wrinkles or gaps.
- Use the manufacturer’s accessories for corners and ends.
General-purpose duct tape and mismatched adhesives are poor substitutes. Compatibility is part of the system.
How to Seal Pipes, Conduits and Other Penetrations
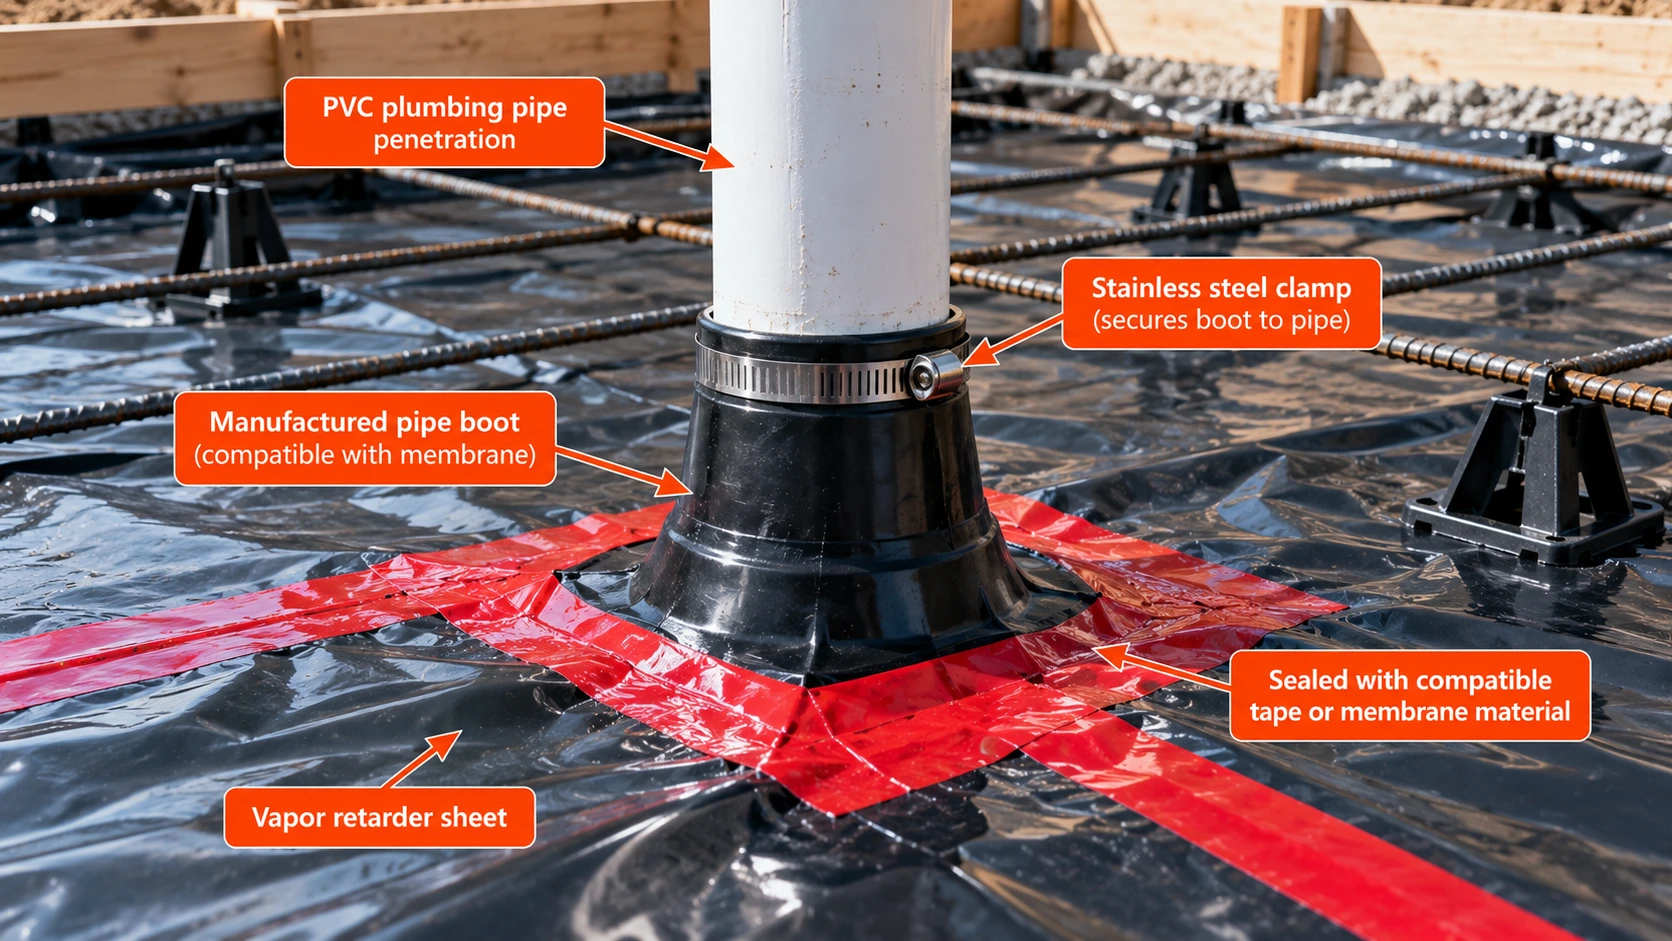
Pipes and conduits are weak points, because the sheet has to be cut and then sealed again. A loose cut around a pipe leaves a path for moisture straight into the slab.
- Boots or collars made for the penetration.
- Field-cut patches that fit snugly.
- Compatible tape on every edge.
- Small openings, not oversized holes.
Seams, penetrations and punctures must be sealed so the under-slab moisture-control layer remains continuous.
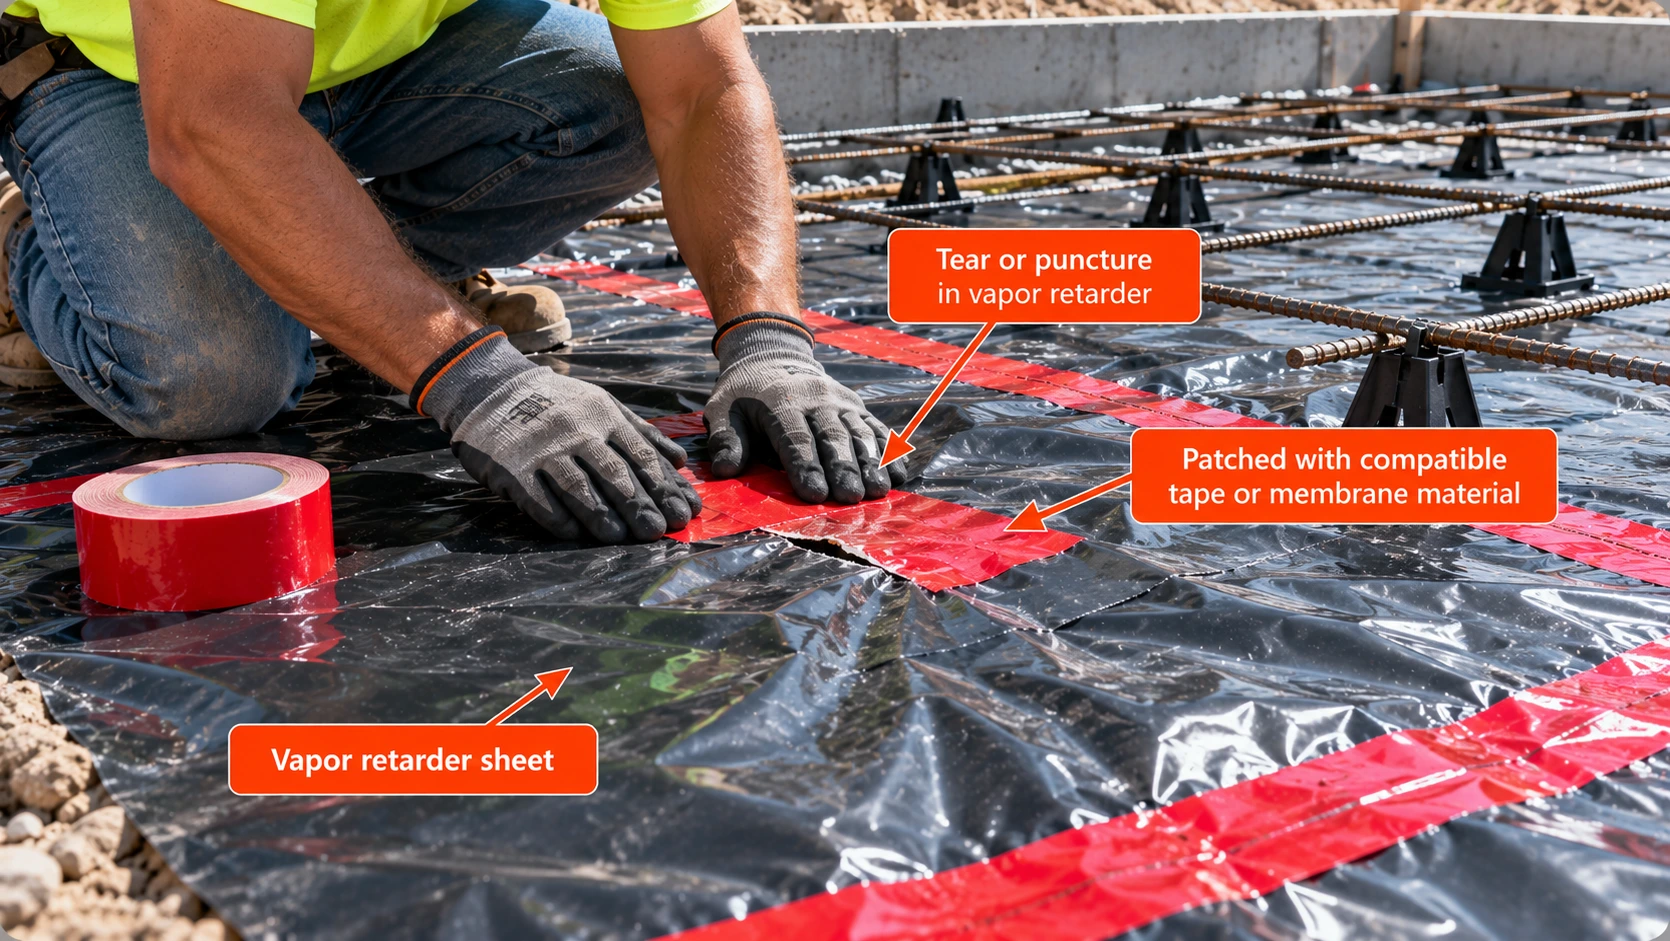
How to Repair Tears and Punctures
Repair every tear before concrete goes in. The steps are simple, but each one matters.
- Clean and dry the damaged area.
- Cut a patch of compatible membrane that extends well beyond the damage.
- Seal all of its edges with compatible tape or adhesive.
- Reinspect before concrete placement.
Rebar chairs, boots, and construction traffic are common sources of damage, so inspect again after the reinforcement is down.
How a Vapor Barrier Changes Concrete Bleeding and Finishing
Placing concrete directly on a vapor retarder changes how it bleeds. NRMCA says that excess bleeding that does not dissipate can delay finishing, and that final finishing must not begin while bleed water is on the surface.
Bleed water trapped under a finished surface can cause delaminations or blisters. See the concrete delamination guide and the concrete dusting guide for those defects.
There are benefits too. NRMCA notes that bleed water reaching the surface can reduce plastic shrinkage cracking in high-evaporation conditions. It also warns that curling can occur from differential drying, and that minor cracking is often considered more acceptable than floor-covering failure.
Vapor Barriers, Slab Drying and Floor-Covering Moisture Tests
A vapor retarder reduces moisture entering from below, but new concrete still contains mix water that has to dry upward. NRMCA notes that residual moisture and construction rewetting take a long time to leave a slab.
Absorbent fill trapped above a vapor retarder can add moisture to the slab and delay readiness for moisture-sensitive flooring.
For a slab getting a moisture-sensitive covering, NRMCA suggests curing under plastic sheeting for 3 days and not moist curing for more than 7 days. It also suggests asking the producer about reduced-moisture-emission mixtures.
Moisture tests, such as ASTM F2170 and ASTM F1869, are used before flooring goes down. Follow the flooring manufacturer’s test method and acceptance limits. For curing and drying background, see the Concrete Curing and Drying Time Guide, the Concrete Curing Time Chart, and the Concrete Resurfacing Guide for bond and moisture considerations with overlays.
Common Vapor Barrier Installation Mistakes
Most failures come from skipped details, not the material. The table lists the usual mistakes and what to do about them.
| Mistake | Possible consequence | Better practice |
|---|---|---|
| Unsealed overlaps | Vapor bypass | Seal laps with compatible system |
| Tears left open | Local moisture path | Patch before pour |
| Loose cut around pipes | Major discontinuity | Seal penetration tightly |
| Rough aggregate punctures sheet | Loss of continuity | Prepare smooth support |
| Rebar chairs damage membrane | Multiple punctures | Use suitable supports/protection |
| Fill above membrane becomes wet | Slab drying delayed | Use direct-under-slab placement where specified |
| Assuming gravel is enough | Vapor still enters slab | Use both systems where required |
Also watch for no membrane at all where one is needed, and for concrete placement dragging across laps. A quick walk-through before the pour catches most of these.
Concrete Vapor Barrier FAQs
Does every slab need a vapor barrier?
No. The 2024 IRC has exceptions, and exterior flatwork generally does not need one. Interior slabs, especially those with moisture-sensitive finishes, usually benefit.
Is 6-mil plastic enough?
It meets the 2024 IRC minimum option in applicable residential slabs. NRMCA recommends a durable ASTM E1745 product at least 10 mils thick for better performance.
Is 10-mil better than 6-mil?
Generally it is more durable during construction, but performance depends on the actual product and how well it is installed. Look for ASTM E1745 compliance.
Should the membrane go directly under concrete?
For slabs that will get moisture-sensitive floor coverings, yes. ACI 302.1R and NRMCA recommend placing the concrete directly on the vapor retarder.
Can gravel replace a vapor barrier?
No. A coarse stone capillary break does not reduce vapor transmission, so a vapor retarder is still required above it where one is needed.
Do garages need vapor barriers?
It depends. Unheated detached garages may be exempt under the IRC, but heated or finished garages and future conversions are better protected. Check local code.
Does a vapor barrier cause concrete to sweat?
It does not cause sweating, but it can change bleeding. Concrete placed directly on it may bleed longer, which affects finishing time.
Can it cause cracking or delamination?
Not by itself. Finishing over bleed water can cause delamination or blisters, and curling or minor cracking is possible, which is why finishing timing and curing matter.
What happens if the barrier gets punctured?
Moisture can bypass it at that point. Patch tears before the pour and inspect again after reinforcement is placed.
Can you add a vapor barrier under an existing slab?
Not practically. That is why it is worth planning one before the pour, especially if the space may be conditioned later.