Concrete Delamination: Causes, Detection, Repair and Prevention
Concrete Delamination
Learn how hidden layer separation differs from spalling and scaling, how to detect and map it, and how to choose between a local repair and broader removal or professional evaluation.
What Is Concrete Delamination?
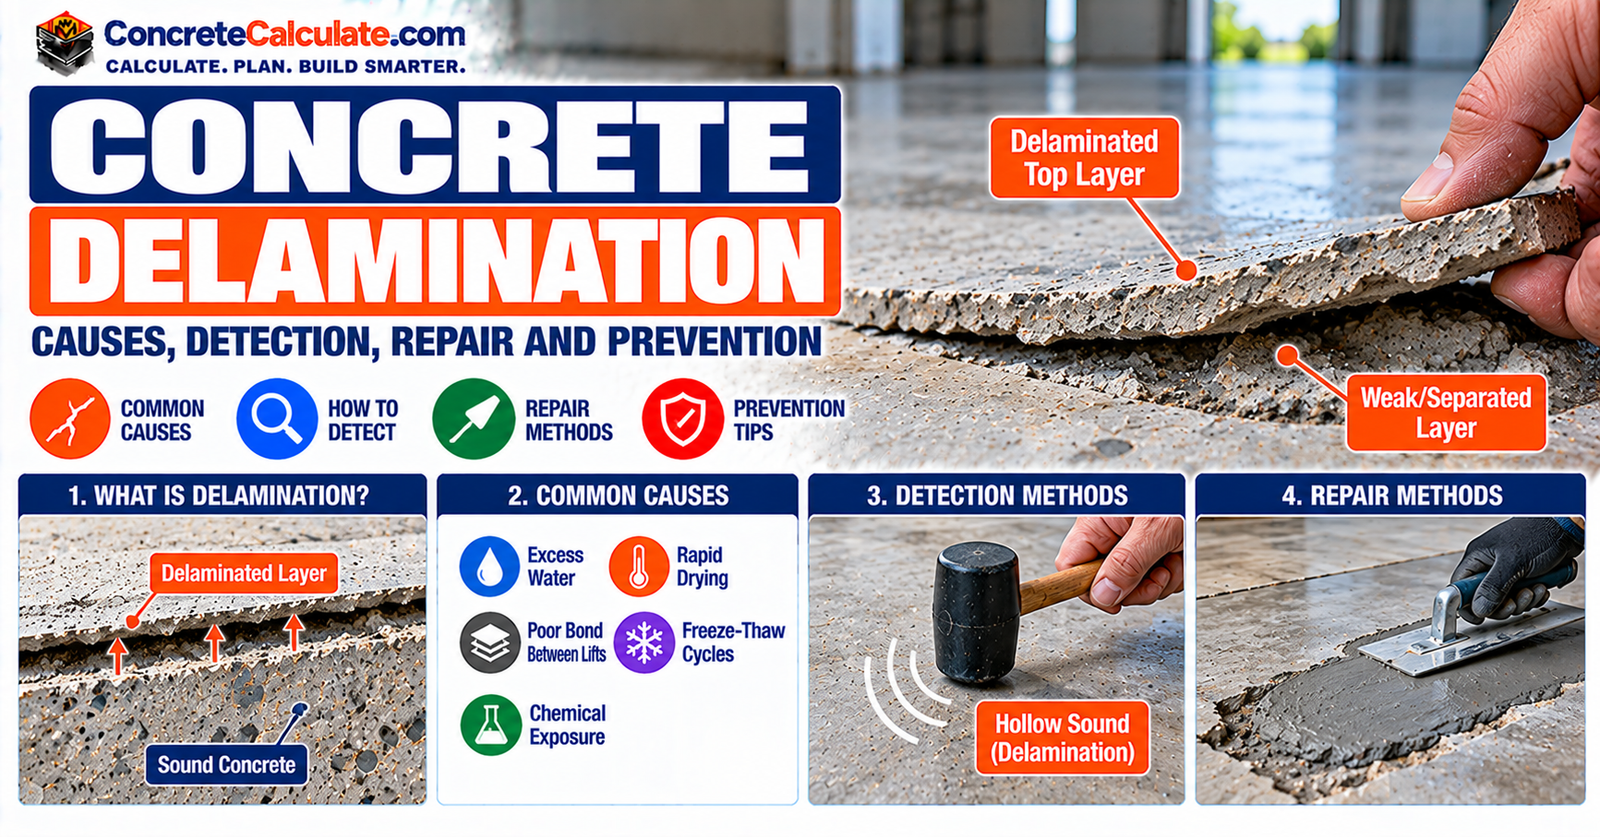
Concrete delamination is a separation of concrete into layers, usually parallel or nearly parallel to the surface. The top layer can look completely intact while it has already separated from the concrete below.
The Federal Highway Administration (FHWA) defines delamination as a surface separation of concrete into layers and notes that it might eventually result in a loss of material, meaning it becomes a spall.
That is the practical takeaway: a delaminated layer can crack, detach, and turn into a spall. Finding it early is far easier than repairing the damage after it breaks loose.
What Does Concrete Delamination Look Like?
Some delamination shows clear signs, and some shows almost none. Here is what to look and listen for:
- A hollow or drum-like sound when you tap the surface.
- Hairline, map-like cracking over a patch.
- Slight lifting of the surface.
- Blister-like raised areas.
- Patches that later break away.
- Rust staining in older reinforced concrete.
- Edge spalling around a delaminated zone.
Some areas show no visible clues at all, which is why the detection section of this guide matters more than the appearance section.
Concrete Delamination vs. Spalling, Scaling, Blisters and Honeycombing
Delamination is easy to confuse with several other defects, each with a different cause and a different fix. The table below puts them side by side.
| Defect | Typical appearance | Main mechanism | Typical next step |
|---|---|---|---|
| Delamination | Surface may look intact; hollow sound | Layer separation | Map extent and identify cause |
| Spalling | Missing/chipped concrete | Material has detached | Repair exposed cavity |
| Scaling | Thin surface flaking | Surface durability/freeze-thaw | Assess depth and exposure |
| Blister | Small raised/localized delamination | Trapped air/water under surface | Evaluate extent |
| Honeycombing | Exposed aggregate/voids from placement | Incomplete mortar/consolidation | Assess as-cast voids |
| Dusting | Fine powdering surface | Weak surface paste | Evaluate surface hardness |
Once material has broken away, you are looking at concrete spalling. Thin surface flaking is concrete scaling, and powder is covered in the concrete dusting guide. Open voids from the pour belong to honeycombing, a completely different mechanism.
Delamination is hidden layer separation that can eventually progress to visible spalling.
Surface Delamination vs. Deep Delamination
Delamination comes in different scales, and its depth alone does not decide how serious it is. Four situations are worth separating:
- Thin near-surface delamination in finished slabs, usually from finishing.
- Deeper delamination around reinforcement, usually from corrosion.
- Debonding beneath overlays or repair layers.
- Larger internal separations that affect a structural member.
NRMCA describes finishing-related delaminations as separating thin layers, typically 1/8 to 1/4 inch thick, with areas from a few square inches to many square feet. Corrosion-related separations are typically thicker.
A thin layer on a basement floor is a minor nuisance. A thinner-looking separation on a balcony slab can be far more serious, so location and function matter as much as depth.
Is Concrete Delamination Dangerous?
It depends on where the concrete is and what it does. An isolated shallow defect in a floor slab is mostly a nuisance and a tripping or traffic concern.
The picture changes for these conditions:
- Slabs that carry traffic, where a detached layer can break up under wheels.
- Overhead concrete, where a detaching layer can fall.
- Balconies and other elevated slabs.
- Bridge or parking structure decks.
- Any area with exposed or corroded steel.
FHWA notes that spalls and delaminations can change the structural performance of a component or expose reinforcement to corrosive agents. Overhead and elevated concrete deserve the most caution because fragments can fall on people below.
When Does Delamination Require Professional Evaluation?
Call a qualified professional, such as a structural engineer or an experienced concrete repair contractor, if any of these apply:
- A beam or column is involved.
- The concrete is an elevated slab, balcony, or overhead surface.
- Reinforcement is exposed.
- Hollow-sounding areas are widespread.
- You see corrosion staining.
- Cracking is active.
- There is movement.
- Repairs have failed more than once.
- You cannot tell how deep the separation goes.
ACI’s repair bulletin for horizontal surfaces says repair planning should follow an evaluation by an engineer, and it is not meant to replace a proper condition assessment or structural evaluation.
What Causes Concrete Delamination?
There are really two different delamination stories, and a good diagnosis separates them. One happens while a new slab is being finished. The other develops later, as the concrete ages in service.
| Cause | Common clue | Typical location |
|---|---|---|
| Premature finishing | Hollow thin top layer | Hard-troweled floor |
| Trapped bleed water/air | Broad drummy zones | New slabs |
| Excessive air in hard-troweled slab | Widespread surface separation | Interior floor |
| Reinforcement corrosion | Rust staining/cracks parallel to steel | Older reinforced concrete |
| Freeze-thaw deterioration | Exterior exposure with related scaling/spalling | Pavements/decks |
| Chemical/ASR-related distress | Cracking and broader deterioration | Structure-specific |
| Poor overlay bond | Hollow sound at overlay interface | Resurfaced concrete |
Fresh-concrete causes include premature finishing, trapped bleed water and air, excessive densification, and problem air entrainment in hard-troweled surfaces. Later-service causes include corrosion, freeze-thaw, chemical attack, alkali-silica reaction (ASR), impact or overstress, and debonding beneath overlays.
How Premature Finishing Causes Surface Delamination
NRMCA’s CIP 20 explains the classic slab mechanism. Delamination occurs when troweling or excessive finishing seals the surface after it appears to have stiffened, while the concrete below is still plastic and still bleeding or releasing air.
- The concrete settles, and bleed water and air start rising.
- The surface is finished and densified too early.
- The dense skin traps water and air beneath it.
- A weak zone forms just below the surface.
- Once the slab hardens, the thin layer can separate and detach.
CIP 20 adds that these delaminations tend to form fairly late in finishing, after floating and the first troweling pass, though overworking during floating can also cause them.
Delaminations are hard to detect while the slab is being finished. They become evident after the surface has set.
How Bleed Water and Trapped Air Create a Weak Layer
Bleeding is the upward flow of mixing water as solids settle. As water and trapped air rise, they meet the densified surface and collect underneath it, forming a weak horizontal plane.
Premature finishing can trap bleed water and air beneath a dense surface, creating a delaminated layer.
NRMCA lists the factors that change how much a slab bleeds: entrained air, higher cementitious content, fly ash or slag, aggregate fines, high mixing water, slab thickness, a cold subgrade, an impermeable subgrade, and a vapor retarder directly under the slab.
Rapid surface stiffening also raises the risk. Wind, sun, and low humidity dry the top while the lower concrete stays plastic, and a cold subgrade can stiffen a slab from the top down.
Air-Entrained Concrete and Hard-Troweled Floors
Entrained air affects how fast concrete bleeds. NRMCA warns that it can lead to premature finishing, because the bleed water sheen may disappear before the concrete has set, even though bleeding continues.
NRMCA’s guidance on blisters (CIP 13) likewise lists entrained air as a cause and says air-entrained normal weight concrete should not be steel troweled. Not every air-entrained slab fails, but hard-troweled interior floors with elevated air content are more vulnerable.
NRMCA recommends a maximum air content of 3 percent for troweled floor slabs and advises against air-entrained concrete for slabs getting a trowel finish. Exterior concrete exposed to freezing usually needs air entrainment, so follow your specification and avoid overworking the surface.
How Reinforcement Corrosion Causes Delamination
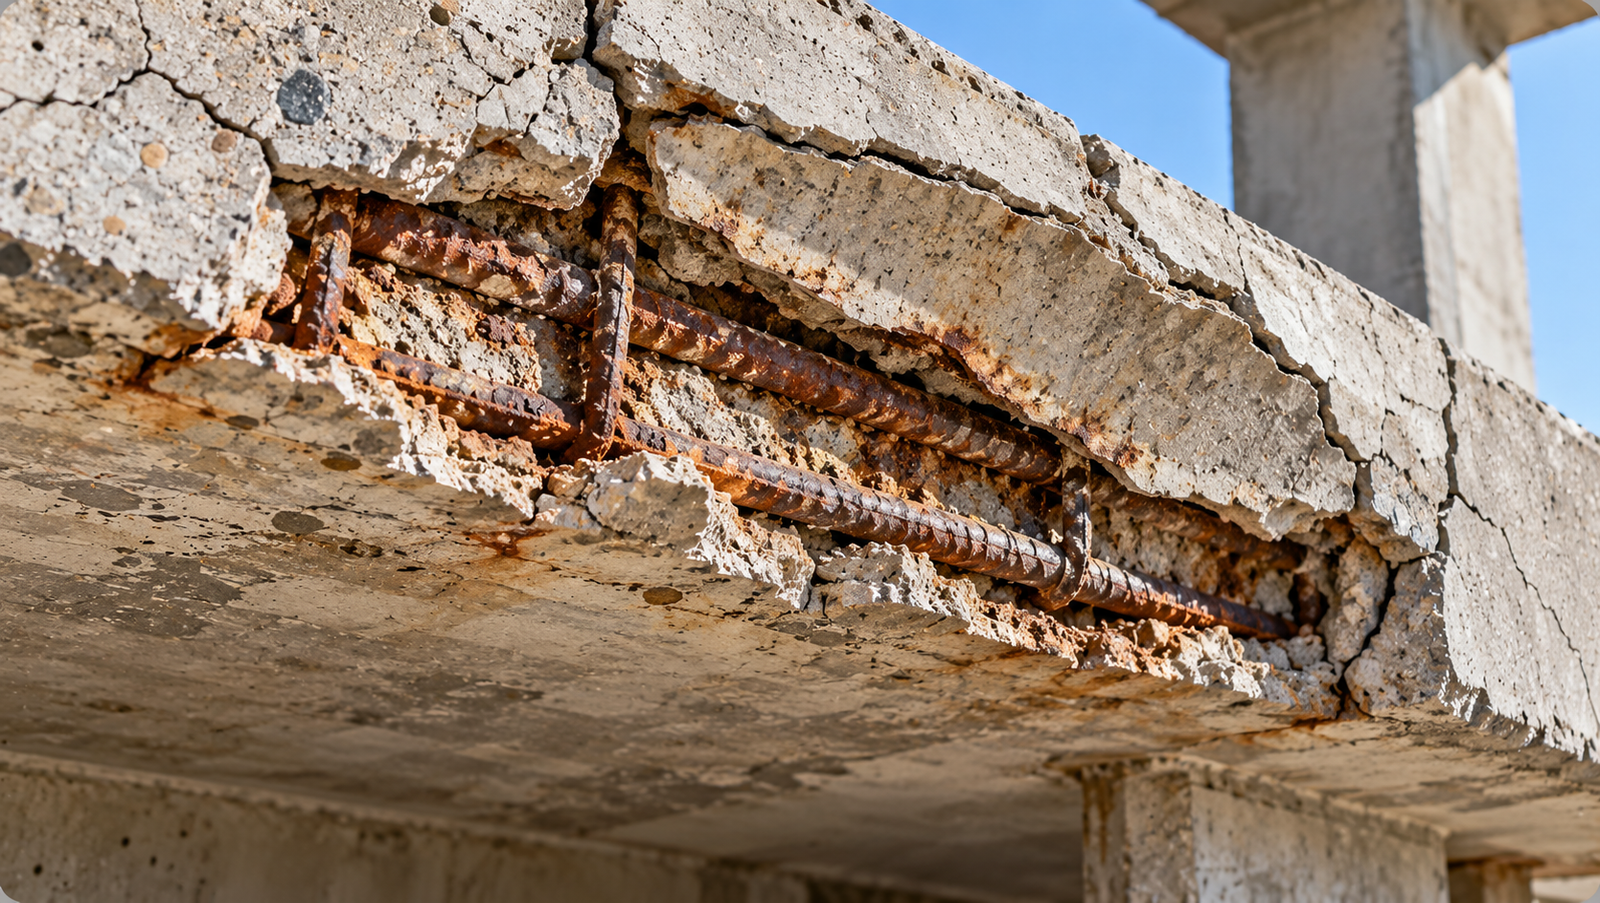
Corrosion is the most common cause of delamination in older reinforced concrete. As the steel rusts, the rust takes up more space than the original metal and pushes outward on the concrete cover.
- Moisture and chlorides reach the reinforcing steel.
- The steel corrodes, and rust expands.
- Tensile stress builds in the surrounding concrete.
- Cracks form parallel to the surface.
- The cover concrete delaminates, and spalling may follow.
NRMCA notes that corrosion-related delamination is typical when clear cover over the steel is small, and when permeable concrete lets chlorides reach the bars.
Freeze-Thaw and Chemical Deterioration
Freeze-thaw cycling, chemical attack, and other durability problems can weaken concrete until layers separate. ACI’s repair bulletin lists freezing-and-thawing deterioration and chemical attack alongside corrosion as common causes of horizontal surface deterioration.
FHWA also lists alkali-silica reaction, formation of ettringite, collisions, earthquakes, and overstress as possible causes. For the detailed look at surface flaking from freeze-thaw, see the concrete scaling guide.
Delamination Beneath Concrete Overlays and Repair Layers
A bonded overlay or repair layer can itself delaminate from the old concrete. This happens between an old slab and a resurfacer, a bonded overlay and its base, or a repair mortar and the existing concrete.
Contamination, an inadequate surface profile, moisture problems, and poor preparation can all contribute. NRMCA adds that poor bond between two-course placements may also cause delaminations.
The Concrete Resurfacing Guide explains why preparation controls the bond and why delaminated concrete must be removed before any overlay goes down.
Why Delamination Can Be Hard to See
A delaminated layer acts like a thin shell over a separated or voided zone. Because the shell is intact, the surface can look and feel normal.
Visual inspection alone is not enough. Hairline cracks or color differences may hint at a problem, since thinner delaminated areas can dry faster than the sound slab, but many defects show nothing until you tap or drag a chain across the surface.
How to Check Concrete for a Hollow Sound
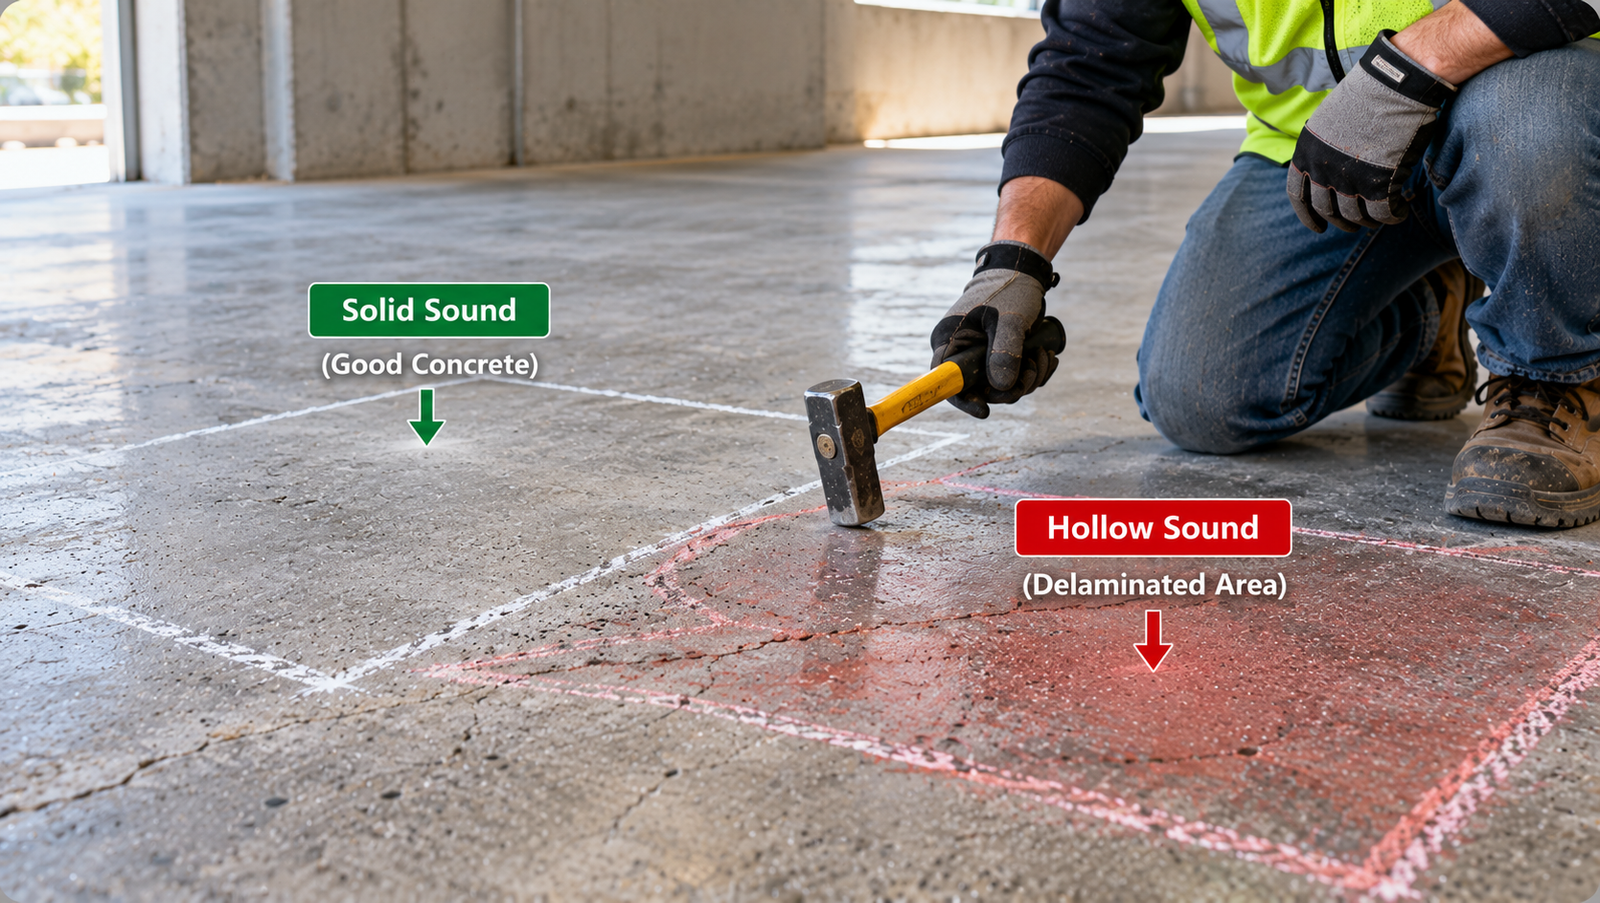
Hammer sounding is the simplest way to find a delaminated area, and any ordinary masonry hammer will do. FHWA describes the principle: sound concrete gives a clear ringing sound, while a delaminated area gives a muted, hollow one.
The hollow sound comes from the separated layer flexing like a drum head. FHWA notes this oscillation typically falls between 1 and 3 kHz, well within what the ear can hear.
- Work in a quiet place, away from traffic and machine noise.
- Tap a known sound area first so you know what ringing sounds like.
- Tap across the surface in a steady pattern.
- Listen for a dull, drummy change in tone.
- Mark the edges where the sound changes.
Hammer Sounding vs. Chain Drag
Chain drag works best on large horizontal surfaces, while hammer sounding suits smaller areas and for refining boundaries. The methods work together, and visual inspection alone is the weakest of the four.
| Method | Best use | Main advantage | Limitation |
|---|---|---|---|
| Visual inspection | Visible distress | Fast | Hidden delamination may be missed |
| Hammer sounding | Small areas | Good boundary refinement | Subjective |
| Chain drag | Large horizontal areas | Fast coverage | Limited to suitable flat surfaces |
| Automated sounding | Large infrastructure surveys | Rapid mapping | Specialized equipment |
| Infrared thermography | Larger surface surveys | Noncontact | Weather/condition dependent |
| Impact echo/ultrasonic/NDE | Deeper or uncertain defects | More detailed investigation | Professional interpretation needed |
FHWA describes chain drag as a fast method for locating moderate to severe delamination, and says hammer sounding is slower but more appropriate for smaller areas. ASTM D4580 describes the sounding practice for bridge decks.
How to Map the Extent of a Delaminated Area
Mapping turns a few hollow spots into a defined repair area. FHWA’s bridge-deck protocol uses essentially this process, scaled down for a floor or patio:
- Clean the surface of debris so you can see defects.
- Set out a measurement grid.
- Sound the surface systematically, a few feet at a time.
- Mark the boundary where the sound changes.
- Measure the maximum length and width of each area.
- Photograph and sketch what you find.
Use the record below to keep the details in one place. It can be copied into your own inspection form.
| Item | What to document |
|---|---|
| Surface/member | Slab, wall, balcony, deck, etc. |
| Visible distress | Cracks, spalls, rust, blistering |
| Sounding method | Hammer/chain/etc. |
| Marked delaminated area | Length × width |
| Estimated depth | If known |
| Reinforcement | Exposed/not exposed |
| Cause suspected | Finishing/corrosion/freeze-thaw/etc. |
| Repair method | Partial-depth/resurface/etc. |
| Material | Product/specification |
| Final acceptance | Inspection/testing |
Delamination repair should include the full unsound area, not only the visible surface defect.
Can Hammer Sounding Miss Delamination?
Yes. FHWA says sounding is mainly used to detect moderate to severe delamination, and that it cannot pick up the onset of delamination. Its pavement and tunnel guidance adds that sounding cannot detect early-stage or deep delamination.
Results are also subjective and vary from one technician to the next, and background noise can hide the sound changes. Sounding is also generally ineffective on decks with asphalt overlays.
When the extent is uncertain, professionals may add methods such as impact echo, infrared thermography, ultrasonic techniques, ground-penetrating radar, or cores. These are not DIY tools. The answer should come from an experienced evaluator, not from a hammer alone.
How to Measure Delamination Area and Repair Quantity
Repair quantity starts with the mapped area, but it does not end there. Work through four numbers:
- The mapped surface area.
- The estimated removal depth.
- The actual removal quantity.
- The repair material yield from the product data sheet.
Repair volume should come from the final prepared cavity, not the visible outline. Removing unsound concrete usually uncovers more than you mapped.
Illustrative Worksheet: Planning Quantity
Assumed mapped area: 4 ft × 3 ft = 12 ft². Both the area and the removal depth below are hypothetical.
Assumed removal depth: 1.5 in = 0.125 ft.
Volume: 12 × 0.125 = 1.5 ft³, or 1.5 ÷ 27 = 0.056 yd³.
What it means: The real number depends on how far the unsound concrete extends once you open it up and on the product’s yield.
After the cavity is defined, use the Concrete Repair Calculator to estimate material and the Concrete Repair Cost Calculator to budget the work.
Can Delaminated Concrete Be Repaired?
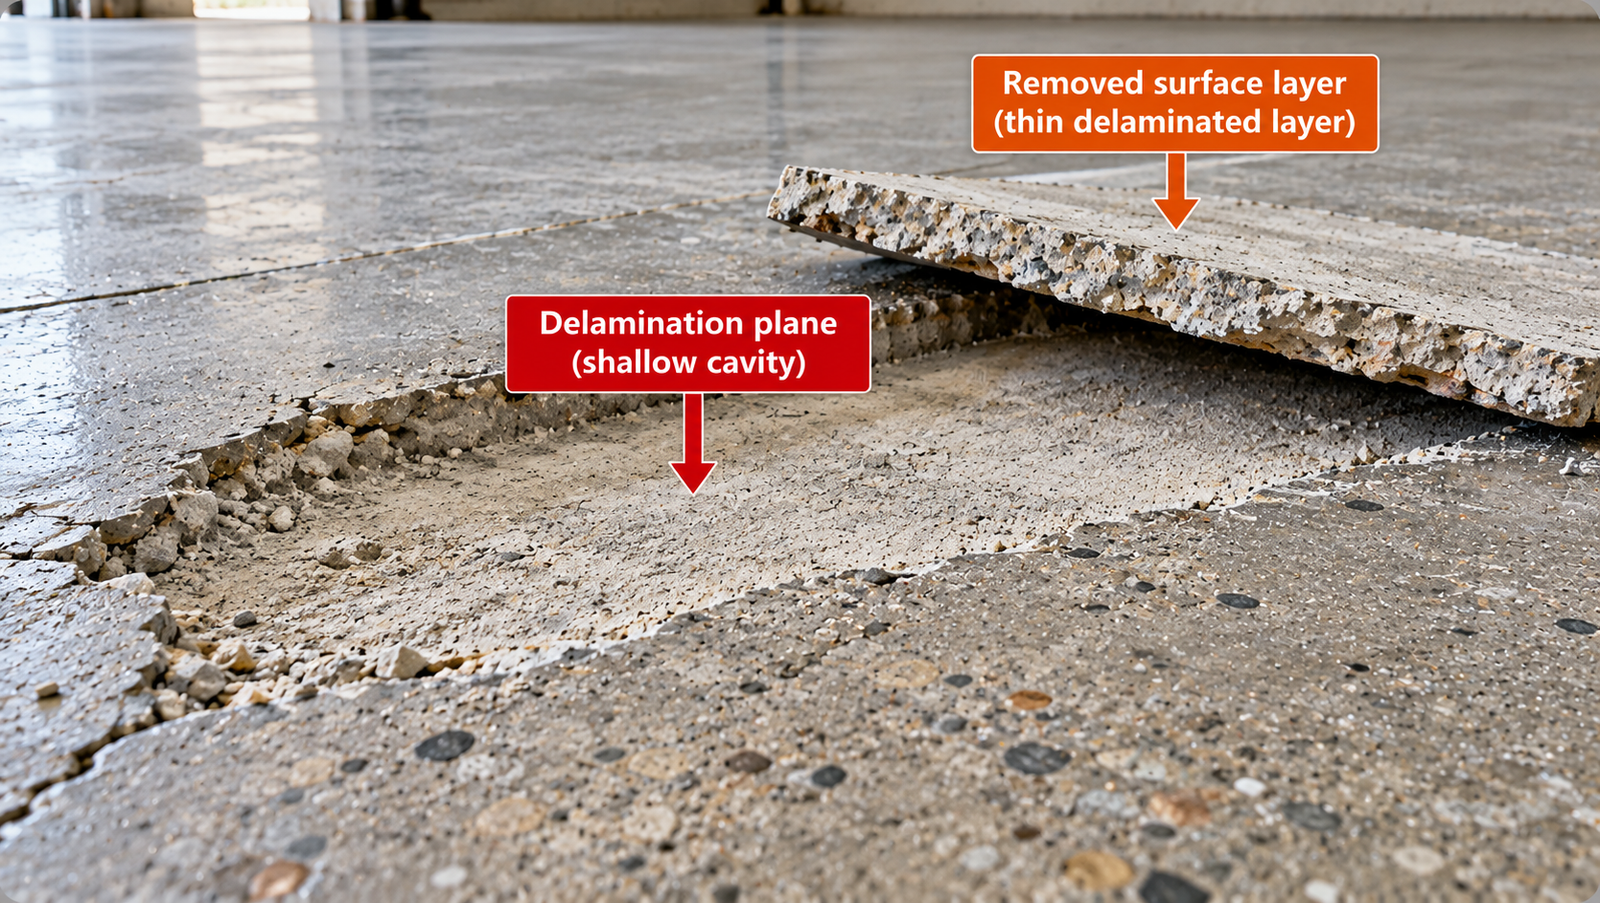
Yes, but the method depends on the cause, extent, depth, reinforcement, structural function, traffic, moisture, and how much sound concrete remains. A shallow local repair is very different from corrosion-driven delamination across a structural slab.
NRMCA says delaminated surfaces can be repaired by patching after the surface layer is removed and the underlying concrete is properly cleaned. It adds that extensive delamination may need grinding and a new overlaid surface.
Delamination Repair Methods Compared
Match the repair to the condition, not to the cheapest product. The table lists common situations and the main catch with each.
| Condition | Potential repair | Main limitation |
|---|---|---|
| Small shallow isolated delamination | Local partial-depth repair | Must remove all unsound material |
| Broad shallow delamination | Surface removal + repair/resurfacing | Remaining slab must be sound |
| Delamination around rebar | Reinforcement repair + patch | Corrosion cause must be addressed |
| Large/deep structural delamination | Engineered repair | Structural assessment required |
| Overlay debonding | Remove failed overlay and reprepare substrate | Must correct bond/moisture issue |
| Overhead delamination | Professional repair | Falling-fragment risk |
Form-and-pour repair, shotcrete, and full replacement are other options for larger or deeper work. They belong to engineered repairs, not weekend projects.
When Is Resurfacing Appropriate?
Resurfacing is appropriate only after every delaminated or unsound area is removed and the remaining substrate is sound. Overlaying concrete that looks fine but is delaminated beneath leads to early failure, because the overlay inherits the weak plane.
Sound the whole slab first, repair what you find, and then follow the Concrete Resurfacing Guide for preparation and product selection. A rough budget check is available in the Concrete Resurfacing Cost Calculator.
When Does Delamination Require Partial-Depth Repair?
Partial-depth repair replaces deteriorated concrete in the upper part of a slab without removing the full thickness. The key is finding and removing all of it.
FHWA’s guidance for partial-depth repairs stresses sounding the concrete, marking the boundaries, and removing all deteriorated concrete. Sounding with a steel rod, hammer, or chain gives a clear ring on sound concrete and a dull response on deteriorated concrete.
That guidance comes from highway pavement work. Do not apply its depths and dimensions as universal residential rules; follow your engineer’s plan and the repair product’s data sheet.
What If Reinforcement Is Exposed or Corroded?
Exposed or corroded steel changes the job. The ACI bulletin for horizontal surface repair lays out a clear approach:
- Remove enough concrete to fully expose any corroded bar, regardless of how much of it is corroded.
- Allow clearance so a hand can pass under the bar, about 3/4 inch.
- Clean the exposed steel by high-pressure water or abrasive blasting.
- If the bar has lost cross-section, consult a structural engineer.
NRMCA adds that delaminations caused by steel corrosion also require sandblasting to remove rust from the steel. Restoring cover and treating the cause of corrosion are part of the repair, not optional extras.
How to Repair Concrete Delamination Step by Step
This sequence follows the structure of ACI RAP-7, a field guide for repairing spalls and delaminated areas on horizontal surfaces. Your project documents, engineer, and the repair product’s data sheet govern every detail.
Step 1: Sound and mark the full delaminated area
Tap or drag a chain across the whole surface, and mark every hollow zone.
Step 2: Confirm the repair boundary and locate reinforcement
Outline a simple shape with few re-entrant corners that encloses the hollow zone and reaches sound concrete. Find the steel before you cut.
Step 3: Remove all unsound concrete
Saw cut the perimeter no deeper than the cover over the reinforcement, then remove concrete inside it. RAP-7 recommends 15 or 30 pound jackhammers, with the smaller size for final work near bars.
Step 4: Prepare repair edges and substrate
Clean up edges and roughen the surface so the repair has sound, rough concrete to bond to.
Step 5: Clean and assess exposed reinforcement
Clean the bars, inspect for section loss, and call an engineer if you find it.
Step 6: Condition the substrate as required
RAP-7 calls for a saturated surface-dry condition, with no standing water. Bonding agents are optional and product-specific.
Step 7: Place the selected repair material
Mix bagged material exactly as the manufacturer directs, and place it into the prepared cavity.
Step 8: Consolidate and finish
Vibrate or compact the material so it flows around the steel and contacts the substrate, then screed, float, and finish.
Step 9: Cure and protect
Follow the manufacturer’s curing directions. For ready-mix or site-mixed repair concrete, RAP-7 calls for wet burlap and polyethylene sheet for a minimum of 7 days, or a curing compound.
Step 10: Reinspect the surrounding concrete
Sound the repaired area and the concrete around it again. RAP-7 also describes pull-off bond testing as a way to check the finished repair.
Surface Preparation for Delamination Repair
Preparation decides whether a repair lasts. The goal is sound, clean, properly profiled concrete without damaging what you keep.
- Remove deteriorated concrete down to sound substrate.
- Avoid unnecessary damage to the concrete that stays, since oversized hammers can damage reinforcement and bond.
- Remove dust and debris. RAP-7 calls for high-pressure water of at least 3,000 psi or abrasive blasting for final cleaning.
- Create the repair profile the material requires.
- Avoid feather edges where the repair system prohibits them.
- Meet the moisture and primer requirements of the repair material.
After preparation, check it again. RAP-7 recommends a visual check for dust and a second sounding to find any delamination still hiding beneath the prepared surface.
Why Delamination Repairs Fail, and How to Prevent Recurrence
Most repair failures come from what was left behind, not from the new material. The table pairs failures with better practice.
| Failure | Likely cause | Better approach |
|---|---|---|
| New patch debonds | Poor preparation | Remove to sound substrate and profile correctly |
| Hollow area remains beside patch | Repair boundary too small | Sound and map complete extent |
| Repair cracks | Movement or shrinkage | Diagnose cause and cure properly |
| Corrosion returns | Steel/cause not treated | Address reinforcement and exposure |
| Overlay peels | Delaminated substrate left in place | Remove unsound concrete first |
| Edge breaks | Poor geometry/feather edge | Use approved repair boundary |
| New slab delaminates | Premature finishing | Delay final finishing until bleeding ends |
For new slabs, NRMCA’s rules for avoiding delamination boil down to a short list:
- Do not finish while bleeding continues, and do not seal the surface before air and bleed water escape.
- Manage evaporation by covering the slab or using evaporation retarders, particularly in wind, sun, or low humidity.
- Use a suitable mixture and air content for troweled floors.
- Coordinate finishing timing, and avoid dry shakes on air-entrained concrete.
- Account for subgrade temperature. NRMCA advises against placing on a substrate below 40°F.
- Do not trowel until the slab is ready. A boot indentation of about 1/4 inch and a probe into the surface help confirm the concrete below is no longer plastic.
For more on spotting weak surfaces, the concrete dusting guide covers a related finishing defect, and Why Is My Concrete Cracking? helps with cracks that appear alongside delamination.
Concrete Delamination FAQs
What causes concrete delamination?
In new slabs, it is usually finishing the surface while the concrete is still bleeding, which traps water or air under the dense layer. In older concrete, it is mostly reinforcement corrosion, freeze-thaw, chemical attack, or bond failure under an overlay.
Can delamination be repaired?
Yes. The unsound layer must be removed back to sound concrete and replaced with a suitable repair, and the cause must be dealt with so it does not return.
Is delamination the same as spalling?
No. Delamination is separation into layers, while spalling is actual loss of material. A delaminated area can become a spall.
What does hollow concrete sound like?
Sound concrete gives a clear ringing sound when tapped. A delaminated area gives a dull, muted, drum-like sound.
Can resurfacing fix delamination?
Only after the delaminated concrete is removed and the remaining base is sound. Overlaying delaminated concrete usually fails early.
Does delamination always mean structural failure?
No. A shallow floor-surface defect may be minor, while delamination near reinforcement, on elevated slabs, or overhead can be serious. Location and function matter.
How do you find hidden delamination?
Sound the surface with a hammer or chain, mark the hollow areas, and record them. Professionals may add impact echo, thermography, ultrasonic methods, radar, or cores.
Can delamination occur in new concrete?
Yes. Finishing too early over bleeding concrete can trap water and air under the surface, particularly on hard-troweled floors.
What causes delamination around rebar?
Corroding steel expands, creating tension that cracks the concrete in a plane parallel to the surface, and the cover then separates.
When should an engineer inspect it?
Involve one for beams, columns, elevated slabs, balconies, overhead concrete, exposed or corroded steel, widespread hollow areas, or when you are unsure how deep it goes.