Door Rough Opening Chart – Standard Interior & Exterior Door Sizes
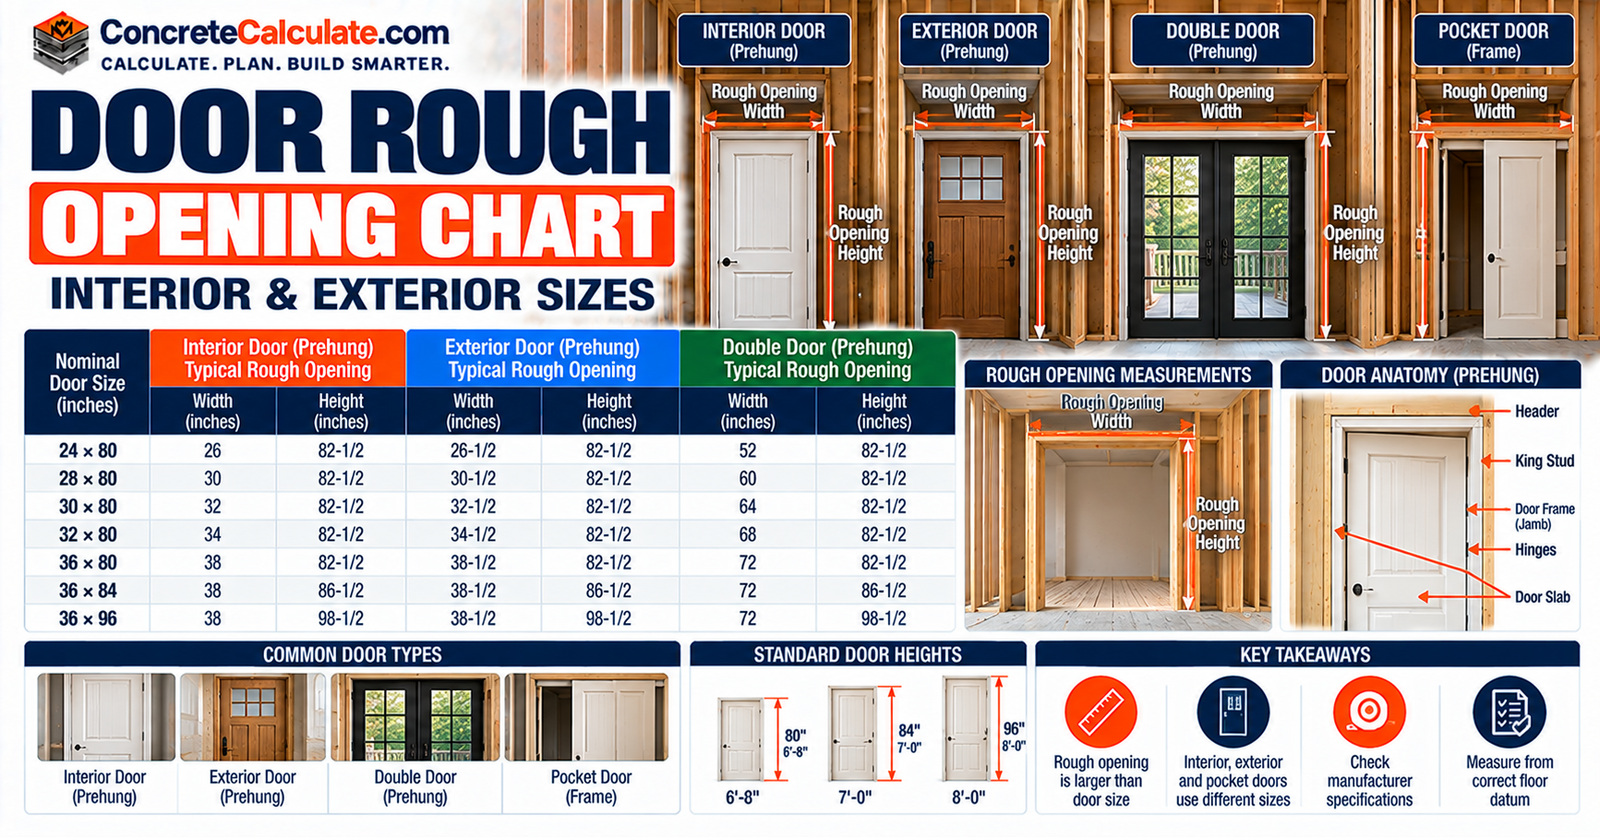
Door Rough Opening ChartStandard Interior & Exterior Door Sizes
Rough opening sizes for 24 to 36-inch doors, with manufacturer examples for exterior, double and pocket doors, plus how to measure and verify the opening.
 Reviewed by Muhammad Ramzan Babar, PhD Researcher (Plasma Physics) & Calculator Developer | View Profile
Quick Answer: There Is No Single Rough Opening Rule
- Preliminary interior planning: slab width +2 in. and slab height +2-1/2 in., so a 30 x 80 door frames at about 32 x 82-1/2 in.
- Published exterior examples are unit specific: a 36 x 80 Therma-Tru unit needs 38-1/2 x 82-1/2 in. in one sizing set and 38-1/4 x 82 in. in another.
- Pocket doors use different math: Johnson 1500 Series width = 2 x door + 1 in. Always verify the exact unit before framing.
Door Rough Opening Chart
Common interior prehung door sizes with clearly labeled planning assumptions.
Use these dimensions for preliminary interior-door planning only. Before framing, verify the rough opening specified for the exact prehung door you will install.
| Nominal interior door slab | Illustrative RO width | Illustrative RO height |
|---|---|---|
| 18 x 80 in. | 20 in. | 82-1/2 in. |
| 20 x 80 in. | 22 in. | 82-1/2 in. |
| 24 x 80 in. | 26 in. | 82-1/2 in. |
| 26 x 80 in. | 28 in. | 82-1/2 in. |
| 28 x 80 in. | 30 in. | 82-1/2 in. |
| 30 x 80 in. | 32 in. | 82-1/2 in. |
| 32 x 80 in. | 34 in. | 82-1/2 in. |
| 34 x 80 in. | 36 in. | 82-1/2 in. |
| 36 x 80 in. | 38 in. | 82-1/2 in. |
Values assume the stated +2 in. width and +2-1/2 in. height convention. Heights assume the unit’s specified floor datum. Metric: 1 in. = 25.4 mm.
Important chart assumptions
This is a trade-planning convention, not a building standard or a manufacturer table. Confirm the assembled-unit size, shim allowance and the manufacturer’s rough-opening requirement, and check the floor reference used for the height.
Where this chart does not apply
Do not use it for exterior entry units, fire-rated assemblies, pocket doors, bifolds or sliding doors without product-specific verification. It does not give code-required clear passage width.
What Is a Door Rough Opening?
The framed opening that receives the door assembly.
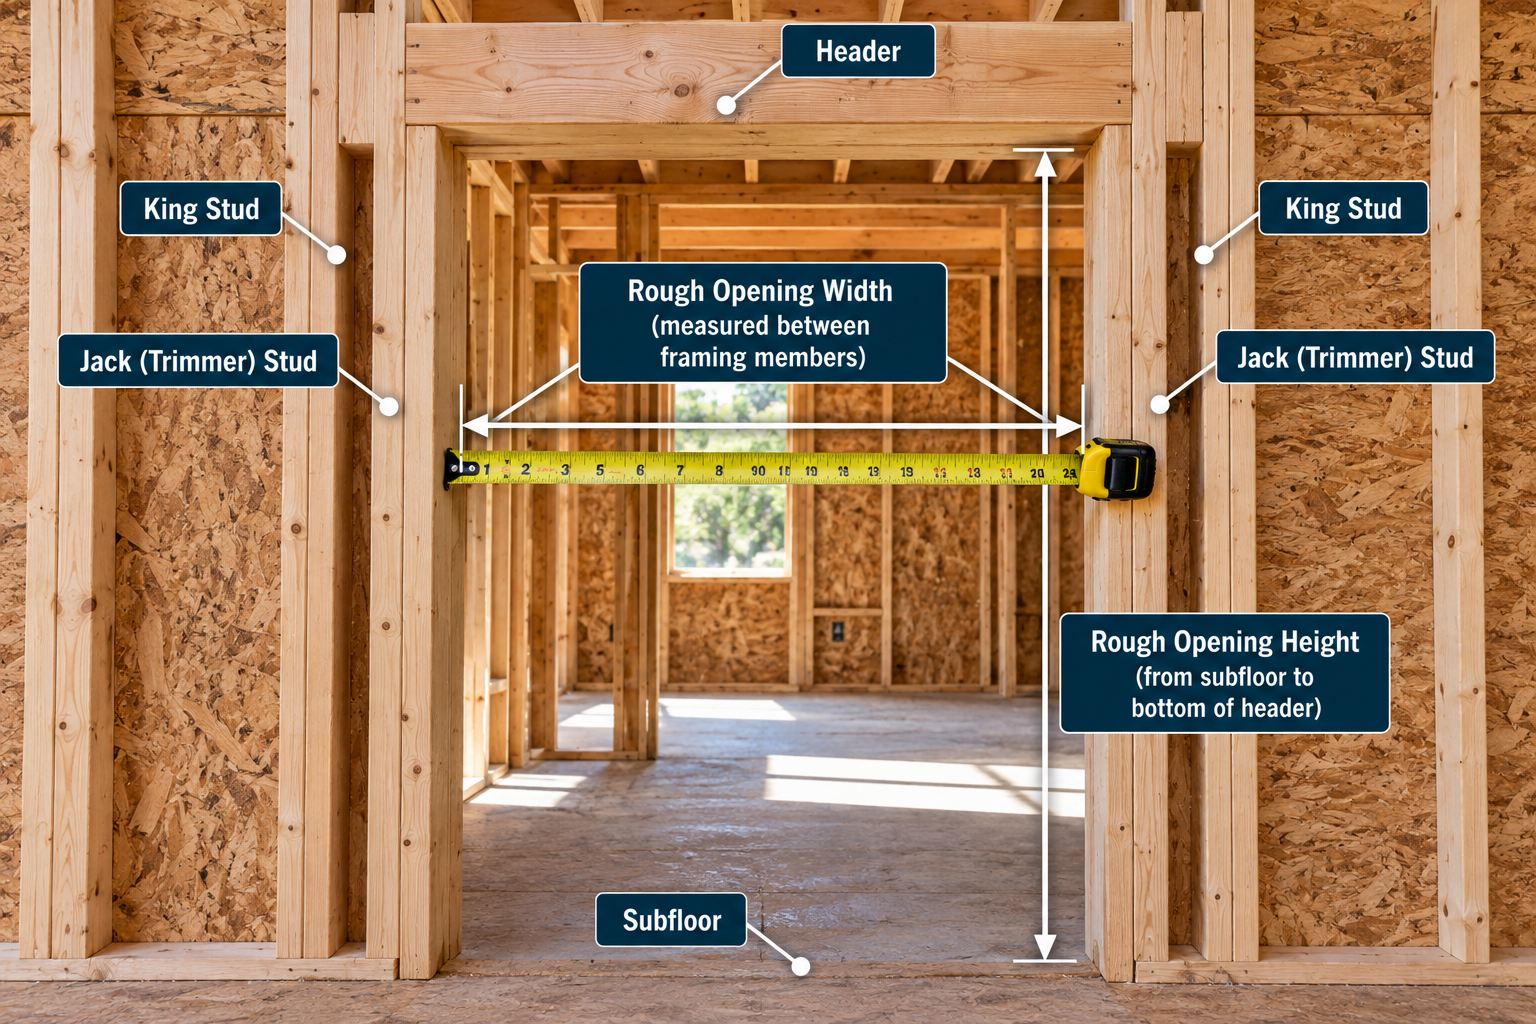
The rough opening (RO) is the framed space that receives the door assembly. It is bounded by the jack (trimmer) studs, the underside of the header and the floor reference.
Width and height
RO width is measured between the framing faces that receive the unit. RO height is measured from the specified floor reference to the header underside.
Installation allowance
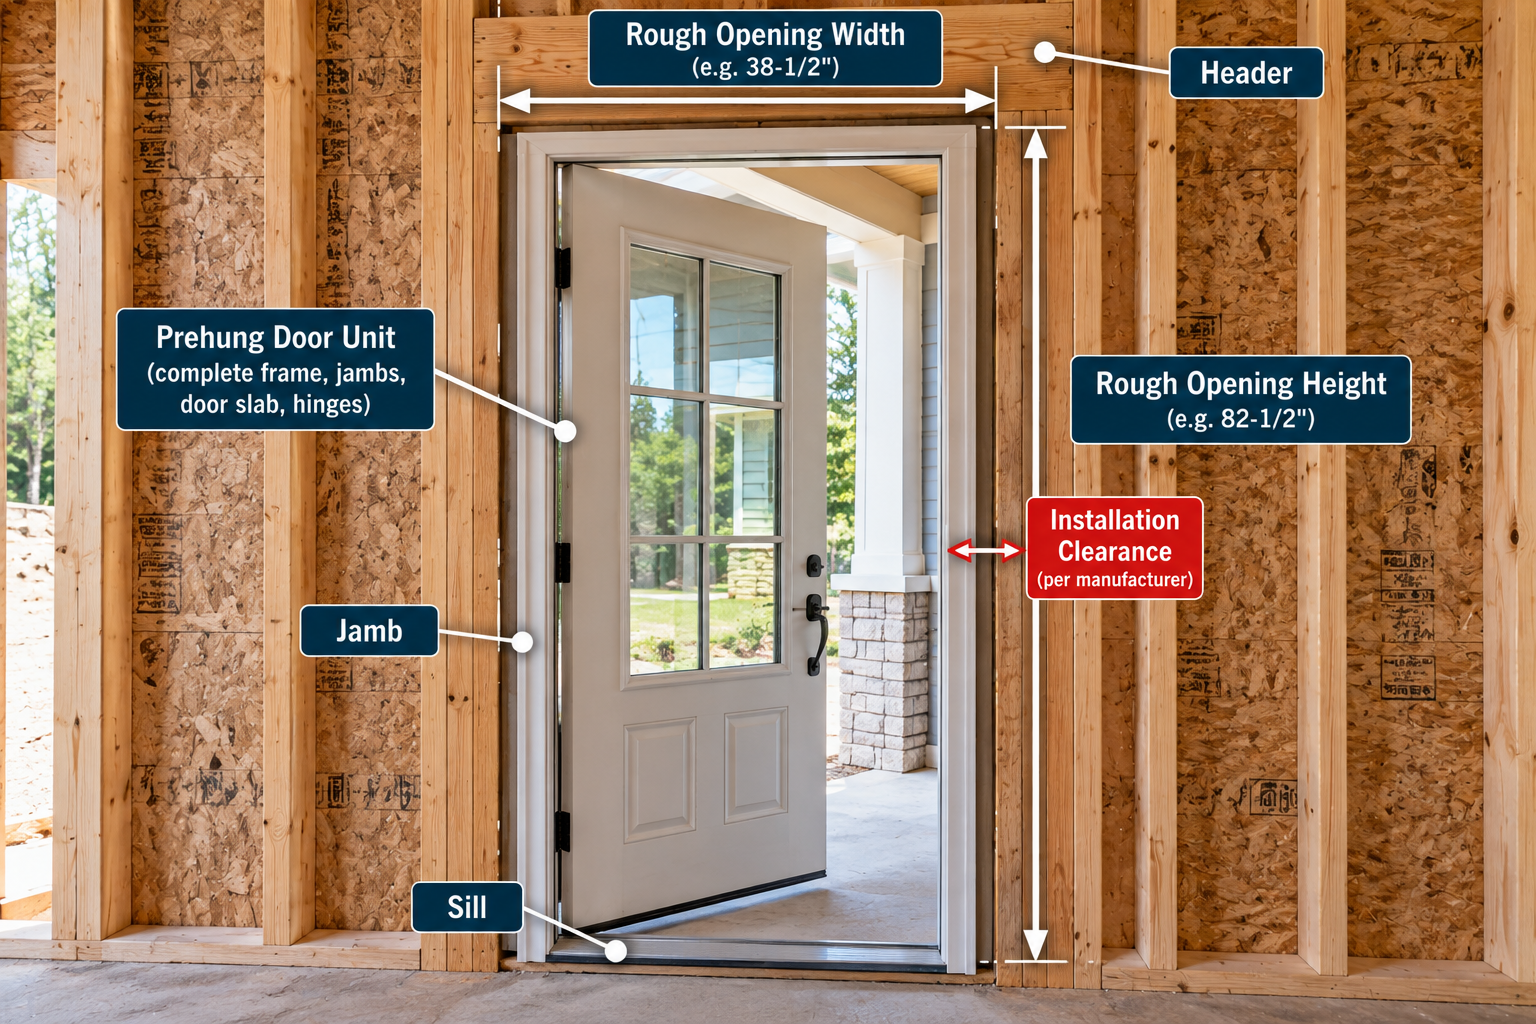
The RO is larger than the unit so the frame can be set plumb, level and square.
Shim space
The gap between the unit and the framing that you fill with shims. It is not a fixed dimension for every door.
Structure vs finish
Framing is structural. Casing, stops and finish floors are finish components added later.
For framing lumber terms such as nominal and actual stud sizes, see the Lumber Size Chart. For common wall-stud layout around an opening, see the Stud Spacing Chart.
Door Slab vs. Unit Size vs. Rough Opening
Four measurements that should never be swapped.
Four measurements are often confused.
Door slab
The moving panel only.
Prehung unit
The slab plus its assembled frame, as defined by the manufacturer.
Rough opening
The framed opening into which the unit is installed.
Finished opening
What remains after jambs, stops and finishes are installed.
| Measurement | Set 1 width | Set 1 height | Set 2 width | Set 2 height |
|---|---|---|---|---|
| Nominal door designation | 36 in. | 80 in. | 36 in. | 80 in. |
| Assembled unit | 37-5/8 in. | 82 in. | 37-1/2 in. | 81-1/2 in. |
| Manufacturer rough opening | 38-1/2 in. | 82-1/2 in. | 38-1/4 in. | 82 in. |
| RO minus unit | 7/8 in. | 1/2 in. | 3/4 in. | 1/2 in. |
Set 1 and Set 2 are two sizing sets in the same manufacturer document. The RO-minus-unit row is an overall allowance and does not mean equal gaps at every edge. Brickmould-to-brickmould dimensions add 2-1/2 in. to width and 1-1/4 in. to height in that document, so trim size is not rough-opening size.
Figure 1. Door slab, assembled unit and rough opening. Schematic, with no universal jamb or shim dimensions.
Standard Interior Door Rough Opening Chart
Trade size names, slab sizes and illustrative openings.
Interior doors are often called by feet and inches (2-6 x 6-8 means 30 x 80 in.). The planning convention is RO = slab width + 2 in. and RO = slab height + 2-1/2 in.
| Door size name (ft-in) | Nominal slab | Illustrative RO (in.) | Illustrative RO (mm) |
|---|---|---|---|
| 1-6 x 6-8 | 18 x 80 in. | 20 x 82-1/2 in. | 508 x 2096 mm |
| 1-8 x 6-8 | 20 x 80 in. | 22 x 82-1/2 in. | 559 x 2096 mm |
| 2-0 x 6-8 | 24 x 80 in. | 26 x 82-1/2 in. | 660 x 2096 mm |
| 2-2 x 6-8 | 26 x 80 in. | 28 x 82-1/2 in. | 711 x 2096 mm |
| 2-4 x 6-8 | 28 x 80 in. | 30 x 82-1/2 in. | 762 x 2096 mm |
| 2-6 x 6-8 | 30 x 80 in. | 32 x 82-1/2 in. | 813 x 2096 mm |
| 2-8 x 6-8 | 32 x 80 in. | 34 x 82-1/2 in. | 864 x 2096 mm |
| 2-10 x 6-8 | 34 x 80 in. | 36 x 82-1/2 in. | 914 x 2096 mm |
| 3-0 x 6-8 | 36 x 80 in. | 38 x 82-1/2 in. | 965 x 2096 mm |
Illustrative figures, not a manufacturer-issued universal table. Confirm the actual prehung unit before framing.
Rough Openings for Common Door Widths
24, 28, 30, 32 and 36-inch doors.
24-Inch Door
Nominal 24 x 80 in. planning RO: 26 x 82-1/2 in. The jamb, head clearance and floor reference can change the actual requirement.
28-Inch Door
Nominal 28 x 80 in. planning RO: 30 x 82-1/2 in. Check the exact prehung frame specification.
30-Inch Door
Nominal 30 x 80 in. planning RO: 32 x 82-1/2 in. A 32-inch framed opening is not a 32-inch clear passage.
32-Inch Door
Nominal 32 x 80 in. planning RO: 34 x 82-1/2 in. Nominal width alone does not prove any required clear opening.
36-Inch Door
The answer depends on the door type. Compare three contexts.
| Door example | RO width | RO height |
|---|---|---|
| Illustrative interior 36 x 80 | 38 in. | 82-1/2 in. |
| Therma-Tru exterior 36 x 80, Set 1 | 38-1/2 in. | 82-1/2 in. |
| Therma-Tru exterior 36 x 80, Set 2 (U-1 convention) | 38-1/4 in. | 82 in. |
The two exterior rows are different sizing sets in one manufacturer’s document, not conflicting measurements for one door. That is why there is no single correct answer for a 36-inch door.
Rough Openings for 84-Inch and 96-Inch Doors
Taller doors need their own verification.
The interior height convention gives 84 + 2.5 = 86.5 in. and 96 + 2.5 = 98.5 in. These are planning examples only.
| Door height | Interior planning RO height | Therma-Tru Set 1 (36 wide) | Therma-Tru Set 2 (36 wide) |
|---|---|---|---|
| 80 in. (6-8) | 82-1/2 in. | 38-1/2 x 82-1/2 in. | 38-1/4 x 82 in. |
| 84 in. (7-0) | 86-1/2 in. | Not in the data reviewed | Not in the data reviewed |
| 96 in. (8-0) | 98-1/2 in. | 38-1/2 x 98-1/2 in. | 38-1/4 x 98 in. |
Masonite lists 82.5 in. and 98.5 in. as common exterior rough-opening heights while stressing that sizes vary. Do not assume every 96-inch exterior door uses a 98-1/2 in. opening; the second Therma-Tru set above uses 98 in. for a 96-inch door.
Exterior Door Rough Opening Chart
Manufacturer examples, not universal values.
Exterior prehung units include jambs, sills and thresholds, so their rough openings come from the manufacturer’s unit table. These are identified examples from one document, not universal values.
| Nominal door | Set 1 unit | Set 1 rough opening | Set 2 unit | Set 2 rough opening |
|---|---|---|---|---|
| 32 x 80 | 33-5/8 x 82 | 34-1/2 x 82-1/2 | 33-1/2 x 81-1/2 | 34-1/4 x 82 |
| 36 x 80 | 37-5/8 x 82 | 38-1/2 x 82-1/2 | 37-1/2 x 81-1/2 | 38-1/4 x 82 |
| 42 x 80 | 43-5/8 x 82 | 44-1/2 x 82-1/2 | – | – |
| 36 x 96 | 37-5/8 x 98 | 38-1/2 x 98-1/2 | 37-1/2 x 97-1/2 | 38-1/4 x 98 |
The document says to deduct 1 in. from the unit height for outswing doors, and brickmould-to-brickmould measurements add 2-1/2 in. to width and 1-1/4 in. to height. This is a December 2010 document; confirm the selected current product still uses these dimensions.
Figure 2. A 36 x 80 exterior unit and its rough opening from the Set 1 example, drawn near scale.
What changes the exterior opening
- Prehung jambs and brickmould (trim is not part of the rough opening).
- Thresholds, sill pans and flashing thickness.
- Inswing versus outswing configuration.
- Product series and the manufacturer’s sizing convention.
Other makers use different allowances. The covered Andersen entry doors need an opening 1/2 in. larger than the unit in both width and height, with allowance for flashing thickness. Andersen’s 200 and 400 Series product guide lists minimum openings of door width +3/4 in. and door height +1/2 in. for its single- and two-panel patio doors. Masonite lists 38.5 in. and 34.5 in. as common exterior widths.
Double Door and French Door Rough Openings
Frame to the unit-specific size, never to a doubled number.
A double-door opening is not twice a single-door opening. Two slabs, a combined jamb assembly, meeting stiles, astragals, sidelites and transoms all change the unit dimensions.
| Unit | Actual unit size | Rough opening |
|---|---|---|
| 32 x 80 pre-hung double, Set 1 | 66-9/16 x 82 | 67-1/4 x 82-1/2 |
| 36 x 80 pre-hung double, Set 1 | 74-9/16 x 82 | 75-1/4 x 82-1/2 |
| 36 x 80 pre-hung double, Set 2 | 74-1/4 x 81-1/2 | 74-3/4 x 82 |
| 5-0 replacement double patio/French unit | 59-1/2 x 79-1/2 | 60 x 80 |
| 6-0 replacement double patio/French unit | 71-1/2 x 79-1/2 | 72 x 80 |
Identified examples only. Replacement patio/French units are jamb-to-jamb. Frame to your unit’s rough-opening table; Andersen’s Frenchwood guidance also tells installers to use the unit-specific dimensions.
Pocket Door Rough Opening Chart
Why pocket doors cannot use the swing-door rule.
A pocket door frame includes the pocket into which the door slides, so the framed width is about twice the door width.
| Nominal door slab | Manufacturer RO width | Manufacturer RO height |
|---|---|---|
| 24 x 80 in. | 49 in. | 84-1/2 in. |
| 28 x 80 in. | 57 in. | 84-1/2 in. |
| 30 x 80 in. | 61 in. | 84-1/2 in. |
| 32 x 80 in. | 65 in. | 84-1/2 in. |
| 36 x 80 in. | 73 in. | 84-1/2 in. |
Johnson 1500 Series formula
Check: for a 30 x 80 door, 2(30) + 1 = 61 in. and 80 + 4.5 = 84.5 in., which matches the manufacturer’s 61 x 84-1/2 in. opening.
Applies only to this frame system. Other pocket-door hardware uses different dimensions; the same Johnson sheet sets the header-mounting height at 80-3/4 in. above the finish floor or 81-1/2 in. above the subfloor.
Bifold Door Rough Opening
Verify the hardware system first.
Bifold doors are sized by the finished opening and hardware, not by the swing-door +2 in. convention. Nominal bifold size, specified finished opening, framed rough opening and track and pivot hardware requirements are different things.
Use the manufacturer’s installation guide for the exact opening. Do not apply the swing-door convention to bifold doors.
Sliding Patio Door Rough Opening
Complete assembly dimensions control.
Sliding patio doors are ordered by complete unit size or manufacturer configuration, not by the size of one sliding panel.
- Sill, flashing and installation flange affect the opening.
- Masonry openings have their own requirements.
- Frame to the unit-specific rough-opening table in the installation guide.
This section is kept short on purpose to avoid duplicating a future patio-door chart.
How to Calculate a Door Rough Opening
Two distinct methods, used for different purposes.
Method A: preliminary interior planning
- Dw, Dh = nominal slab width and height (in.)
- Aw = 2 in., Ah = 2-1/2 in. (illustrative convention)
Method B: actual prehung unit
- Uw, Uh = actual assembled-unit width and height (in.)
- Cw, Ch = total width and height allowance specified by the manufacturer
Cw and Ch must come from the manufacturer
They are not universal. Examples in this page range from 1/2 in. total (Andersen entry doors) to 7/8 in. wide (Therma-Tru Set 1).
Worked Door Rough Opening Examples
One interior planning example and one manufacturer example.
30 x 80-Inch Interior Door (Method A)
What it means: The exact RO remains subject to the prehung door’s specification and floor-height reference.
36 x 80-Inch Exterior Door (Method B)
What it means: The allowances are total differences between the unit and the rough opening, not necessarily equal gaps on every side.
Rough Opening Width: Jambs and Shims
Where the extra width goes.
The assembled unit width includes the frame, so the opening has to allow for the jambs plus installation clearance.
- Hinge jamb and strike jamb: both are part of the unit width.
- Frame thickness: common side jamb depths are 4-9/16, 5-1/4 and 6-9/16 in., depending on wall thickness, but not every door matches.
- Shim allowance: the gap you fill to plumb the frame; it is small and product specific.
- Installation tolerances: out-of-plumb framing consumes the allowance.
Do not assume all jambs have identical dimensions. Use the unit’s own frame size.
Rough Opening Height: Subfloor vs. Finished Floor
Measure from the right floor level.
Height depends on which floor reference the product uses. Subfloor, finished floor, carpet, tile, threshold and sill support all change the number.
Masonite measures interior replacement openings from the finished floor or carpet to the bottom of the header, and exterior replacement openings from the subfloor.
Coordinate conversion (illustrative)
- H1 = subfloor to header underside
- H2 = finished floor to header underside
- tfloor = finish floor thickness (3/4 in. here)
Finished-Floor to Subfloor Reference
What it means: This is a coordinate conversion, not an instruction to add 3/4 in. to every rough opening. The Johnson Hardware pocket-door sheet shows the same 3/4 in. step (80-3/4 in. from the finish floor, 81-1/2 in. from the subfloor).
Figure 3. Rough opening height from the subfloor (H1) versus the finished floor (H2). Not to scale.
How to Measure an Existing Door Rough Opening
Casing off, multiple readings, smallest value.
Expose the framing, measure at several points and record the smallest dimension.
- Measure width at the top, middle and bottom, from stud to stud.
- Measure height at more than one location, from the correct floor datum to the header.
- Identify the floor datum required by the replacement product.
- Record the smallest usable width and height (Masonite suggests the nearest 1/16 in.).
- Measure the existing unit separately; do not confuse trim-to-trim or slab dimensions with framing.
- Verify the replacement unit and its required rough opening.
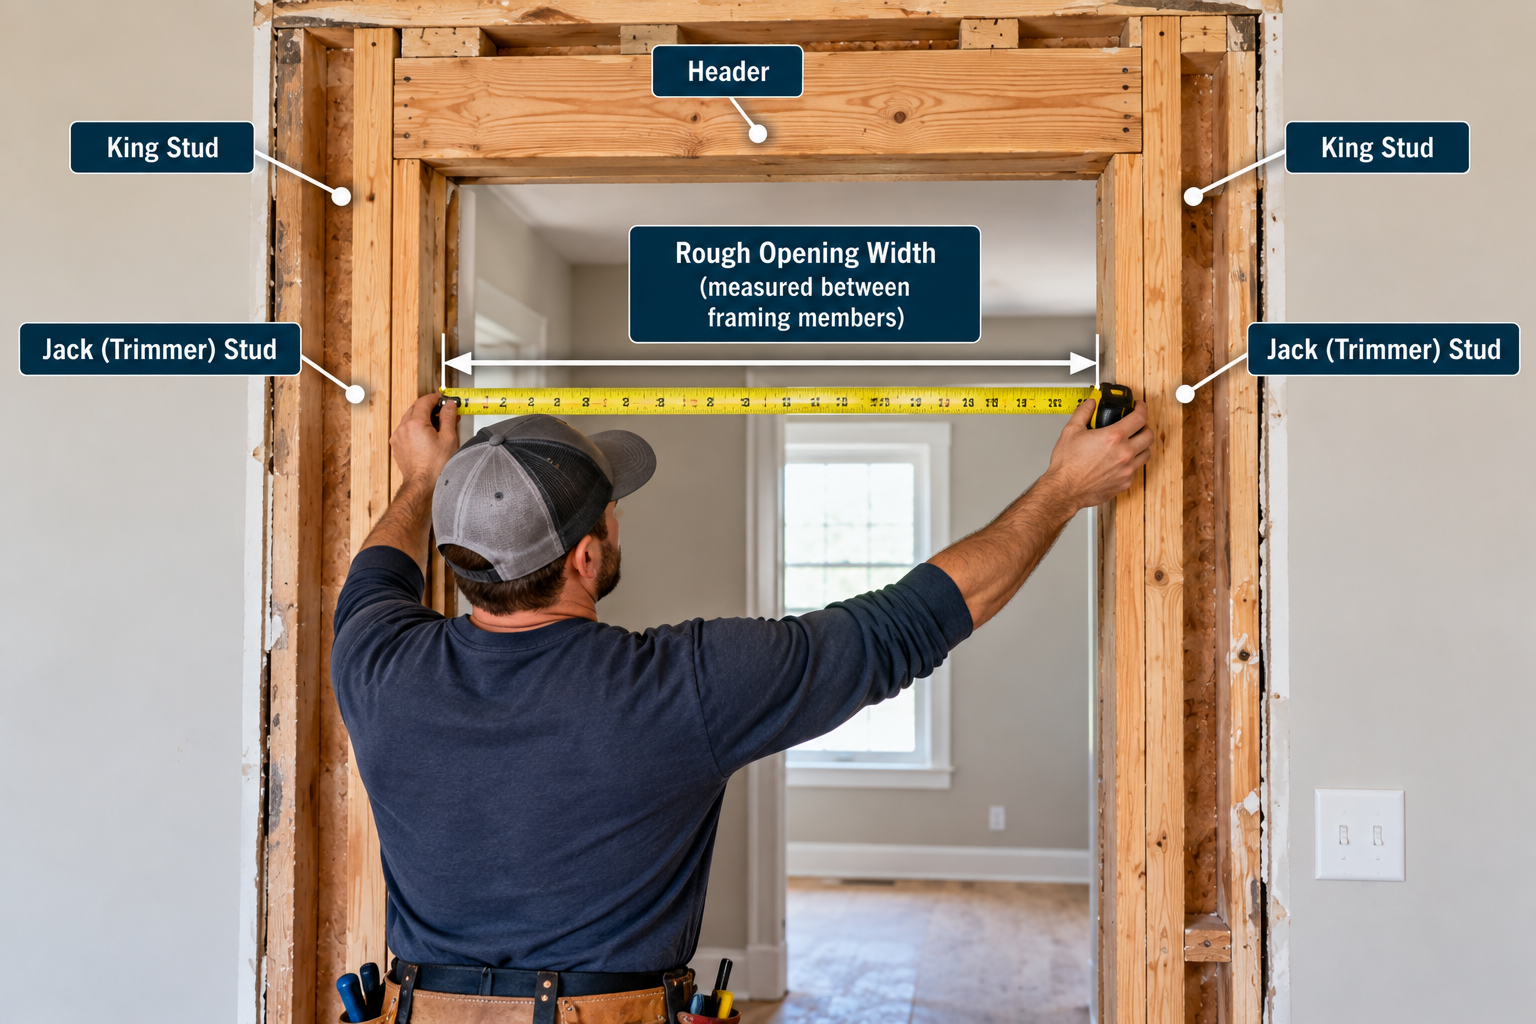
Figure 4. Width, height and diagonal measurements, plus level and plumb checks.
Checking for Square, Plumb and Level
What to verify before the unit goes in.
A rough opening can have the right dimensions and still be hard to install in.
- Sill or floor line: level.
- Side framing: plumb.
- Header: level.
- Diagonals: compare corner to corner.
- Clearance: enough for the specified unit.
For one Andersen hinged patio door, the guide says an opening is square if the two diagonals are within 1/8 in. That is a requirement of that installation guide, not a universal framing-code tolerance, and equal diagonals alone do not prove plumb or level.
Door Rough Opening and Header Framing
The framing around the opening.
Around a door opening you will usually find these members.
King studs
Full-height studs on each side of the opening.
Jack (trimmer) studs
They carry the header and set the RO width at their inner faces.
Header
Spans the opening and carries loads above it.
Top plate
The horizontal member capping the wall.
Cripple studs
Short studs above the header where used.
Rough sill
Only where the door type needs sill support.
Rough-opening width is measured between the relevant framing faces, not from the outer edge of one king stud to the outer edge of the other.
This page does not choose header sizes. For structural header sizing see the Header Span Chart; header design depends on loads, span, material and code. To plan studs, plates and headers for a new opening, use the Lumber Calculator.
Door Rough Openings in Load-Bearing Walls
Structural checks before you enlarge an opening.
Widening or adding an opening in a load-bearing wall changes how loads reach the foundation.
- The header must be sized for the span and loads (engineered options such as LVL appear in the LVL Span Chart).
- Supporting studs and bearing at each end need checking.
- Existing framing modifications need temporary support during alterations.
Adding 2 inches to a rough opening is not structurally harmless in a bearing wall. Check the applicable structural requirements first.
Door Rough Opening vs. Code-Required Clear Opening
Framing dimension versus installed clear passage.
Code-required clear opening is a different measurement from the rough opening.
The 2021 IRC, Section R311.2, requires at least one qualifying side-hinged egress door per dwelling unit with a clear width of at least 32 in. (measured between the face of the door and the stop, with the door open 90 degrees) and a clear height of at least 78 in. (from the top of the threshold to the bottom of the stop).
- These dimensions are measured on the installed opening, not at the framing stage.
- A nominal 32-inch slab will not provide a 32-inch clear opening once hung in a frame.
- Other doors are not required to meet these minimums.
- Accessibility rules are separate and may involve different codes, standards and measurement conditions.
Confirm the locally adopted code and any amendments.
Fire-Rated Door Rough Openings
Use the listing, not a generic formula.
Fire-rated doors are listed assemblies. They need listed frame and door components, approved installation methods, specified clearances and correct hardware.
Do not apply a generic rough-opening chart to a rated assembly without its listing and installation instructions. Door-to-frame clearance is not the same as rough-opening shim clearance.
What If the Rough Opening Is Too Large or Too Small?
Fix the framing, not the door.
- Too large: the frame needs more shimming, blocking or added framing, and large gaps affect fastening and air sealing. Correct the framing instead of stacking shims.
- Too small: the unit will not fit or cannot be set plumb and square. Trim or reframe the opening; do not force or cut the door frame.
Confirm the amount of allowance in the manufacturer’s instructions before correcting either condition.
Common Door Rough Opening Mistakes
Errors that cost a re-frame.
Using slab width as RO width
The RO must be larger than the unit.
Adding a generic allowance to a unit
The assembled unit already includes the jamb.
Using the interior rule on an exterior door
Exterior units have their own tables.
Measuring casing instead of framing
Casing hides the true opening.
Using the wrong floor datum
Subfloor and finished floor differ.
Ignoring flooring added later
It changes finished height.
Confusing brickmould with the RO
Trim width is not framing width.
Assuming all 36 x 80 exterior doors match
Sizing sets differ.
Applying swing-door math to pocket doors
Pocket frames use their own formula.
Doubling a single-door RO for French doors
Use the unit’s table.
Ignoring sill pan and flashing
They affect the opening.
Framing out of square
Check diagonals, plumb and level.
Assuming nominal width equals clear width
Clear width is measured when installed.
Changing bearing framing without checking
Structure may need design.
Ignoring the installation instructions
They control the final RO.
More framing references are in the Construction Charts hub.
Door Rough Opening FAQs
Short answers to common rough-opening questions.
Using the preliminary interior convention (slab +2 in. wide, +2-1/2 in. tall), about 26 x 82-1/2 inches. Confirm the actual prehung unit and its instructions.
About 30 x 82-1/2 inches by the same preliminary interior convention. Confirm the actual prehung unit.
About 32 x 82-1/2 inches for a typical interior prehung door by the preliminary convention. Confirm the actual prehung unit.
About 34 x 82-1/2 inches for a typical interior prehung door. A 32-inch framed opening is not a 32-inch clear passage.
It depends on the door. The interior planning convention gives 38 x 82-1/2 in. Published Therma-Tru exterior examples are 38-1/2 x 82-1/2 in. (one sizing set) and 38-1/4 x 82 in. (another). Use the exact unit’s specification.
The interior planning convention gives 84 + 2-1/2 = 86-1/2 in. tall. Exterior and specialty units differ, so confirm the product.
The interior planning convention gives 96 + 2-1/2 = 98-1/2 in. Published Therma-Tru 96-inch examples are 98-1/2 in. and 98 in. in different sizing sets, so do not assume one value.
No. The +2 in. width is a preliminary interior convention, not a code or universal rule. Exterior, pocket and double doors use unit-specific allowances.
Follow the manufacturer. Examples include 1/2 in. total in both directions for the covered Andersen entry doors, 7/8 in. wide by 1/2 in. tall in one Therma-Tru set, and 3/4 in. wide by 1/2 in. tall in another.
No. Exterior units include sills, thresholds and flashing allowances, and their rough openings come from the manufacturer’s unit table.
Follow the product’s instructions. Masonite measures interior replacements from the finished floor or carpet and exterior replacements from the subfloor, so check the datum before you frame or order.
The rough opening is the framed opening before the door unit. The finished opening is what remains after jambs, stops and finishes are installed.
There is no safe doubling rule. Published Therma-Tru examples include 67-1/4 x 82-1/2 in. for a 32 x 80 double unit and 75-1/4 x 82-1/2 in. for a 36 x 80 double unit in one sizing set; use your unit’s table.
It depends on the frame system. For the Johnson Hardware 1500 Series, width is 2 x door width + 1 in. and height is door height + 4-1/2 in., so a 30 x 80 door needs 61 x 84-1/2 in.
For a typical interior prehung door under the planning convention, usually yes. For published exterior examples the openings are 38-1/4 or 38-1/2 in., so 38 in. would be too small.
Remove the casing to expose the framing. Measure width at the top, middle and bottom and record the smallest. Measure height from the product’s floor datum to the header on more than one side and record the smallest.
The frame needs more shimming, blocking or added framing, and large gaps can compromise fastening and insulation. Correct it with proper framing, not just extra shims.
The unit will not fit or cannot be shimmed plumb and square. Trim or reframe the opening; do not force or cut the door frame.
IRC R311.2 requires 32 in. clear width (door open 90 degrees, face of door to stop) and 78 in. clear height for the required egress door. A 36-inch door often provides this, but you must verify the installed clear opening.
No. Header size depends on span, loads, wall configuration, material and code. The rough opening width is one input, not the answer.
Print This Door Rough Opening Chart
Use your browser to save this page as a PDF for a job-site binder or estimating folder. Interactive sections are hidden when printing.