How to Prepare Soil for a Concrete Slab – A Complete Guide
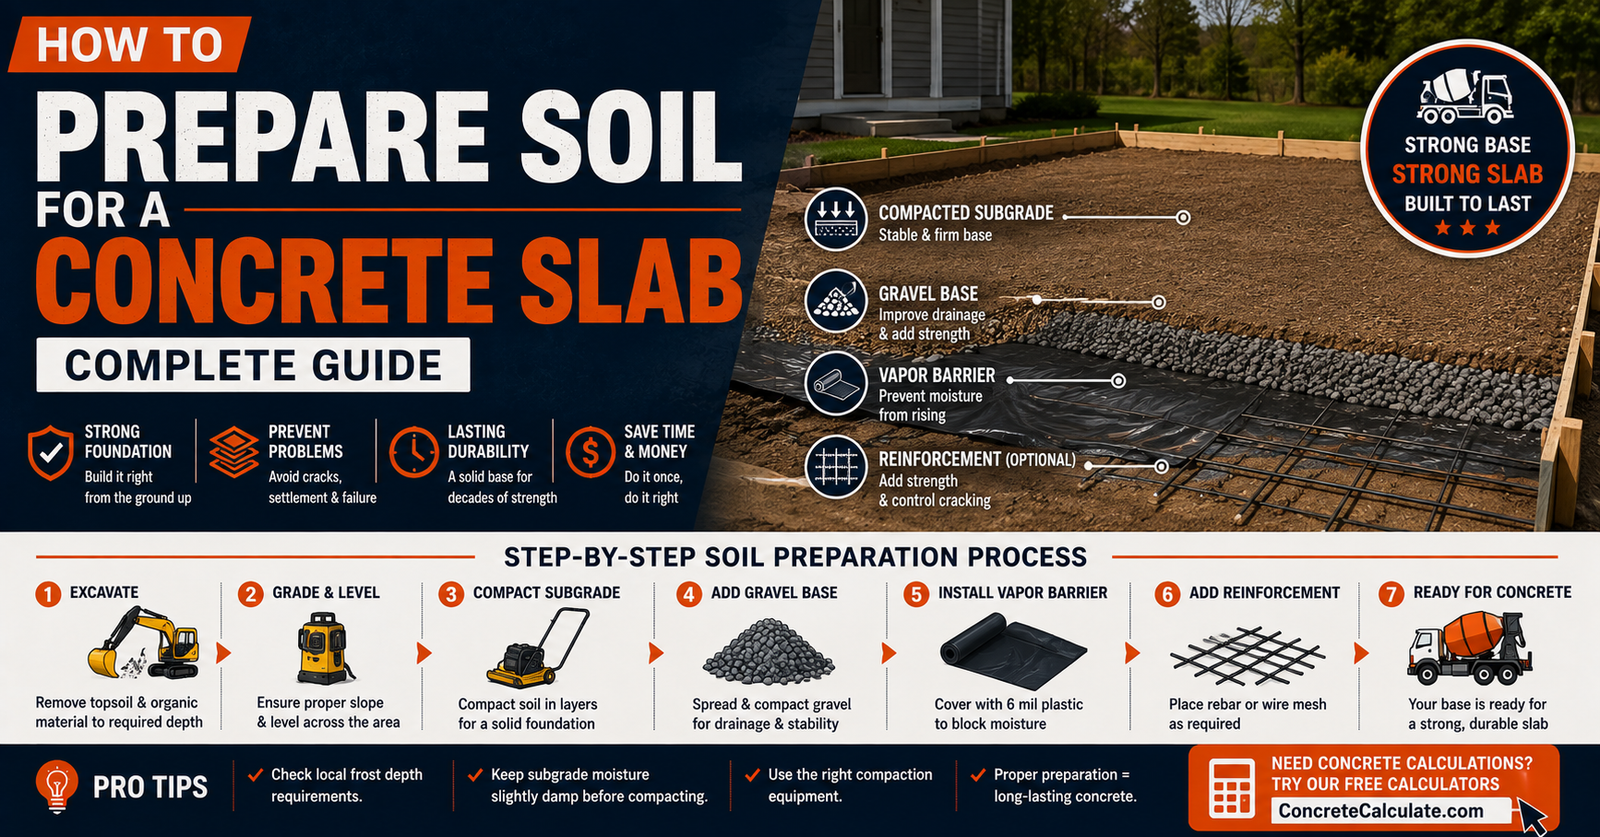
A practical, technically grounded guide to subgrade preparation, compaction, base materials, drainage, and vapor control before you pour.
Quick Answer
To prepare soil for a concrete slab, remove unsuitable material such as topsoil, organic matter, and debris, establish the correct grade and elevation, identify and correct soft or weak spots, place and compact suitable fill in appropriate lifts, add a base or subbase layer if the project requires one, address drainage, install a vapor retarder if required, and verify the finished support system before placing concrete.
The exact combination of steps that applies to your project depends on your soil type, drainage conditions, climate, structural loading, and any applicable code or project specifications. There is no single universal recipe, such as one fixed gravel depth or one fixed compaction percentage, that applies to every slab.
In This Guide
- Concrete Slab Soil Preparation Checklist
- What Goes Under a Concrete Slab?
- What Is Subgrade?
- Can You Pour Concrete Directly on Soil?
- How to Inspect the Existing Soil
- Remove Topsoil, Grass, Roots, and Organic Material
- How Deep Should You Excavate for a Concrete Slab?
- How to Establish the Correct Grade and Elevation
- How to Identify Soft or Weak Soil
- How to Proof-Roll Concrete Slab Subgrade
- How to Correct Soft Spots
- How to Place Fill Under a Concrete Slab
- How to Compact Soil for a Concrete Slab
- What Compaction Percentage Is Needed Under a Concrete Slab?
- What Gravel or Base Material Goes Under a Concrete Slab?
- How Thick Should the Gravel Base Be?
- Subgrade vs. Subbase vs. Base: What’s the Difference?
- How to Improve Drainage Under a Concrete Slab
- Do You Need a Vapor Retarder Under a Concrete Slab?
- Where Should the Vapor Retarder Go?
- How to Prepare Soil for Different Types of Concrete Slabs
- How Soil Conditions Affect Concrete Slab Performance
- How to Prepare Soil in Cold or Wet Conditions
- How to Prepare Soil for a Slab Over Existing Fill
- How to Prepare Soil Around Utility Trenches
- Do You Need Rebar or Wire Mesh?
- How to Check the Slab Base Before Pouring Concrete
- Concrete Slab Soil Preparation Cost
- Common Soil Preparation Mistakes
- When Should You Hire a Geotechnical Engineer?
- How to Prepare Soil for a Concrete Slab FAQs
Concrete Slab Soil Preparation Checklist
Ready-to-Pour Checklist
- Organic material removed
- Debris removed
- Required excavation completed
- Grade established
- Fill placed correctly, if needed
- Fill compacted in appropriate lifts
- Soft spots identified and corrected
- Utility trenches properly backfilled and compacted
- Drainage addressed
- Base or subbase installed, if required
- Surface properly graded
- Vapor retarder installed, if required
- Forms and elevations verified
- Reinforcement installed, if required
- Inspection or testing completed where required
Keep this checklist handy through the rest of this guide. Each item is explained in detail in the sections below.
What Goes Under a Concrete Slab?
A concrete slab is only as good as what supports it. Rather than one generic layer of “gravel,” a slab typically relies on a support system made up of distinct layers, each with a different function.
ACI guidance for slabs-on-ground describes the slab support system as consisting of the subgrade, usually a base, and sometimes a subbase, and notes that suitable existing soil can, in some cases, directly support a slab when it has the required uniformity and properties. That is a meaningfully different message than “every slab needs 4 inches of gravel.”
What Is Subgrade?
Subgrade is the prepared soil, or other supporting material, located immediately beneath the slab support system. It may be existing native soil that has been properly prepared and compacted, or it may be soil that has been partially removed, replaced, and recompacted. Subgrade is the foundation for everything above it, including any base, subbase, vapor retarder, and the slab itself.
Can You Pour Concrete Directly on Soil?
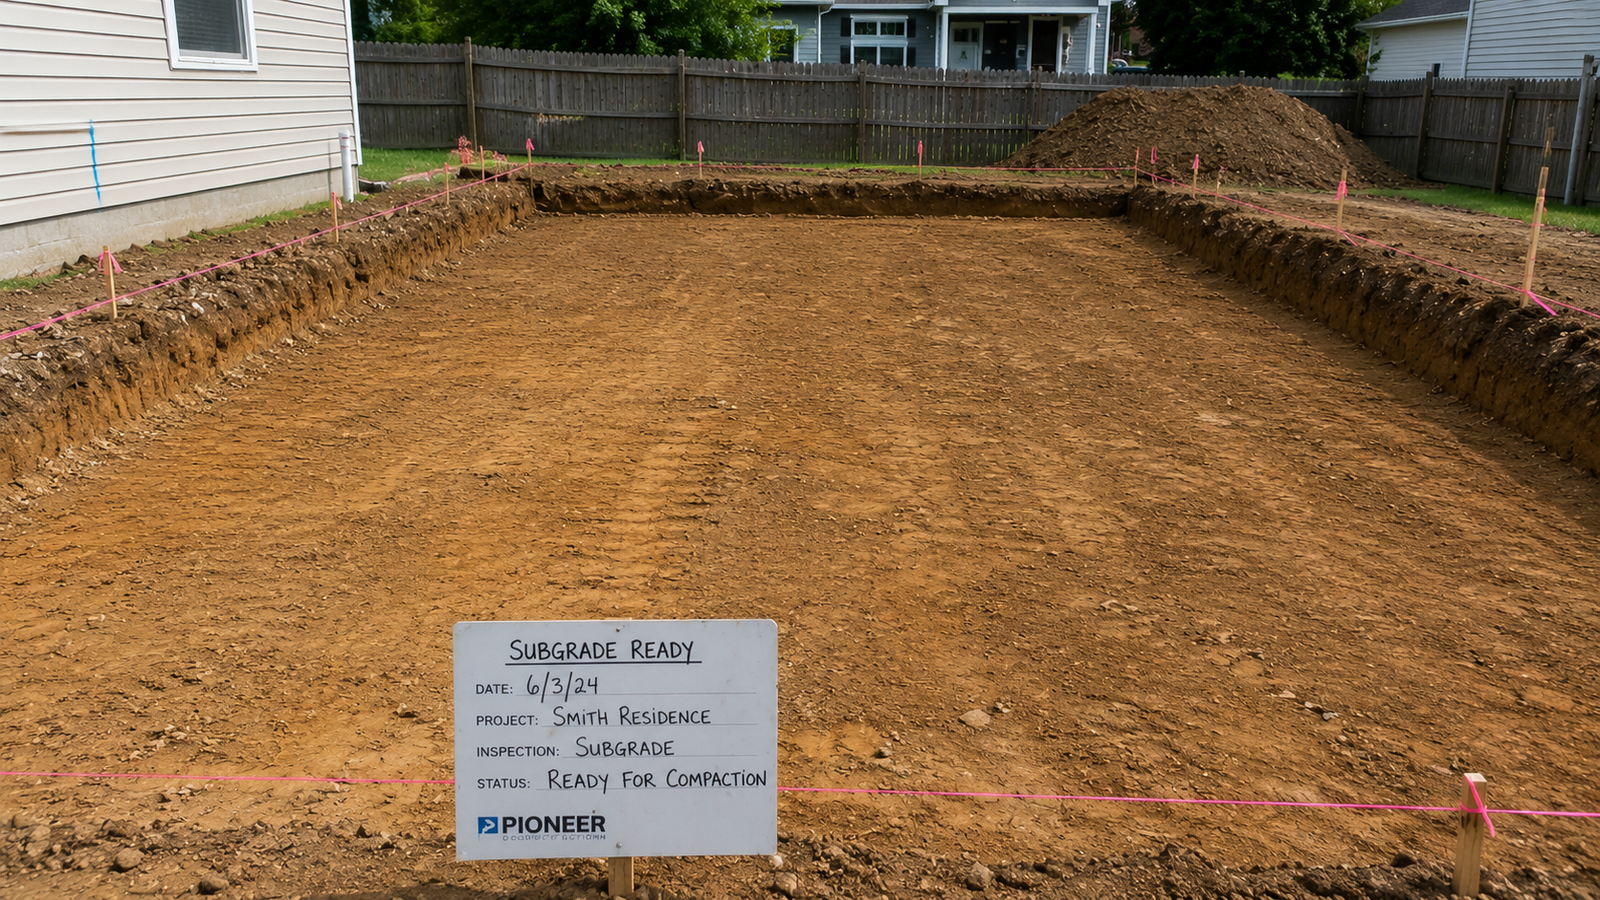
Sometimes, but not on untouched, unprepared ground. Concrete can be placed directly on properly prepared subgrade when that soil is firm, uniform, free of organic material, and adequately compacted, and when the project does not otherwise call for a base or subbase layer. What you cannot safely do is pour directly onto original, undisturbed topsoil, loose fill, or soil that has not been evaluated and compacted, since that soil is unlikely to provide the uniform support a slab depends on.
How to Inspect the Existing Soil
Before deciding what preparation is needed, walk the site and check for:
- Organic material: topsoil, grass, roots, or buried vegetation
- Debris: construction scraps, rocks, or old foundation remnants
- Soft or wet areas: ground that visibly compresses, retains standing water, or feels spongy underfoot
- Uncontrolled fill: soil that appears to have been dumped or placed without compaction, often identifiable by inconsistent color, texture, or visible layering
- Signs of previous excavation: disturbed soil patterns that suggest a trench, hole, or old structure once existed there
- Existing settlement: nearby structures, walkways, or grading showing signs of having already settled unevenly
Remove Topsoil, Grass, Roots, and Organic Material
Removing organic material is typically one of the first practical steps in preparing a site. ACI guidance calls for stripping the initial layer of organic material, debris, and frozen material before establishing the slab support system. Organic soil is unsuitable to support a slab because it can decompose over time, shrink and compress as it breaks down, create voids as it loses volume, and produce nonuniform support across the slab area since organic content rarely decomposes evenly. This is a more complete explanation than simply saying “remove the grass,” but the underlying advice is the same: get all organic material out before building the support system above it.
How Deep Should You Excavate for a Concrete Slab?
There is no single universal excavation depth that applies to every project. The required depth is a function of the target finished slab elevation and everything that needs to fit beneath it:
Excavation Depth Concept
Required excavation = (Finished slab elevation) minus (Existing grade), accounting for slab thickness, any base/subbase layers, and any fill needed to reach the correct elevation
The actual depth depends on the slab thickness specified for the project, whether a base or subbase layer is included, the desired finished elevation relative to surrounding grade, site drainage and slope requirements, and, in freezing climates, frost-related considerations for the specific application. For general slab thickness references once you’ve settled on a design, see the Concrete Slab Thickness Chart, though the required thickness for your project should ultimately come from your project’s design or applicable code requirements.
How to Establish the Correct Grade and Elevation
Soil preparation is not just about making the ground flat. The goal is to establish a specific, verified elevation and slope across the entire slab area. This generally involves:
- Setting a reference elevation, often tied to an existing structure, sidewalk, or benchmark point
- Using string lines, stakes, or a laser level to transfer that reference elevation across the site
- Identifying high and low points in the existing grade that need to be cut down or filled
- Building in slope where applicable, such as drainage slope away from a structure for exterior flatwork
- Rough grading first, followed by fine grading closer to final elevation once the bulk earthwork is complete
ACI guidance discusses both rough and fine grading stages, along with project-specific grading tolerances that should be defined in the project’s plans or specifications rather than assumed universally.
How to Identify Soft or Weak Soil
Soft or weak soil can undermine an otherwise well-built slab. Common indicators include:
- Ground that visibly deflects, ruts, or leaves footprints under normal walking pressure
- Areas that stay wet or muddy longer than the surrounding soil after rain
- Soil that feels noticeably looser or springier than adjacent areas when probed or walked on
- Locations that correspond to known utility trenches, old excavations, or previously disturbed ground
- Visible organic material or debris mixed into the soil
Potential problem areas commonly include soft clay, loose or uncontrolled fill, wet low spots, utility trenches, buried organic material, and areas affected by previous excavation.
How to Proof-Roll Concrete Slab Subgrade
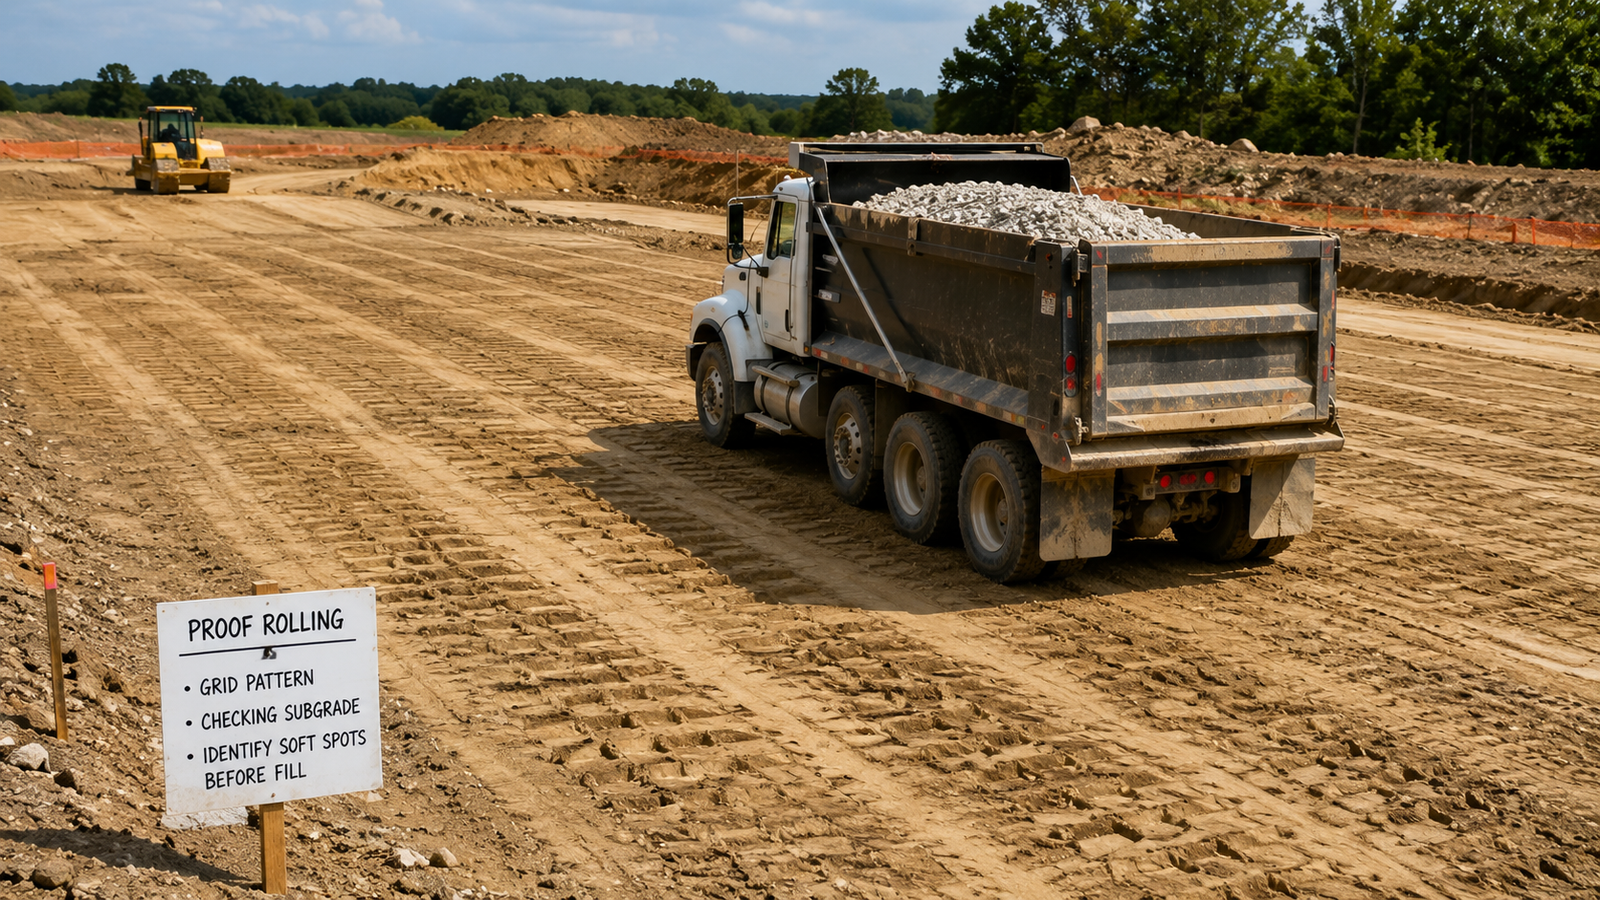
Proof-rolling is a practical field method for finding hidden soft spots that aren’t obvious from a visual inspection alone. ACI guidance describes proof-rolling as typically involving a loaded vehicle driven in a grid pattern over the subgrade to locate soft or compressible areas at or near the surface, usually as part of the quality-assurance process for the soil-support system, with the specific wheel load and number of passes set out in the project specifications rather than treated as one fixed universal test. Guidance associated with this practice notes that the wheel load should be large enough to stress roughly the upper foot of subgrade without causing a bearing failure, and that three passes over the same track are a commonly used pattern.
Proof-Rolling Is Not a Simple Pass/Fail Drive-Over
Proof-rolling is a documented, specification-driven quality assurance step, not simply “drive a truck over it and see if it moves.” The appropriate equipment, wheel load, and number of passes depend on the project. There are no universal numeric standards for proof-rolling, and results are typically evaluated qualitatively by observing deflection, rutting, or pumping rather than compared against a single fixed number.
Where areas of poor support are identified through proof-rolling, they are removed and replaced with compacted material to create more uniform subgrade, and proof-rolling can be repeated after those repairs.
How to Correct Soft Spots
Once a soft or weak area is identified, the typical corrective sequence is:
- Excavate the soft material to a depth sufficient to reach firmer, stable soil underneath.
- Replace it with suitable compacted material, matched to the surrounding subgrade and project requirements.
- Recompact the area in appropriate lifts rather than as one thick layer.
- Reassess the area, including a repeat proof-roll pass if that was how the problem was first identified.
- Escalate to a professional evaluation if the soft area is extensive, keeps recurring, or its cause is unclear, since some soft-soil conditions point to a deeper drainage or soil-stability issue that a simple dig-and-replace won’t resolve.
How to Place Fill Under a Concrete Slab
When a site needs to be raised to reach the target elevation, the fill material and how it’s placed matter as much as the material itself.
Don’t Dump and Compact Only the Top
A common and serious mistake is placing several feet of fill at once and compacting only the surface. The material underneath remains loose, and settlement often shows up months or years later. ACI guidance discusses controlled fill and mechanical compaction of slab-support materials, which means the fill needs to be suitable for the project and placed and compacted in manageable lifts, with each lift compacted before the next is placed on top of it.
What counts as a “manageable lift” depends on the fill material and the compaction equipment being used; this should be defined by the project specification or the equipment manufacturer’s guidance rather than guessed in the field.
How to Compact Soil for a Concrete Slab
Compaction reduces the void space between soil particles, which increases density, reduces the likelihood of future settlement, and helps create more uniform support across the slab area. Several variables affect how compaction should actually be carried out:
- Equipment type, which should match the soil or fill material being compacted
- Soil moisture content, since most soils compact best within a specific moisture range around their optimum moisture content
- Soil type, since cohesive clay soils and granular sands and gravels respond differently to the same compaction method
- Lift thickness, since compaction equipment can only effectively densify a limited depth of material per pass
- Density testing, used to confirm the compacted material actually meets the required standard
| Soil/Material Type | Commonly Used Equipment |
|---|---|
| Granular material (sand, gravel) | Vibratory plate compactors or vibratory rollers |
| Cohesive soil (clay, silt) | Sheepsfoot or other kneading-action compactors |
| Small residential area | Plate compactor or vibratory rammer where suitable for the material |
| Large site or deep fill | Self-propelled or towed rollers |
Equipment selection depends on the specific soil or fill material and project scale; this table shows common patterns, not a mandatory equipment list.
More Compaction Is Not Always Better
Over-compacting or compacting at the wrong moisture content can be counterproductive for some soils. The appropriate compaction method, moisture condition, and target density depend on the specific soil type and the project’s requirements, not a single universal approach applied to every material.
What Compaction Percentage Is Needed Under a Concrete Slab?
There is no single compaction percentage that applies to every residential slab. Compaction requirements are established through laboratory Proctor testing, which determines a soil’s maximum achievable dry density under standardized test conditions, and the project then specifies field compaction as a percentage of that laboratory maximum.
- ASTM D698 (Standard Proctor): establishes maximum dry density using a lower level of compactive energy
- ASTM D1557 (Modified Proctor): establishes maximum dry density using a higher level of compactive energy, commonly referenced for structural fill beneath slabs and pavements
Field density is then verified using test methods such as ASTM D1556 (sand-cone method), ASTM D2167 (rubber balloon method), ASTM D2937 (drive-cylinder method), or nuclear density gauge methods, comparing the in-place density against the applicable Proctor maximum. ACI guidance references these compaction testing standards and notes that specified compaction percentages vary by project.
Do Not Assume a Universal Percentage
Figures such as “95 percent compaction” are commonly cited in general industry references for structural fill beneath slabs and pavements, but the specific requirement for your project should come from the project specification, a geotechnical recommendation, or applicable code or design requirements, not from a generic online rule applied to every slab regardless of soil type, loading, or use.
What Gravel or Base Material Goes Under a Concrete Slab?
Granular base material can serve several functions depending on how the project is designed:
- Providing a stable, workable surface for construction activity before the slab is placed
- Improving drainage when an appropriately designed open-graded material is used
- Helping achieve the target finished elevation
- Creating more uniform support across the slab area
- Reducing capillary moisture movement when the material and design are suited to that purpose
- Working in coordination with a vapor retarder system, depending on the overall design
ACI guidance discusses crushed rock, gravel, and coarse sands as commonly used base materials, selected for characteristics such as strength, compressibility, and permeability. Not every material performs every function equally well, which is why the specific material selected should match the project’s actual requirements.
How Thick Should the Gravel Base Be?
There is no universal thickness appropriate for every slab. The required base thickness depends on:
- The subgrade’s existing strength and uniformity
- The anticipated loading on the finished slab
- Drainage requirements for the specific site
- Any applicable code requirements for the specific occupancy or use
- Project-specific engineering or geotechnical recommendations
General residential guidance commonly discusses base layers in a range of a few inches for many typical light-duty applications, but treat any specific number you see online as an illustrative reference rather than a rule that applies to your project. Confirm the actual required thickness through your project’s plans, applicable code, or a qualified professional.
Subgrade vs. Subbase vs. Base: What’s the Difference?
| Layer | Basic Role | Always Required? |
|---|---|---|
| Subgrade | Prepared, compacted supporting soil beneath everything else | Yes, in some prepared form |
| Subbase | Additional support and/or drainage layer, used when specified | Project-dependent |
| Base | Granular layer directly supporting the slab, when used | Project-dependent |
| Vapor retarder | Moisture-control layer between the base/subgrade and the slab | Project, code, and use dependent |
| Concrete slab | Structural and functional concrete element | Yes |
How to Improve Drainage Under a Concrete Slab
Poor drainage is one of the most consequential problems in slab preparation, because it can undermine everything else you’ve done. Persistent water beneath a slab can contribute to a saturated, weakened subgrade, loss of soil support, pumping under load, frost-related movement in cold climates, ongoing moisture problems, and eventual settlement.
Gravel Is Not a Drainage Fix by Itself
Don’t try to solve a real drainage problem by simply burying it under a layer of gravel and pouring concrete on top. If groundwater, a high water table, or persistent surface water is present at the site, the underlying cause needs to be identified and addressed, whether that means regrading the surrounding area, redirecting surface runoff, or installing an actual subsurface drainage system, before the slab support system is finalized.
ACI guidance for slab-on-ground construction emphasizes the importance of subgrade drainage and appropriate support materials as part of a functioning support system, not as an afterthought layered on top of unresolved water problems.
Do You Need a Vapor Retarder Under a Concrete Slab?
A vapor retarder is a plastic sheet material placed beneath a concrete slab to reduce water vapor movement upward from the soil into and through the slab. ACI guidance explains that vapor retarders and barriers are intended to minimize water vapor transmission through the slab from below, and references ASTM E1745 as the governing standard for plastic vapor retarder and barrier materials used in contact with soil or granular fill beneath concrete slabs. ASTM E1745 sets a maximum permeance for these materials, along with tensile strength and puncture resistance criteria.
What It Does and Does Not Do
A vapor retarder controls moisture vapor movement through the slab. It is not a substitute for solving groundwater problems, correcting poor drainage, or stabilizing genuinely unstable soil. Treat it as one part of a complete moisture-management strategy, not a fix for problems that originate elsewhere in the support system.
For residential construction, the International Residential Code has, in editions such as the 2021 and 2024 IRC, required a vapor retarder conforming to ASTM E1745 beneath concrete floor slabs in conditioned residential space, with specific exceptions for unheated garages and accessory structures, small unheated storage rooms, driveways, walks, patios, and other flatwork not intended to be enclosed and heated later, and situations where a local building official approves an exception based on site conditions. Vapor retarder thickness and permeance requirements have changed between code editions, so confirm the specific requirement under the code edition and any local amendments adopted in your jurisdiction rather than assuming one figure applies everywhere.
Where Should the Vapor Retarder Go?
Vapor retarder placement involves a genuine design tradeoff, and the article should not oversimplify it. ACI guidance discusses this directly: placing the vapor retarder in direct contact with the underside of the slab has been shown to provide strong protection for floor coverings, coatings, and building environments, in part because it eliminates the potential for water from sources like rain, saw-cutting, curing, or compaction to become trapped within a fill layer between the retarder and the slab. At the same time, older guidance describing certain fill or “blotter layer” arrangements above the vapor retarder notes tradeoffs affecting constructability, moisture behavior, and slab curling that need to be weighed against the specific project’s conditions.
Follow the Project Design, Not a Generic Rule
The correct vapor retarder placement depends on the project’s design documents, the applicable code edition, any flooring or coating manufacturer requirements, and the vapor retarder manufacturer’s own installation instructions. Don’t treat one configuration you’ve seen online as a universal rule that overrides the actual project requirements.
How to Prepare Soil for Different Types of Concrete Slabs
The core preparation principles in this guide apply broadly, but a few practical differences are worth noting across common slab types:
- Patios and walkways: typically unheated exterior flatwork; commonly among the vapor-retarder exceptions under residential code, though local amendments can vary
- Driveways: exterior flatwork subject to vehicle loading, where subgrade uniformity and drainage are particularly important given repeated heavy loads
- Garage floors: often unheated, which can affect vapor retarder requirements, but still benefit from careful subgrade preparation given vehicle loads
- Shed slabs: generally lighter loading, but still require organic material removal and basic compaction to avoid settlement
- Basement slabs: below-grade conditions often bring more significant groundwater and hydrostatic pressure considerations, making drainage and vapor control especially important
- Interior conditioned slabs: commonly subject to vapor retarder requirements under residential and commercial codes since they support finished flooring in heated space
Always confirm the specific requirements for your slab type against the applicable code and your project’s design, since exceptions and requirements can differ by use and local amendment.
How Soil Conditions Affect Concrete Slab Performance
| Soil Condition | Potential Issue | Possible Response |
|---|---|---|
| Topsoil / organic soil | Decomposition-related settlement | Remove before establishing support system |
| Soft pocket | Differential support, uneven settlement | Remove and replace with compacted material |
| Uncontrolled fill | Unpredictable future settlement | Evaluate, recompact, or remove and replace |
| Saturated soil | Low support strength, drainage problems | Address the underlying water condition first |
| Frozen soil | Unstable, temporary support condition | Remove frozen material, allow appropriate conditions before proceeding |
| Expansive clay | Volume change with moisture, potential heaving | Geotechnical evaluation, possible engineered response |
| Competent, uniform soil | Potentially suitable as-is | Prepare and compact as specified for the project |
How to Prepare Soil in Cold or Wet Conditions
Climate and weather introduce their own preparation considerations:
- Frozen soil: should not be treated as normal, usable subgrade. ACI guidance specifically identifies frozen material as something to remove during initial site preparation rather than build on top of.
- Saturated subgrade: soil that is currently waterlogged from rain or a high water table typically needs to dry out, or the underlying water condition needs to be addressed, before reliable compaction is possible.
- Active rain: attempting to grade, place fill, or compact during active rainfall generally produces poor, inconsistent results and should be avoided when practical.
- Groundwater: sites with a persistently high water table may require a more significant drainage strategy than typical dry-site preparation, and may benefit from professional evaluation.
How to Prepare Soil for a Slab Over Existing Fill
Building over fill that was placed by a previous owner, previous project, or unknown source deserves extra caution. Uncontrolled fill, meaning fill that was not placed and compacted in a documented, engineered manner, is one of the most common real-world causes of unexpected slab settlement, because its density and composition are unpredictable from the surface. If you suspect your site has uncontrolled fill, treat it the same way you would treat any other suspect soil: inspect, proof-roll if practical, and consider professional evaluation before assuming it can simply be built on directly.
How to Prepare Soil Around Utility Trenches
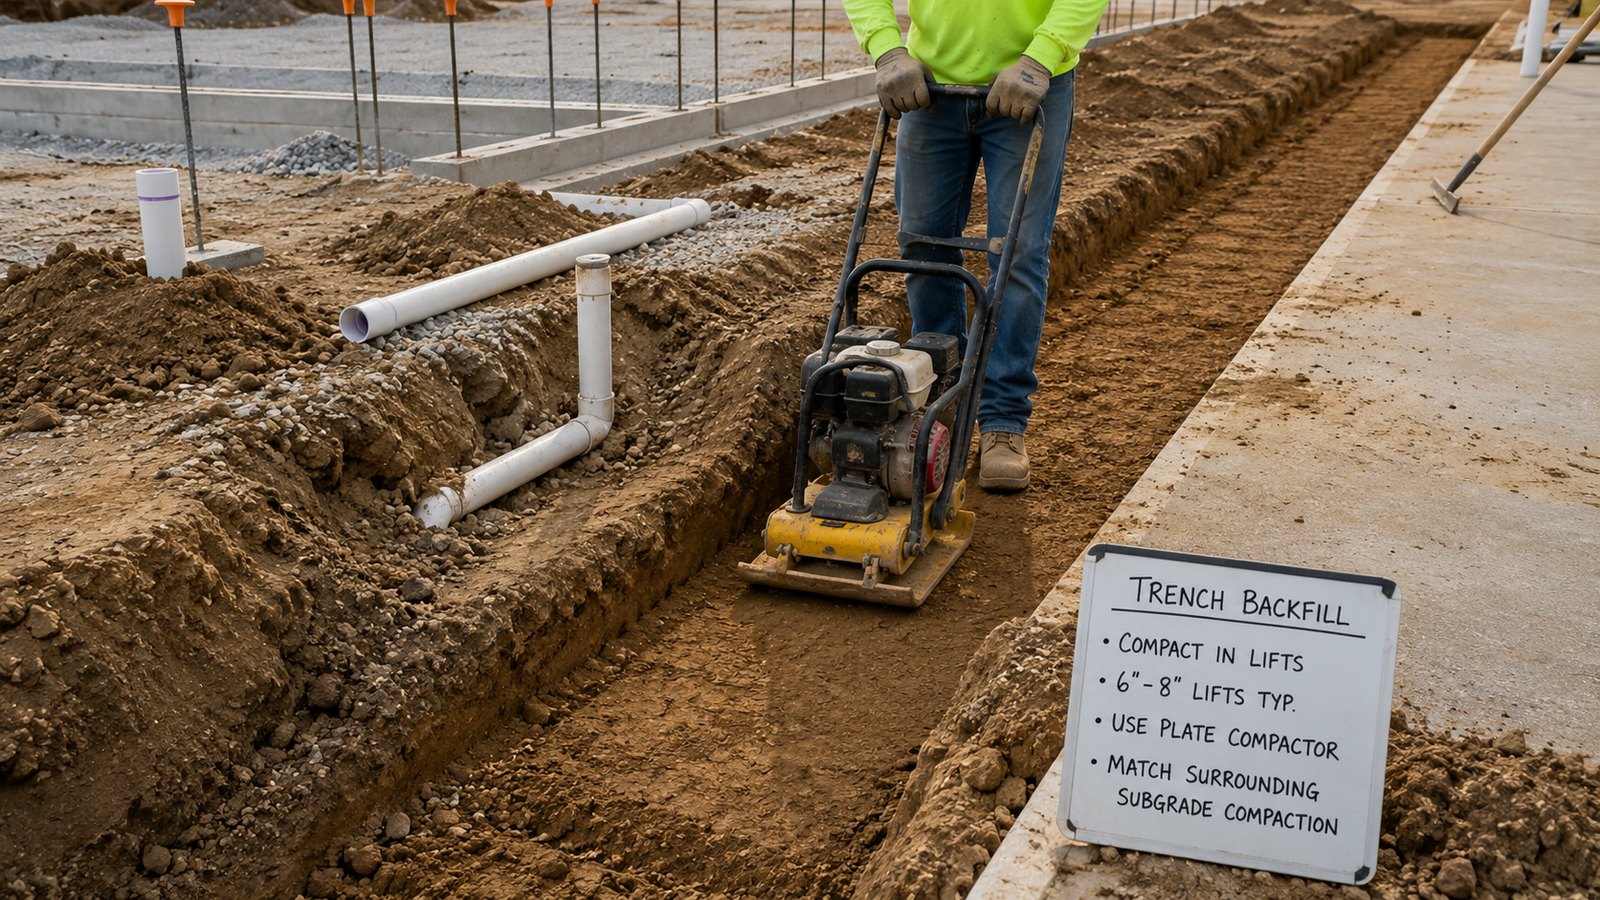
Utility trenches for plumbing, electrical conduit, drainage lines, and water service are common locations for future settlement because trench backfill is easy to under-compact compared with the broader surrounding subgrade. Proper trench preparation involves:
- Using backfill material suitable for the trench and surrounding soil
- Placing backfill in the same kind of manageable lifts used elsewhere on the site
- Compacting each lift, with particular attention to the narrow trench walls where compaction equipment access is limited
- Avoiding leaving any uncompacted or loosely backfilled patches, even small ones, since these often become visible settlement lines later
ACI guidance also discusses buried conduits and drain lines in the context of avoiding conditions that interfere with the slab’s design thickness or its ability to move as intended, which reinforces why trench location and backfill quality deserve deliberate attention rather than an afterthought.
Do You Need Rebar or Wire Mesh?
Reinforcement does not substitute for proper soil preparation. A slab with excellent rebar placement can still crack or settle unevenly if the support system beneath it is inadequate, since reinforcement primarily addresses concrete’s internal tensile behavior, not the uniformity of the ground supporting it. Soil preparation and reinforcement are separate, complementary parts of a successful slab, not substitutes for one another. For a full discussion of when reinforcement is appropriate, see Does Concrete Need Rebar? and the Rebar vs. Wire Mesh comparison.
How to Check the Slab Base Before Pouring Concrete
Before concrete arrives, walk the prepared area and confirm:
- All organic material, debris, and unsuitable soil have been removed
- The grade matches the planned elevation at multiple reference points
- No soft, spongy, or visibly wet areas remain
- Any base or subbase material is placed to a consistent, verified depth
- The surface is properly graded and free of standing water
- The vapor retarder, if required, is installed without tears and with properly overlapped and sealed seams
- Forms are stable, square, and set to the correct elevation
- Reinforcement, if specified, is properly positioned and supported
- Any required inspection or testing has been completed and documented
Once this checklist is satisfied, you’re ready to move from ground preparation into actual concrete placement. See How to Pour a Concrete Slab for the placement, finishing, and curing steps that follow.
Concrete Slab Soil Preparation Cost
Soil preparation costs vary widely by site condition, and the biggest cost driver is often how much material needs to be removed or imported, not the concrete itself. Common cost components include:
- Excavation and soil removal
- Hauling and disposal of unsuitable material
- Imported fill material, if the site needs to be raised
- Gravel or base material
- Compaction equipment and labor
- Grading labor
- Drainage improvements, if required
- Geotechnical testing or evaluation, for larger or more complex projects
- General equipment and labor time
Once your slab area and dimensions are settled, the How to Calculate Concrete guide and How Many Yards of Concrete Do I Need? guide can help you estimate the concrete portion of the project separately from site preparation costs.
Common Soil Preparation Mistakes
- Pouring directly over topsoil or organic material
- Pouring over frozen ground
- Leaving known soft spots uncorrected
- Using uncontrolled, undocumented fill without evaluation
- Compacting only the top of a thick fill layer instead of compacting in lifts
- Ignoring utility trenches during compaction
- Working with saturated soil without addressing the underlying water source
- Assuming every slab needs the same gravel depth
- Assuming gravel alone fixes poor or unstable soil
- Skipping elevation checks before placing concrete
- Ignoring drainage design around the slab
- Installing a vapor retarder without considering the actual project and code requirements
- Assuming reinforcement compensates for a poor subgrade
- Failing to inspect or proof-roll the support system before placement
- Pouring before required inspection or testing is complete
When Should You Hire a Geotechnical Engineer?
| Issue | Typically Responsible Party |
|---|---|
| Basic DIY grading and compaction on a small residential project | Contractor or homeowner |
| Field density testing and verification | Testing agency or qualified technician |
| Suspected problem soil (expansive, organic, uncontrolled fill) | Geotechnical professional |
| Structural slab design and reinforcement | Structural engineer |
| Code compliance approval | Local building department |
Consider a professional geotechnical evaluation when you encounter expansive or otherwise problematic soil, uncontrolled or undocumented fill, evidence of significant existing settlement, a persistently high water table, unusual structural loading, major grade changes, retaining structures near the slab, large structural slabs, or general uncertainty about actual soil conditions. This does not mean every residential patio or small walkway needs a geotechnical engineer. It means that when the signs above are present, or the project’s consequences of failure are significant, professional input is the appropriate next step rather than a DIY judgment call.
How to Prepare Soil for a Concrete Slab FAQs
Can you pour concrete directly on soil?
Sometimes, but only on properly prepared subgrade that is firm, uniform, free of organic material, and adequately compacted. Pouring directly onto untouched topsoil or unprepared loose ground is not appropriate.
Do you need gravel under a concrete slab?
Not always. Whether a base or subbase layer is needed depends on the existing subgrade’s condition, drainage requirements, loading, and project specifications. Some projects place a slab directly on prepared subgrade when that soil is suitable.
How deep should you dig for a concrete slab?
There’s no universal depth. Required excavation depends on the target finished elevation, the specified slab thickness, whether a base or subbase layer is included, and site-specific drainage and frost considerations.
How thick should the gravel base be?
It depends on the subgrade condition, anticipated loading, drainage needs, and applicable code or engineering requirements. There is no single thickness that applies to every project.
How do you compact soil for a slab?
Using equipment suited to the specific soil type, at an appropriate moisture content, placed and compacted in manageable lifts, and verified with density testing when required by the project specification.
What is the best soil for a concrete slab?
Firm, uniform, well-drained soil free of organic material and soft pockets generally performs best. The specific suitability of your existing soil should be assessed on-site rather than assumed from general descriptions.
How do you fix soft soil under a slab?
Typically by excavating the soft material, replacing it with suitable compacted fill in appropriate lifts, and reassessing the area, escalating to professional evaluation if the problem is extensive or recurring.
Can you pour concrete on clay soil?
It depends on the specific clay and its behavior. Some clay soils can be prepared and compacted adequately, while expansive clay that shrinks and swells significantly with moisture changes may require geotechnical evaluation and an engineered response.
Can you pour concrete on wet soil?
Generally not without addressing the moisture first. Saturated soil typically cannot be reliably compacted and may lack adequate support strength until the underlying water condition is resolved.
Should you put plastic under a concrete slab?
A vapor retarder, often a plastic sheet meeting ASTM E1745, is required under certain conditions by codes such as the IRC for conditioned residential slabs, with exceptions for unheated structures and exterior flatwork. Whether it applies to your specific project depends on the applicable code edition, local amendments, and your project’s design.
What goes under a concrete slab?
Typically a prepared, compacted subgrade, and depending on the project, a subbase and/or base layer, and a vapor retarder when required, all beneath the concrete slab itself.
How do you know if the subgrade is ready?
Organic material and debris are removed, the grade matches the planned elevation, no soft or wet spots remain, any required fill has been compacted in lifts, and proof-rolling or other verification (where used) shows uniform support without excessive deflection.
What compaction percentage is required?
There is no single universal percentage. Required compaction is based on laboratory Proctor testing (ASTM D698 or D1557) and specified as a percentage of that maximum density in the project specification or geotechnical recommendation.
Do you need rebar in a concrete slab?
It depends on the project’s loading, use, and design. Reinforcement addresses different concerns than soil preparation and does not substitute for a properly prepared subgrade. See Does Concrete Need Rebar? for a full discussion.
Can a concrete slab settle if the soil is not compacted?
Yes. Uncompacted or poorly compacted soil is one of the most common causes of slab settlement and cracking, since it leaves uneven or inadequate support beneath the concrete.
Ready to Move From Soil to Slab?
Once your subgrade is prepared and verified, calculate your concrete quantity and plan your pour with the Concrete Slab Calculator.
Use the Slab Calculator