How to Create a Broom Finish on Concrete: Timing, Technique and Common Mistakes
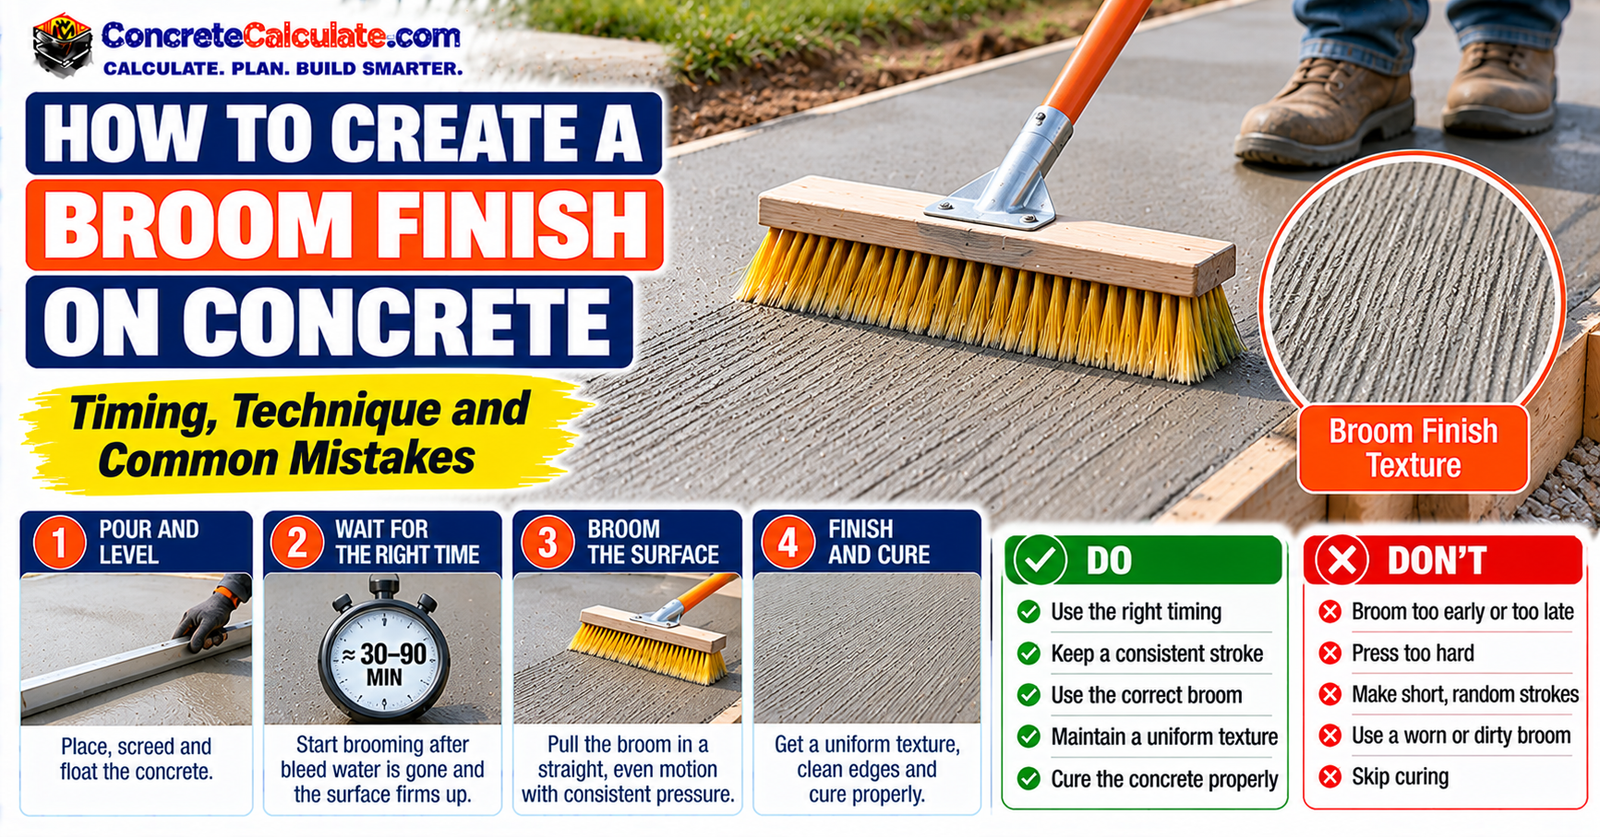
A practical guide to the right timing, tools, pressure and direction for a clean, even broom finish on sidewalks, patios, driveways and other exterior slabs.
Do not broom concrete by the clock. Broom when bleeding has stopped and the surface is firm enough to hold clean grooves but still plastic enough to accept texture.
ACI says finishing should begin after bleeding stops and the concrete has stiffened so the surface does not close upon texturing. That typically coincides with initial set, and finishing must be done before final set.
- Place, strike off and bull float the concrete.
- Edge and joint the slab where required.
- Wait until the bleed water has gone and the sheen is off the surface.
- Test a short broom stroke at an edge.
- Pull the broom in steady, continuous passes with even pressure.
- Rinse the broom between passes and never add water to the slab.
- Start curing as soon as finishing is complete.
A. Understand the finish
- What Is a Broom Finish on Concrete?
- Why Use a Broom Finish?
- Fine vs. Medium vs. Coarse Broom Finish
- What Tools Do You Need?
B. Prepare the surface
- Step 1: Place and Strike Off the Concrete
- Step 2: Bull Float the Surface
- Should You Edge and Joint Before Brooming?
- Should You Trowel Before a Broom Finish?
C. Know when it is ready
- When Should You Broom Concrete?
- How to Tell If Concrete Is Too Wet to Broom
- How to Tell If Concrete Is Too Dry to Broom
- What Affects Broom-Finish Timing?
D. Choose and prepare the broom
- What Type of Concrete Broom Should You Use?
- How Wide Should the Broom Be?
- Should the Broom Be Wet?
- How to Keep Concrete From Building Up on the Broom
E. Create the finish
- How to Broom Concrete Step by Step
- How Much Pressure Should You Apply?
- Which Direction Should You Broom?
- How to Keep Broom Lines Straight and Uniform
F. Edges, joints and large slabs
- How to Broom Around Edges and Corners
- How to Broom Across Tooled Control Joints
- How to Broom a Large Patio or Driveway
G. Avoid common defects
- Why Does My Broom Finish Look Too Rough?
- Why Are the Broom Lines Uneven or Patchy?
- Common Broom-Finish Mistakes
H. Cure and finish
What Is a Broom Finish on Concrete?
A broom finish is a textured surface made by dragging a purpose-made broom across plastic concrete. The bristles leave fine parallel grooves, called striations, that give the surface grip.
It is one of the most common finishes on exterior flatwork. You will see it on sidewalks, driveways, patios, ramps and other outdoor slabs where a smooth, slick surface would be a problem.
Brooming is a texturing step, not the whole finishing process. It comes after the concrete is placed, struck off and floated, and after the bleed water has gone.
The workflow is: place, strike off, float, wait, texture, then cure. Skipping the waiting step is where most broom finish problems begin.
Why Use a Broom Finish?
Texture matters for safety. ACI notes that surface finish and texture provide aesthetics and safety, and that on traveled surfaces texture supplies skid resistance and friction (ACI technical FAQ).
- Better traction than a smooth, steel-troweled surface
- Less slipperiness when wet
- A simple finish that is applied right in the field
- A uniform look across a slab
- A good match for common exterior flatwork
NRMCA also says exterior slabs must be sloped to drain water and have a texture that will not be slippery when wet. It adds that excessive finishing should be avoided (NRMCA CIP 14).
Table 1 compares a broom finish with other common surface finishes.
| Finish | Texture | Traction | Typical use |
|---|---|---|---|
| Broom | Linear grooves | Good | Exterior flatwork |
| Float | Matte, lightly textured | Moderate | Base finish or intermediate step |
| Steel trowel | Smooth and dense | Lower when wet | Interior floors |
| Exposed aggregate | Aggregate texture | High, depending on finish | Decorative exterior |
| Swirl | Circular decorative texture | Moderate to high | Walkways and patios |
Fine vs. Medium vs. Coarse Broom Finish
The three broom finishes differ by bristle stiffness, pressure and timing. PCA describes stiff-bristle brooms on newly floated concrete as producing coarse textures, and soft-bristle brooms on floated or steel-troweled surfaces as producing medium to fine textures (PCA).
ACI 302.1R makes a related distinction: for a fine broom, broom a freshly troweled surface, and for a coarse broom, broom after floating (ACI Concrete International).
| Finish | Broom tendency | Pressure | Surface character | Typical application |
|---|---|---|---|---|
| Fine | Softer, finer bristles | Light | Fine texture | Decorative pedestrian flatwork |
| Medium | Medium bristles | Moderate | Balanced texture | Sidewalks and patios |
| Coarse | Stiff bristles | Greater, but controlled | Pronounced grooves | Higher-traction exterior surfaces |
Do not copy a groove depth from a highway document. FHWA reports broom texture depths of roughly 1/16 to 1/8 in. (1.5 to 3 mm) for pavements, and an ACI parking lot specification uses the same range.
That range shows how shallow the grooves are. It is not a requirement for your patio (FHWA).
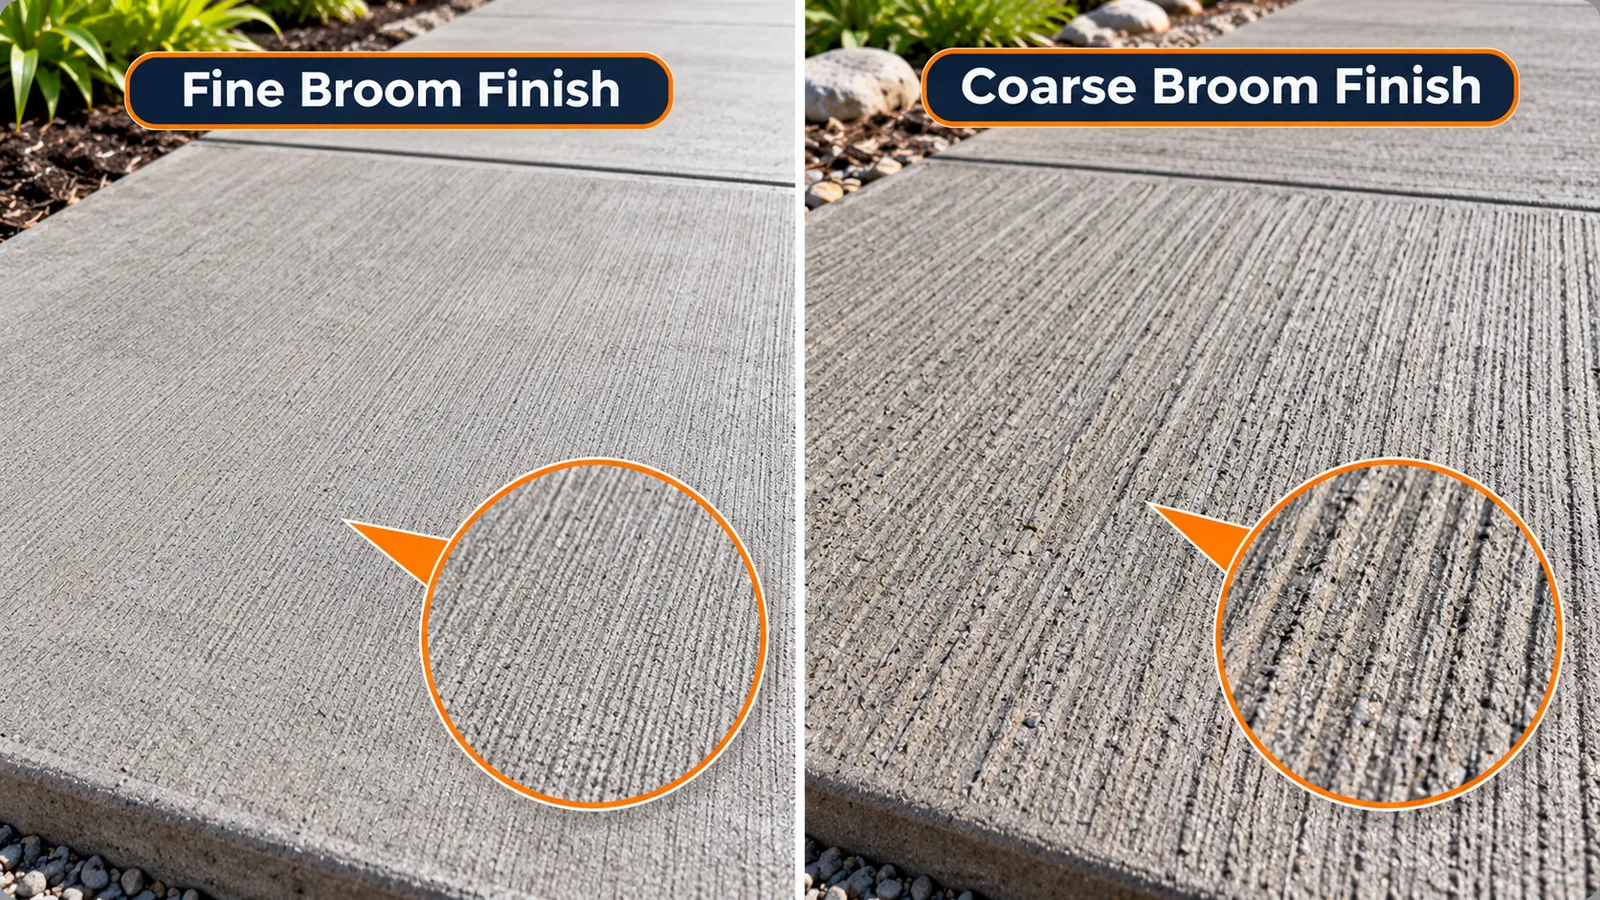
Broom texture becomes more pronounced as bristle stiffness, pressure and timing change.
What Tools Do You Need?
Gather everything before the truck arrives. Once concrete is placed, the finishing window will not wait for you to find a tool.
- A purpose-made concrete broom, with a handle or extension handle
- A bull float for the first leveling pass
- A hand float for edges and small areas
- An edger and, where specified, a jointing tool or groover
- A steel trowel or fresno only if the finish system calls for it
- A bucket or hose for rinsing the broom, set up away from the slab
- Kneeboards, if you must reach into the slab
- Curing materials, such as curing compound or coverings
Wear waterproof gloves, long sleeves and boots. Fresh concrete can cause chemical burns, and NRMCA advises keeping it off skin and eyes.
Step 1: Place and Strike Off the Concrete
Place concrete as close to its final position as you can, consolidate it as required, and strike it off to the form or screed elevation. Avoid overworking the surface.
A broom only changes texture. It cannot fix a slab that was poorly struck off, so get the grade and thickness right first. The sidewalk forms guide covers how to set that up before the pour.
Step 2: Bull Float the Surface
Bull floating follows strike-off promptly. NRMCA says it should be done before bleed water appears, and that it embeds large aggregate, smooths the surface and evens out high and low spots (CIP 14).
Keep the bull float as flat as possible. Tilting it can seal the surface too early and trap water below.
Should You Edge and Joint Before Brooming?
Usually yes. Edge the slab when required, and tool contraction joints where the plan calls for them, then broom each panel consistently.
The sequence can vary with the joint type. Tooled joints are cut in the plastic concrete, saw-cut joints are cut after hardening, and formed joints are set in place before finishing.
NRMCA says the blade of a jointing tool should be at least one quarter of the slab depth, and a shallow groover is for decorative grooves only. See concrete control joints for spacing and depth.
Should You Trowel Before a Broom Finish?
It depends on the finish you want. A coarse broom generally follows floating, while a fine broom can follow a freshly troweled surface.
For ordinary exterior flatwork, a floated surface followed by brooming is the common approach. Some project specifications allow a light troweling first, so check yours.
Air-entrained concrete needs caution. NRMCA says it bleeds more slowly, so premature troweling can cause delamination and blisters, and it advises avoiding steel troweling of air-entrained exterior concrete (CIP 14).
When Should You Broom Concrete?
Broom when bleeding has stopped and the surface has stiffened enough that texture does not close back over. ACI says this typically coincides with initial set, and finishing must be done before final set (ACI FAQ).
- The bleed water has risen and disappeared.
- The surface has stiffened and the water sheen is gone.
- A test stroke leaves open grooves that stay open.
- The concrete is still plastic enough to accept texture.
Do not broom by the clock. The same mix can be ready in a short time on a hot, windy day and take much longer in cool, humid weather.
Broom finish should be applied after bleeding stops but while the concrete remains plastic enough to receive a clean texture.
NRMCA gives one practical check. It estimates set for final finishing when a footprint on the slab is about 1/8 to 1/4 in. (3 to 6 mm) deep (CIP 14).
Confirm readiness with a test stroke on a spot at the slab edge or a hidden corner. If the grooves hold and the paste does not tear, you are in the window.
How to Tell If Concrete Is Too Wet to Broom
Brooming too early drags water and paste to the surface. The signs are easy to spot:
- A water sheen is still visible.
- The broom tears slurry instead of scoring grooves.
- Paste piles up in front of the bristles.
- The grooves collapse behind the broom.
- Aggregate rolls under the surface.
- Deep ridges form with very little pressure.
NRMCA warns that finishing while the concrete is still bleeding, or with water on the surface, leads to dusting, scaling, crazing, delamination and blisters. In dry, windy weather the surface can look dry while bleeding continues underneath (NRMCA CIP 2).
Wait, and check again. NRMCA suggests covering a small portion of the slab to check whether it is still bleeding.
How to Tell If Concrete Is Too Dry to Broom
Brooming too late tears or skips the surface instead of texturing it. Watch for these signs:
- The broom barely marks the surface.
- The surface flakes or tears.
- You need heavy pressure to leave any texture.
- The grooves are broken or discontinuous.
- The broom skips across the slab.
Do not spray or sprinkle water to bring the surface back. NRMCA says never to sprinkle water or cement on concrete to ease finishing, because it causes dusting or scaling.
If the concrete is drying faster than it is setting, the fix is evaporation control from the start, not finishing water. NRMCA recommends fog sprays or evaporation retardants in dry, windy conditions, and the hot weather concrete guide covers more.
| Surface condition | Broom now? | Reason |
|---|---|---|
| Visible bleed water | No | Finishing too early |
| Sheen just gone, but surface very soft | Usually wait | Texture may tear or close |
| Surface plastic and grooves stay open | Often appropriate | Proper texturing window |
| Broom needs heavy force | Too late or nearly | Surface is stiffening |
| Crusted on top, soft underneath | Caution | Wind or sun can create false dryness |
What Affects Broom-Finish Timing?
Many conditions move the finishing window earlier or later. This is why no fixed number of minutes works on every job.
| Condition | Likely effect on timing |
|---|---|
| Hot concrete or weather | Faster setting |
| Wind | Faster surface drying |
| Low humidity | Faster evaporation |
| Cool weather | Slower setting |
| Retarding admixture | May delay the finishing window |
| Accelerator | May shorten the finishing window |
| Dry, absorptive base | Can alter moisture loss |
| Large slab or long placement | Different areas may be ready at different times |
Sun, slab thickness and the finishing sequence also play a part. The ACI guide for slab construction calls the timing of finishing, jointing and curing critical to surface quality.
What Type of Concrete Broom Should You Use?
Choose the broom for the texture you want and the specification you follow. Bristle stiffness is the main variable.
- Soft bristles: fine to medium texture on floated or troweled surfaces.
- Medium bristles: a balanced texture for general sidewalks and patios.
- Stiff bristles: a coarser, more pronounced texture on newly floated concrete.
- Horsehair or synthetic: both materials are used, and the choice often comes down to the texture and the specification.
Use a broom made for concrete. Ordinary household brooms are not built for the job and tend to leave an uneven texture.
How Wide Should the Broom Be?
Match the broom to the slab. A narrow broom suits small pads and tight spots, while a wider broom suits sidewalks and patios and covers more area per pass.
Add an extension handle for reach, but do not go too wide. A very wide broom is harder to keep level and to pull with even pressure.
Should the Broom Be Wet?
A damp broom is normal, a dripping one is not. PCA describes pulling damp brooms across freshly floated or troweled surfaces and rinsing the broom after each pass (PCA).
Rinse the broom, then shake or tap off the excess water before the next pass. Do this away from the slab so no water drips onto the surface.
Some project specifications say not to dampen the broom at all. If you have a specification, follow it.
How to Keep Concrete From Building Up on the Broom
- Rinse the broom after each pass, or as often as paste collects.
- Tap or shake off excess water before the next pass.
- Keep the bristles straight and even.
- Replace a broom head that is curled, bent or worn.
A clogged broom smears paste instead of scoring clean lines. Cleaning it is faster than repairing a patch of torn surface.
How to Broom Concrete Step by Step
Once the surface passes the readiness check, work in one steady rhythm. These seven moves cover each pass.
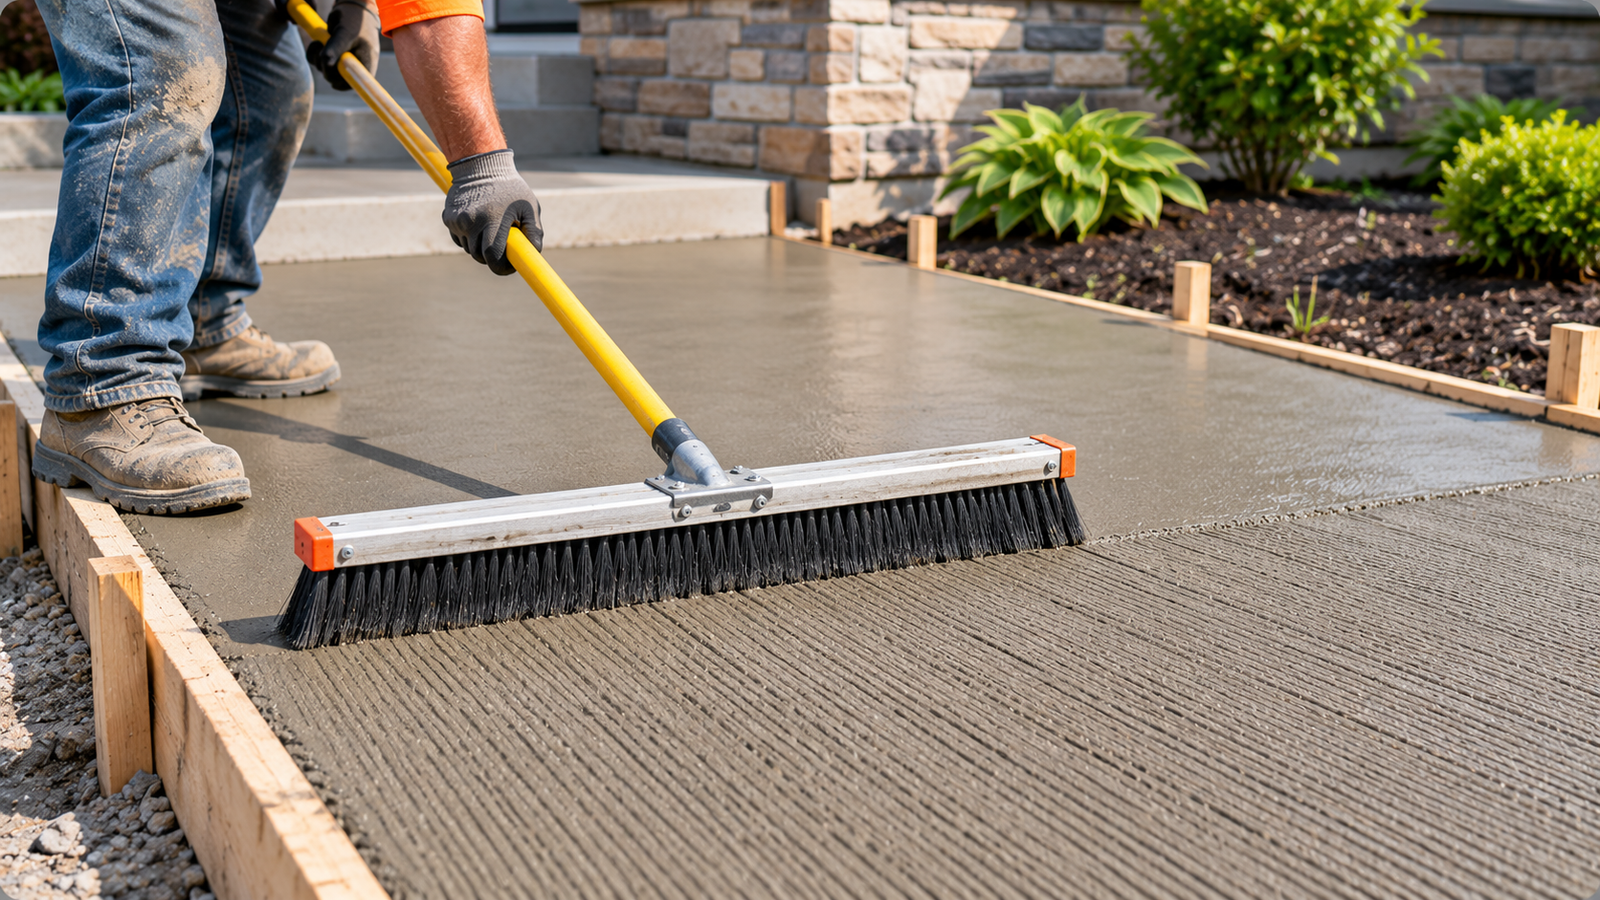
Start from the far side of the slab
Begin at the edge farthest from you and pull toward yourself. That way you never walk on the texture you just made.
Set the broom gently onto the surface
Lower the broom flat, with the bristles meeting the concrete evenly. Do not drop it or press it in.
Pull in one continuous controlled pass
Draw the broom toward you in a steady motion from one edge to the other. Do not stop in the middle of the slab, because a pause leaves a visible mark.
Maintain consistent pressure
Use the same light pressure through the whole pass. Pressure should create the texture without tearing the paste.
Lift the broom cleanly at the edge
Lift straight up at the end of the pass so the bristles do not drag a hook-shaped mark across the finished texture.
Clean the broom before the next pass
Rinse and shake the broom, as described above, then return to the far edge for the next pass.
Overlap or align adjacent passes consistently
Keep each pass aligned with the last one so the grooves stay parallel. Avoid re-brooming areas that have already begun to harden, because that tears the surface.
How Much Pressure Should You Apply?
Use just enough pressure to create the texture you intend. Too little leaves faint or uneven marks, and too much tears the paste and builds deep ridges.
FHWA lists down pressure along with bristle stiffness, mix design, timing and finishing conditions as factors that affect broom texture depth (FHWA). Timing and pressure work together, so a softer surface needs lighter pressure.
If you cannot get a clean texture without bearing down, you are probably too late. Stop and reassess rather than forcing it.
Which Direction Should You Broom?
Direction can be transverse, longitudinal or decorative, and FHWA recognizes both longitudinal and transverse broom texture. One ACI specification for parking lots calls for brooming perpendicular to the nearest edge, with every area of a panel brushed in the same direction (ACI).
That is a specification for a particular use, not a universal code. For a home sidewalk or patio, direction should follow the project specification, the traction you want, the layout and the look.
On sidewalks, a consistent direction from panel to panel usually looks best.
How to Keep Broom Lines Straight and Uniform
- Work from a straight slab edge or a straight reference.
- Hold the handle at the same angle on every pass.
- Use a continuous motion and avoid stopping partway.
- Keep the bristles parallel or perpendicular to the intended line.
- Reset your position before each pass instead of reaching.
Consistency matters more than perfection. A steady rhythm with matched pressure looks better than a few perfect passes mixed with rushed ones.
Uniform broom finishes come from continuous passes with consistent pressure and a clean broom head.
How to Broom Around Edges and Corners
Take care not to crush the freshly edged radius. Start and stop cleanly so the texture runs right up to the edge without damaging it.
Use a smaller hand broom in tight corners and near obstructions, and match its texture to the main broom as closely as you can. Texture should look continuous across the slab.
How to Broom Across Tooled Control Joints
Where the sequence calls for it, tool the joint first and then broom across it. Make sure the broom does not push paste back into the groove.
Clean the joint edges after brooming only if you need to, and avoid reworking the surface to do it. The goal is a clean groove with texture on both sides.
How to Broom a Large Patio or Driveway
Large placements are about logistics. Plan the finishing sequence so you never trap yourself in the middle of a slab you cannot reach.
- Work panel by panel in a planned order.
- Use a long-handled broom to reduce the need to step on the slab.
- Coordinate several finishers so the whole slab reaches the same stage together.
- Keep the crew, tools and rinse station organized before the first load.
A small test patch is easy to broom, but an ACI Concrete International article notes that a small sample is not representative of a large placement.
A big slab is much harder to finish uniformly, so do not assume a DIY crew can handle a large pour alone.
For the broader process, see how to pour a concrete driveway and how to pour a concrete slab.
Why Does My Broom Finish Look Too Rough?
A rough, torn finish usually traces back to a handful of causes:
- The concrete was too wet when brooming started.
- The broom was too stiff for the surface.
- Too much pressure was applied.
- Too many passes were made over the same area.
- The surface had a weak, paste-rich layer.
A weak surface may later show dusting or scaling. NRMCA links scaling in some cases to early use of a steel trowel, over-finishing or finishing with bleed water present, so read about concrete dusting and concrete scaling if you see powdery or flaking areas.
Why Are the Broom Lines Uneven or Patchy?
Uneven lines come from inconsistency, in timing, pressure or technique. Common causes include:
- Different parts of the slab were brushed at different stages of set.
- The broom was dirty or clogged with paste.
- Pressure varied from pass to pass.
- Passes overlapped in an irregular way.
- The surface dried unevenly because of sun, wind or shade.
Working in a planned order, with a clean broom and steady pressure, solves most of these. Keep an eye on sun and wind, since they can leave one side of a slab ahead of the other.
Common Broom-Finish Mistakes
- Brooming over bleed water
- Waiting too long
- Adding water to the surface
- Over-troweling before brooming
- Using a dirty broom
- Applying too much pressure
- Making multiple random passes
- Ignoring curing
| Problem | Likely cause | Better practice |
|---|---|---|
| Deep torn ridges | Too wet or too much pressure | Wait longer and use a lighter pass |
| Barely visible texture | Too late or a broom that is too soft | Broom earlier with the correct broom |
| Crooked lines | Inconsistent pull path | Use a straight reference |
| Paste balls on the surface | Dirty broom | Clean between passes |
| Weak, dusty finish | Overworking or added water | Avoid added surface water |
| Uneven appearance | Different timing or pressure | Work systematically |
| Smooth spots | Missed passes | Maintain a panel-by-panel sequence |
How to Cure Concrete After Broom Finishing
Finishing is not complete until curing begins. NRMCA says to cure concrete as soon as all finishing is completed, because curing is essential to reach the required strength and durability (CIP 14).
For exterior slabs, NRMCA lists pigmented liquid membrane curing compound, or wet burlap covered with plastic sheets, as ways to cure (CIP 2). Proper curing means keeping the concrete at adequate temperature and moisture.
Do not place coverings too early. A sheet or burlap laid on a surface that is still soft can mar the texture you just made.
For timing and temperature, see the concrete curing and drying time guide, the Concrete Curing Time Chart and the Concrete Curing Temperature Chart. Estimate curing compound with the Curing Compound Calculator.
Run through Table 6 before the first broom stroke.
| Check | Ready? |
|---|---|
| Concrete struck off correctly | ☐ |
| Bull floating complete | ☐ |
| Edges and joints handled | ☐ |
| No bleed water present | ☐ |
| Surface still plastic | ☐ |
| Correct broom selected | ☐ |
| Broom clean and excess water removed | ☐ |
| Direction established | ☐ |
| Consistent pressure maintained | ☐ |
| No finishing water added | ☐ |
| Curing plan ready | ☐ |
Broom Finish Concrete FAQs
How long after pouring should I broom concrete?
There is no fixed time. Broom after the bleed water is gone and the surface has stiffened enough that the grooves stay open, but while it is still plastic. ACI says this typically coincides with initial set, and the timing depends on weather, concrete temperature and the mixture.
Can you broom concrete too early?
Yes. Brooming while bleed water is present can tear paste, trap water at the surface and lead to dusting, scaling or blisters. Wait until the water sheen has gone and a test stroke leaves clean, open grooves.
Can you broom concrete too late?
Yes. If the surface has stiffened too far, the broom barely marks it, skips or tears the surface and you need heavy pressure. Do not add water to compensate.
Should I wet the broom?
A damp broom is normal, but it should not drip. Rinse it after each pass and shake or tap off the excess water before the next pass. Some project specifications say not to dampen the broom, so follow the specification if there is one.
Should I trowel before brooming?
It depends on the finish. A coarse broom generally follows floating, and a fine broom can follow a freshly troweled surface. For air-entrained exterior concrete, avoid over-troweling.
What broom is best for concrete?
Choose a purpose-made concrete broom. Stiff bristles give a coarser texture, and softer bristles give a medium to fine texture. Match the broom to the texture you want and to the project specification.
Which direction should broom lines run?
It depends on the project specification, the traction you want and the layout. Some specifications call for brooming perpendicular to the nearest edge with every area of a panel brushed the same way. There is no single rule for every slab.
How deep should broom marks be?
Shallow. FHWA reports broom texture depths of roughly 1/16 to 1/8 in. (1.5 to 3 mm) for pavements, but that is pavement guidance, not a requirement for residential slabs. Depth depends on bristle stiffness, pressure, timing and the mix.
Can you fix a bad broom finish?
Only while the concrete is still plastic. Once it has hardened, a broom cannot redo the texture, and options such as grinding or a bonded resurfacing depend on the condition of the surface. Get advice for serious defects such as dusting or scaling.
Does broom finish make concrete less slippery?
Generally yes. Texture provides skid resistance and friction on traveled surfaces, and broom grooves give more grip than a smooth troweled surface, especially when wet. Actual slip resistance depends on the texture, wear and conditions.
Conclusion
A good broom finish depends on timing, not the clock. Wait until bleeding has stopped and the surface holds clean grooves, keep the broom clean, use steady pressure, and cure right away.
Work out your slab quantity before you order concrete.
Open the Concrete Slab Calculator