How to Seal Concrete in 2026 – A Complete Application Guide
Choose the right sealer, prepare the surface correctly, apply it with confidence, and know what to do if something goes wrong.
Quick Answer
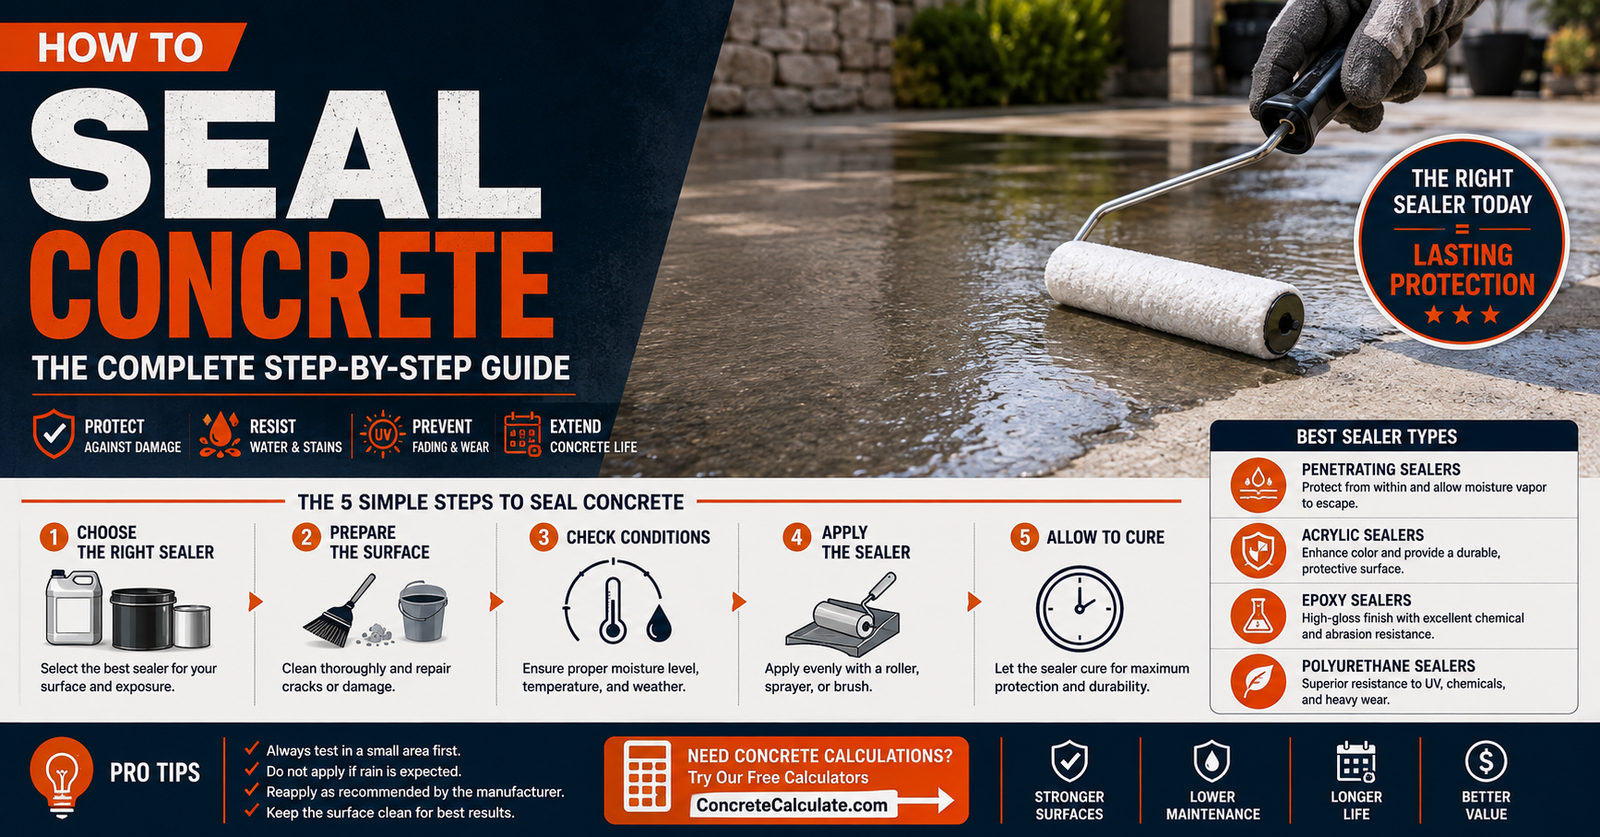
To seal concrete, choose a sealer suited to your surface and exposure, prepare the concrete so it is clean, dry, and free of contamination or failing old sealer, confirm the concrete’s age, moisture level, and weather conditions meet the product’s requirements, then apply the specified number of thin, even coats with a roller or sprayer. Allow the manufacturer’s required drying and curing time before returning the surface to foot or vehicle traffic.
The most important thing to understand up front is this: the correct sealing method depends on the specific sealer product and the concrete surface you’re treating. There is no single universal procedure that applies to every sealer, every slab, and every climate.
In This Guide
- Concrete Sealer Calculator
- What Does Concrete Sealer Do?
- Do You Need to Seal Concrete?
- Concrete Sealing vs. Concrete Curing
- When Should You Seal New Concrete?
- When Can You Seal Old Concrete?
- How to Choose the Right Concrete Sealer
- Penetrating vs. Film-Forming Concrete Sealers
- Types of Concrete Sealers Explained
- Best Concrete Sealer for Different Surfaces
- How to Prepare Concrete for Sealing
- How to Tell if Concrete Is Dry Enough to Seal
- Can You Seal Over Existing Concrete Sealer?
- Tools and Materials for Sealing Concrete
- How to Seal Concrete Step by Step
- How to Apply Concrete Sealer With a Roller
- How to Apply Concrete Sealer With a Sprayer
- Should You Roll or Spray Concrete Sealer?
- How Many Coats of Concrete Sealer Should You Apply?
- How Much Concrete Sealer Do You Need?
- Concrete Sealer Coverage Calculation Example
- How Long Does Concrete Sealer Take to Dry?
- When Can You Walk or Drive on Sealed Concrete?
- How to Seal Different Concrete Surfaces
- Common Concrete Sealer Problems and How to Fix Them
- How to Remove Failed Concrete Sealer
- Concrete Sealing Safety
- Common Concrete Sealing Mistakes
- How to Maintain Sealed Concrete
- How Often Should You Reseal Concrete?
- How Much Does It Cost to Seal Concrete?
- Concrete Sealing FAQs
Concrete Sealer Calculator
Before you buy sealer, figure out how much you actually need. The Concrete Sealer Calculator lets you enter your surface length and width (or total square footage), the product’s coverage rate, and the number of coats required, then returns the gallons or quarts you should plan to purchase.
If you only need the surface area first, the Square Footage Calculator can help you measure irregular areas before moving on to sealer quantity.
What Does Concrete Sealer Do?
Concrete sealer is applied to hardened concrete to reduce water absorption, resist staining, and in many cases improve appearance. Depending on the product type, sealer can help with:
- Water resistance: reducing how much water and moisture the concrete absorbs
- Stain resistance: making it harder for oil, grease, and other contaminants to penetrate the surface
- Surface protection: reducing abrasion and wear on exposed concrete
- Freeze-thaw related exposure: helping manage how much water the surface absorbs in climates where freeze-thaw cycling is a concern
- Appearance: enhancing color, adding sheen, or protecting decorative finishes such as stamped concrete
- Easier maintenance: making the surface simpler to clean
An Important Clarification
Sealer reduces water absorption and can improve resistance to staining and wear, but it does not make concrete waterproof or eliminate every risk of moisture-related damage. No sealer product should be assumed to provide complete, permanent protection under all conditions.
Do You Need to Seal Concrete?
Sealing is not mandatory for every slab, but it is commonly beneficial depending on:
- Exposure: exterior concrete exposed to rain, snow, and deicing chemicals often benefits more than fully sheltered interior concrete
- Climate: freeze-thaw regions and areas with heavy salt use for winter deicing are common reasons homeowners choose to seal
- Desired appearance: decorative and stamped concrete typically benefits from sealing to protect color and texture
- Surface type: garage floors exposed to oil and chemicals often benefit from a higher-performance coating rather than a basic sealer
- Traffic: driveways and heavily used walkways face different wear demands than a rarely used patio
- Contaminants: concrete regularly exposed to oil, grease, or chemicals is a stronger candidate for a protective sealer or coating
Concrete Sealing vs. Concrete Curing
This distinction is essential and frequently misunderstood. Curing and sealing are related processes that serve different purposes and are governed by different ASTM standards.
| Process | Purpose | Relevant Standard |
|---|---|---|
| Curing | Protects fresh concrete from early moisture loss so the cement can hydrate properly and develop strength | ASTM C309 |
| Sealing | Protects already-hardened concrete from environmental exposure and/or changes its appearance | ASTM C1315 (for products with special sealing properties) |
| Cure-and-seal | A single product designed to perform both functions, subject to its specific requirements | ASTM C1315 |
ASTM C309 covers liquid membrane-forming compounds suitable for application to fresh concrete to reduce water loss during the early-hardening period. ASTM C1315 covers membrane-forming liquids with additional special properties, such as improved adhesion, UV resistance, and resistance to degradation, suitable for use as curing compounds on fresh concrete and as sealers on hardened concrete. In practice, this means not every “sealer” is designed to also function as a curing compound, and not every curing compound is intended to serve as a long-term hardened-concrete sealer. Check the specific product’s technical data sheet to see which function, or functions, it is actually designed and tested for. For background on the early-age process itself, see the Concrete Curing and Drying Time Guide.
When Should You Seal New Concrete?
There is no single number of days that applies to every sealer on new concrete. The right timing depends on the specific product:
- Conventional sealers: many are designed to be applied after the concrete has substantially cured, commonly discussed as an approximate 28-day guideline for many products, though this is a general reference point rather than a fixed rule for every sealer
- Cure-and-seal products: some are specifically designed for earlier application on new concrete, since they are formulated to also perform the curing function; follow that product’s specific instructions rather than assuming a 28-day wait applies
- Surface moisture: regardless of age, the surface generally needs to be free of visible moisture sheen before most sealers are applied
There Is No Universal Waiting Period
Do not assume every sealer requires exactly 28 days on new concrete. Some cure-and-seal products are designed for much earlier application, while some conventional film-forming sealers may require longer. The manufacturer’s technical data sheet, not a general rule of thumb, determines the correct timing for the specific product you’re using.
When Can You Seal Old Concrete?
Existing, previously placed concrete can generally be sealed once you have confirmed a few conditions:
- The surface is clean and free of oil, grease, dirt, and other contamination
- The concrete is sufficiently dry for the specific product being applied
- The surface condition is sound, without extensive deterioration that would need repair first
- Any existing sealer is either compatible with the new product or has been properly removed
The real question with older concrete is rarely its calendar age. It is almost always about cleanliness, dryness, surface condition, and compatibility with whatever coating may already be present.
How to Choose the Right Concrete Sealer
Work through this sequence rather than picking a product based on price or marketing alone:
Selection Framework
Surface type → exposure conditions → desired appearance → expected traffic → chemical exposure → moisture conditions → product requirements
Working through each factor in order will usually narrow your choice to one or two suitable product categories before you ever compare specific brands.
Penetrating vs. Film-Forming Concrete Sealers
| Factor | Penetrating Sealer | Film-Forming Sealer |
|---|---|---|
| Mechanism | Absorbs into the concrete’s pore structure rather than sitting on top | Forms a continuous visible layer on the surface |
| Appearance | Typically little to no visible sheen or color change | Can add gloss, sheen, or color enhancement |
| Breathability | Generally allows more water vapor to pass through the slab | Can reduce vapor movement depending on the specific product |
| Peeling risk | Low, since there is generally no continuous film to delaminate | Possible if adhesion, moisture, or application conditions are not correct |
| UV exposure | Commonly well suited to sustained outdoor exposure | UV resistance depends heavily on the specific product chemistry |
| Typical applications | Exterior driveways, walkways, and freeze-thaw exposed surfaces | Decorative floors, stamped concrete, and many interior applications |
| Maintenance | Often longer intervals between resealing for many products | Varies by product; wear patterns are usually more visible |
Neither category is universally superior. Penetrating sealers are commonly favored for many outdoor applications where breathability and low visual change matter, while film-forming systems are common where decorative appearance and a more finished look are the priority. The right choice always depends on your specific surface, exposure, and goals.
Types of Concrete Sealers Explained
- Silane: a penetrating sealer known for effective water repellency at the surface level
- Siloxane: a penetrating sealer chemically related to silane, also used primarily for water repellency
- Silicate: a penetrating, chemically reactive treatment that reacts with components in the concrete rather than forming a surface membrane
- Siliconate: another penetrating water-repellent chemistry, sometimes used on vertical or horizontal surfaces
- Acrylic: a widely used film-forming sealer known for enhancing color and adding sheen, common on decorative and stamped concrete
- Epoxy: a durable film-forming coating commonly used on interior floors such as garages, valued for chemical and abrasion resistance
- Polyurethane/urethane: a film-forming coating often valued for UV stability and abrasion resistance, frequently used as a topcoat
- Polyaspartic: a fast-curing film-forming coating system often used where quick return to service is a priority
Each of these categories includes many specific formulations with different performance characteristics. Always confirm the exact product’s data sheet rather than assuming every silane, every acrylic, or every epoxy behaves identically.
Best Concrete Sealer for Different Surfaces
| Surface | Common Sealer Approach | Main Consideration |
|---|---|---|
| Plain exterior slab | Penetrating or suitable acrylic | Weather and moisture exposure |
| Driveway | Penetrating or suitable film-forming product | Deicing salts, vehicle traffic, traction |
| Patio | Penetrating or acrylic | Appearance combined with weather exposure |
| Stamped concrete | Often acrylic or an appropriate decorative sealer | Color enhancement, UV stability, and texture |
| Exposed aggregate | Penetrating or acrylic, depending on desired sheen | Aggregate appearance and slip resistance |
| Garage floor | Coating system such as epoxy or polyurethane | Chemical exposure and abrasion from vehicle traffic |
| Interior decorative floor | Film-forming system | Appearance and foot traffic durability |
| Pool deck | Penetrating or a slip-resistant appropriate system | Traction on a surface that regularly gets wet |
These are common approaches, not universal requirements. The right sealer for your specific project depends on the factors discussed in the selection framework above. Since driveways carry additional considerations around vehicle traffic and deicing exposure, see the dedicated When to Seal a Concrete Driveway guide for timing specifics.
How to Prepare Concrete for Sealing
Surface preparation is arguably more important to a successful result than the sealer product itself. Follow this general sequence:
- Inspect the surface for cracks, spalling, stains, and any existing coating.
- Clean the concrete thoroughly, removing dirt, dust, and loose debris.
- Remove oil, grease, and other stains using an appropriate cleaner, since these contaminants prevent proper sealer adhesion.
- Remove incompatible existing sealer if the surface has a coating that will not bond properly with the new product.
- Repair appropriate surface defects such as significant cracks or spalled areas before sealing over them.
- Allow adequate drying time after cleaning, since sealing over residual moisture is a common cause of hazing and adhesion failure.
- Test compatibility in a small, inconspicuous area before committing to the full surface.
Oil, grease, dirt, and old incompatible sealer are consistently identified as the most common preparation failures that lead to poor sealer performance.
How to Tell if Concrete Is Dry Enough to Seal
Moisture is one of the leading causes of sealer failure, but the exact acceptable moisture level varies by product. General signs to check include:
- Visible moisture: no standing water, dampness, or visible sheen on the surface
- Recent weather: no rain within the timeframe specified by the product, commonly at least 24 hours for many products, but always check the specific label
- Substrate moisture: concrete that was recently cleaned with water should be allowed to dry fully, often 24 to 48 hours depending on conditions, before sealing
- Manufacturer testing requirements: some professional applications call for a moisture test before sealing, particularly for high-performance interior coating systems
There is no single moisture threshold that applies to every sealer. Water-based, solvent-based, penetrating, and film-forming products all have different tolerances for residual moisture, so the product’s technical data sheet is the final authority.
Can You Seal Over Existing Concrete Sealer?
Sometimes, but only when the new product is compatible with what is already on the surface and the existing coating is in suitable condition.
| Existing Sealer Condition | Recommended Approach |
|---|---|
| Same product, in good condition | Often suitable for a maintenance recoat per label instructions |
| Different but compatible product, sound condition | May be suitable after testing a small area first |
| Unknown previous coating | Test a small area before proceeding, or consult the manufacturer |
| Peeling, flaking, or failing coating | Removal is generally necessary before resealing |
| Heavily worn or contaminated coating | Cleaning and possibly stripping before resealing |
When in doubt, test compatibility on a small, inconspicuous section first, or contact the sealer manufacturer directly with details about the existing coating.
Tools and Materials for Sealing Concrete
- The sealer product itself, in the quantity calculated for your surface area and number of coats
- A pump sprayer, if the product and application method call for one
- A roller with a nap appropriate for the product and surface texture
- An extension pole for comfortable, even application on larger areas
- A squeegee, where the product instructions specify one for spreading or back-working the material
- Brushes for edges, corners, and detail work
- Cleaning equipment appropriate for your surface preparation needs
- Personal protective equipment appropriate for the specific product’s safety data sheet
How to Seal Concrete Step by Step
- Inspect the surface for cracks, existing coatings, and overall condition.
- Clean the concrete to remove dirt, dust, oil, grease, and stains.
- Remove or prepare any existing coating that is incompatible, failing, or unknown.
- Allow the surface to dry fully according to the product’s requirements.
- Check the weather and product application conditions, including temperature, humidity, and rain forecast.
- Mask or protect adjacent surfaces, landscaping, and structures from overspray or drips.
- Apply the first coat at the manufacturer’s specified coverage rate.
- Maintain the specified coverage rate throughout, avoiding thick puddled areas.
- Apply a second coat if the product requires one, often in a perpendicular direction to the first.
- Allow the required cure and dry time before permitting any foot or vehicle traffic.
- Inspect the finished surface for even coverage, sheen, and any signs of application problems.
How to Apply Concrete Sealer With a Roller
Rollers work well for many water-based products and for smaller, more controlled applications. Key technique points:
- Confirm the roller nap and material are suitable for the specific sealer, since some solvent-based products require solvent-resistant rollers
- Apply in thin, even coats rather than one heavy pass
- Maintain a wet edge by overlapping each pass slightly with the previous one
- Avoid puddles or thick spots, which can lead to bubbling, hazing, or extended dry time
How to Apply Concrete Sealer With a Sprayer
Sprayers are commonly used for larger areas and for many solvent-based products, and they work particularly well on textured surfaces like stamped concrete. Key technique points:
- Confirm the sprayer and nozzle setup are compatible with the specific product before starting
- Apply in even, overlapping passes to avoid stripes or uneven coverage
- Avoid overspray onto adjacent surfaces, plants, or structures
- Ensure adequate ventilation, especially with solvent-based products
- Back-roll immediately after spraying when the product or surface texture calls for it, which helps work the sealer evenly into textured or stamped concrete and reduces puddling
Should You Roll or Spray Concrete Sealer?
| Factor | Roller | Sprayer |
|---|---|---|
| Small area | Good | Good |
| Large area | Slower | Faster |
| Textured/stamped concrete | Depends on the product | Often useful, especially with back-rolling |
| Solvent-based products | Product-dependent, needs compatible roller | Common approach for many solvent-based products |
| Water-based products | Common approach for many water-based products | Product-dependent |
| Application control | High | High, but requires more experience to avoid overspray |
Not every sealer can be applied with both methods. Always confirm the manufacturer’s approved application methods for the exact product before deciding.
How Many Coats of Concrete Sealer Should You Apply?
Apply the number of coats and the coverage rate specified by the product manufacturer, which is commonly two thin coats for many sealers, but this varies by product. Some systems use a single coat, and some multi-component coating systems use different numbers of layers entirely.
Why Over-Application Is a Real Risk
Applying more coats or thicker coats than specified does not add extra protection. It commonly causes hazing, peeling, bubbling, poor adhesion, reduced breathability, and uneven, blotchy appearance. Thin, even coats applied at the correct number consistently outperform a single heavy application.
How Much Concrete Sealer Do You Need?
Sealer Quantity Formula
Sealer needed = Surface area ÷ Coverage rate
For multiple coats: Total quantity = Quantity for coat 1 + Quantity for coat 2 (+ additional coats as specified)
Coverage rate varies significantly by product, and it also varies with the condition of your specific concrete. Older, more porous concrete typically absorbs more sealer and may require a higher quantity than smooth, dense, or previously sealed concrete. Always use the coverage rate printed on the exact product you’re using rather than a generic industry average.
Concrete Sealer Coverage Calculation Example
Worked Example
Given: A 400 ft² patio, with a sealer rated for 200 ft² per gallon coverage, requiring two coats.
First coat: 400 ÷ 200 = 2 gallons
Second coat: If the manufacturer specifies the same coverage rate for the second coat, this is also 2 gallons.
Total: 2 + 2 = 4 gallons
Important note: If the manufacturer specifies a different coverage rate for the second coat (some products call for a lighter second coat), use that rate instead of assuming it matches the first coat.
How Long Does Concrete Sealer Take to Dry?
Drying and curing happen in stages, and the actual time for each stage varies dramatically by product:
- Dry to touch: the surface is no longer visibly wet or tacky to a light touch
- Recoat time: the window during which a second coat can be applied over the first
- Light foot traffic: when the surface can tolerate careful walking without damaging the film
- Vehicle or heavy traffic: generally requires substantially more time than foot traffic
Timing Varies Enormously by Product
Some acrylic sealers dry quickly, often allowing foot traffic within a day under favorable conditions, while epoxy and urethane systems can require considerably longer, sometimes several days, before reaching full service readiness. Temperature and humidity also significantly affect these timelines. There is no single universal “24-hour rule” that applies to every sealer, so always follow the specific product’s technical data sheet.
When Can You Walk or Drive on Sealed Concrete?
Treat foot traffic, light use, and vehicle traffic as three separate milestones, each with its own required wait time set by the manufacturer:
- Foot traffic: often the earliest milestone, but still governed by the specific product’s stated timeframe
- Light traffic: may require a longer wait than simple foot traffic, particularly for film-forming systems
- Vehicle traffic: generally requires the longest wait, since the sealer needs to reach a more complete cure before it can handle the weight and friction of tires
The manufacturer’s stated return-to-service time is always the controlling figure. For general guidance on concrete readiness separate from sealing, see When Can You Walk on Concrete? and When Can You Drive on Concrete?
How to Seal Different Concrete Surfaces
How to Seal a Concrete Driveway
Driveways face unique demands: repeated vehicle traffic, tire pickup of debris, deicing salt exposure in winter climates, sustained UV exposure, and the need for adequate traction when wet. These factors often shift the sealer selection toward a product designed to handle traffic and chemical exposure rather than a purely decorative sealer. For a complete discussion of driveway sealing timing and frequency, see When to Seal a Concrete Driveway.
How to Seal Stamped Concrete
Stamped concrete sealing is particularly important because the sealer often does double duty: protecting the surface and enhancing the color and texture of the decorative pattern. Spray-and-backroll application is commonly recommended for textured stamped surfaces, since it helps work the sealer evenly into the texture and helps avoid puddling in low spots created by the stamped pattern.
How to Seal a Concrete Patio or Walkway
Patios and walkways generally follow the same core process as other exterior flatwork, but walkways deserve extra attention to traction. A glossy, high-sheen film is not automatically desirable on a surface that regularly gets wet underfoot, since it can become slippery. Consider whether a slip-resistant additive or a lower-sheen product is more appropriate for walkways and pool-adjacent surfaces.
How to Seal a Garage Concrete Floor
Garage floors should not be treated the same as ordinary outdoor concrete. They routinely face oil drips, gasoline exposure, abrasion from tires, hot tire pickup, and various automotive chemicals. Higher-performance coating systems, such as epoxy or polyurethane, are commonly used for garage floors specifically because they hold up better to these interior, high-traffic, chemical-exposure conditions than a basic exterior acrylic sealer.
Common Concrete Sealer Problems and How to Fix Them
| Problem | Likely Causes | First Response |
|---|---|---|
| White or hazy appearance | Trapped moisture, incompatible products, unsuitable application conditions, or excessive thickness | Stop applying further coats and diagnose the cause before proceeding |
| Peeling | Poor adhesion, surface contamination, trapped moisture, or an incompatible previous coating | Determine the condition of the existing coating before deciding whether to strip or patch |
| Bubbles | Excessive thickness, overworking the material, trapped moisture, or application in unsuitable conditions such as direct sun | Assess the extent of bubbling before applying any additional coats |
| Streaks | Uneven application, rapid drying, incorrect coverage rate, or visible applicator marks | Check your coverage rate and application technique before recoating |
| Sticky or tacky surface | Incomplete cure or unsuitable temperature and humidity during application | Follow the product’s specific guidance on extended cure time before further action |
A useful diagnostic for white haze specifically: if you dampen the affected area with a small amount of water and the haze temporarily disappears while wet, then returns as it dries, that pattern points toward trapped moisture beneath the film rather than a permanently degraded coating. This is a helpful clue, not a definitive diagnosis for every situation, so consult the product manufacturer if the problem persists.
How to Remove Failed Concrete Sealer
When a sealer has failed and cannot simply be recoated, removal is typically necessary before resealing:
- Mechanical removal: methods such as grinding or scraping can physically remove a failed coating
- Chemical stripping: solvent-based strippers can dissolve and lift many film-forming sealers, following the stripper manufacturer’s instructions
- Testing: confirm the removal method is appropriate for both the failed coating and the underlying concrete before treating the full surface
- Ventilation: chemical stripping often involves strong solvents that require adequate airflow
- Waste handling: dispose of stripped material and solvent waste according to local regulations
- Compatibility: once removed and cleaned, allow the surface to dry fully before testing and applying a new sealer
Concrete Sealing Safety
Follow the Product’s Safety Data Sheet
ASTM C1315 specifically notes that certain solvents used in some membrane-forming compounds can present serious flammability hazards, and that users are responsible for following applicable health, safety, and regulatory requirements. When sealing concrete:
- Wear gloves and eye protection appropriate to the specific product
- Ensure adequate ventilation, especially with solvent-based sealers
- Use a respirator only if specified by the product’s safety data sheet, and use the cartridge type it specifies
- Keep solvent-based products away from open flames, pilot lights, and other ignition sources
- Review the manufacturer’s SDS before beginning any project
- Follow local environmental regulations for VOC content and disposal
- Keep children and pets away from the work area until the surface is fully cured
- Control overspray to avoid affecting nearby plants, vehicles, or structures
Common Concrete Sealing Mistakes
- Sealing dirty concrete without proper cleaning first
- Sealing damp concrete when the product requires a dry substrate
- Ignoring old, incompatible sealer instead of testing or removing it
- Applying too much product in a single coat
- Applying more coats than the manufacturer specifies
- Ignoring weather conditions such as temperature, humidity, and rain forecast
- Using the wrong sealer category for the surface and its exposure
- Using an applicator not suited to the specific product
- Opening the surface to foot or vehicle traffic before the required cure time has passed
- Failing to test a small area before treating the entire surface
- Ignoring traction concerns on surfaces that get wet, such as walkways and pool decks
- Assuming every sealer requires the same cure time as a different product used previously
How to Maintain Sealed Concrete
- Routine cleaning: regularly remove dirt and debris to prevent buildup that can dull appearance or trap moisture
- Stain removal: address spills promptly, especially oil and chemicals on garage floors
- Inspection: periodically check for wear, dulling, peeling, or other visible changes
- Water behavior: for penetrating sealers designed to repel water, changes in how water sits on the surface can be one useful, though not universal, indicator worth investigating
- Traffic wear: heavily used areas will typically show wear before lightly used areas
- Deicing exposure: in winter climates, salt exposure can accelerate wear on some sealed surfaces
How Often Should You Reseal Concrete?
There is no single universal resealing interval. Frequency depends on:
- The specific sealer type and its expected service life
- Traffic level and use pattern
- Climate and weather exposure
- UV exposure
- Chemical or deicing salt exposure
- The current condition of the existing surface
- The manufacturer’s specific recommendation for that product
As a general pattern, many acrylic sealers require more frequent maintenance coats than some higher-performance penetrating or coating systems, but this varies enough by product and exposure that it should not be treated as a fixed schedule. A reasonable practical check: for a penetrating sealer where water is expected to behave a certain way on the surface, a change in that behavior can be one signal worth investigating, but it should not be treated as the only test for every sealer type, particularly film-forming systems where visible wear or damage to the film is often the more relevant indicator. For driveway-specific resealing guidance, see When to Seal a Concrete Driveway.
How Much Does It Cost to Seal Concrete?
Sealing cost depends on surface size, sealer type, the amount of preparation required, the number of coats, and whether you hire a professional or do it yourself. DIY projects generally involve only material costs, while professional application adds labor and equipment costs on top of materials. Rather than duplicating detailed pricing here, use the Concrete Cost Calculator to estimate costs once you know your project’s scope, and see When to Seal a Concrete Driveway for driveway-specific cost context.
Calculate Your Sealer Quantity Now
Enter your surface dimensions, coverage rate, and number of coats to get an accurate gallons-needed estimate before you shop.
Use the Concrete Sealer CalculatorConcrete Sealing FAQs
How long should concrete cure before sealing?
It depends on the product. Many conventional sealers are commonly applied after a general reference point of around 28 days of curing, but some cure-and-seal products are specifically designed for much earlier application. Always follow the manufacturer’s stated requirement for the exact product.
Can you seal old concrete?
Yes, in most cases. The key requirements are that the surface is clean, sufficiently dry, in sound condition, and either free of incompatible old sealer or that the new product is confirmed compatible with what’s already there.
What is the best sealer for concrete?
There is no single best sealer for every situation. The right choice depends on the surface type, exposure conditions, desired appearance, expected traffic, and chemical exposure, as outlined in the selection framework in this guide.
Is penetrating or film-forming sealer better?
Neither is universally better. Penetrating sealers are often favored for exterior surfaces where breathability and minimal appearance change matter, while film-forming sealers are common for decorative floors and surfaces where enhanced appearance is a priority.
Can you seal concrete that already has sealer?
Sometimes. It depends on whether the new product is compatible with the existing coating and whether that existing coating is in sound condition. Peeling or failing sealer generally needs to be removed first.
How many coats of concrete sealer should you apply?
Apply the number of coats specified by the manufacturer, commonly two thin coats for many products, though this varies. More coats than specified does not add protection and can cause problems like peeling or hazing.
Is it better to roll or spray concrete sealer?
Both can work well depending on the product and project size. Rollers offer high control for smaller areas and many water-based products, while sprayers are often faster for larger areas and useful for textured surfaces, especially combined with back-rolling.
How much concrete sealer do I need?
Divide your surface area by the product’s coverage rate, then multiply by the number of coats required. For example, a 400 ft² area with 200 ft² per gallon coverage and two coats needs approximately 4 gallons.
How long does concrete sealer take to dry?
It varies significantly by product. Some sealers are dry to the touch within hours, while others, particularly epoxy and urethane systems, can take considerably longer to reach full cure. Always check the specific product’s data sheet.
How long before you can drive on sealed concrete?
This depends entirely on the manufacturer’s stated cure time for vehicle traffic, which is typically longer than the time required for foot traffic. Follow the specific product’s instructions rather than a general assumption.
How often should concrete be resealed?
There is no universal interval. It depends on sealer type, traffic, climate, UV and chemical exposure, and the manufacturer’s specific guidance for that product.
Can you seal concrete in cold weather?
Many sealers have a minimum application temperature, commonly cited around 50°F for numerous products, though this varies by product chemistry. Always check the specific product’s technical data sheet rather than assuming a universal minimum temperature.
Can you seal concrete after rain?
Most sealers require the surface to be dry, and many product labels call for no rain in the recent forecast, commonly at least 24 hours, before application. Sealing over damp concrete is a common cause of hazing and adhesion problems.
Why did my concrete sealer turn white?
A white or hazy appearance is commonly caused by trapped moisture, applying the product too thickly, incompatible products, or unsuitable temperature and humidity during application.
Why is my concrete sealer peeling?
Peeling is commonly caused by poor adhesion, surface contamination that was not removed before sealing, trapped moisture, or applying a new sealer over an incompatible existing coating.