Rebar Size Chart 2026: Complete #2 to #18 Diameter, Area & Grade Reference
Rebar Size Chart
Complete #2 to #18 Diameter, Area & Grade Reference
The most complete rebar size reference for contractors, engineers, and estimators — diameter, area, weight, grades, spacing, cover, and lap splice in one place.
 Reviewed by Muhammad Ramzan Babar, PhD Researcher (Plasma Physics) & Calculator Developer — View Profile
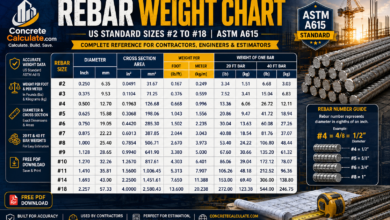
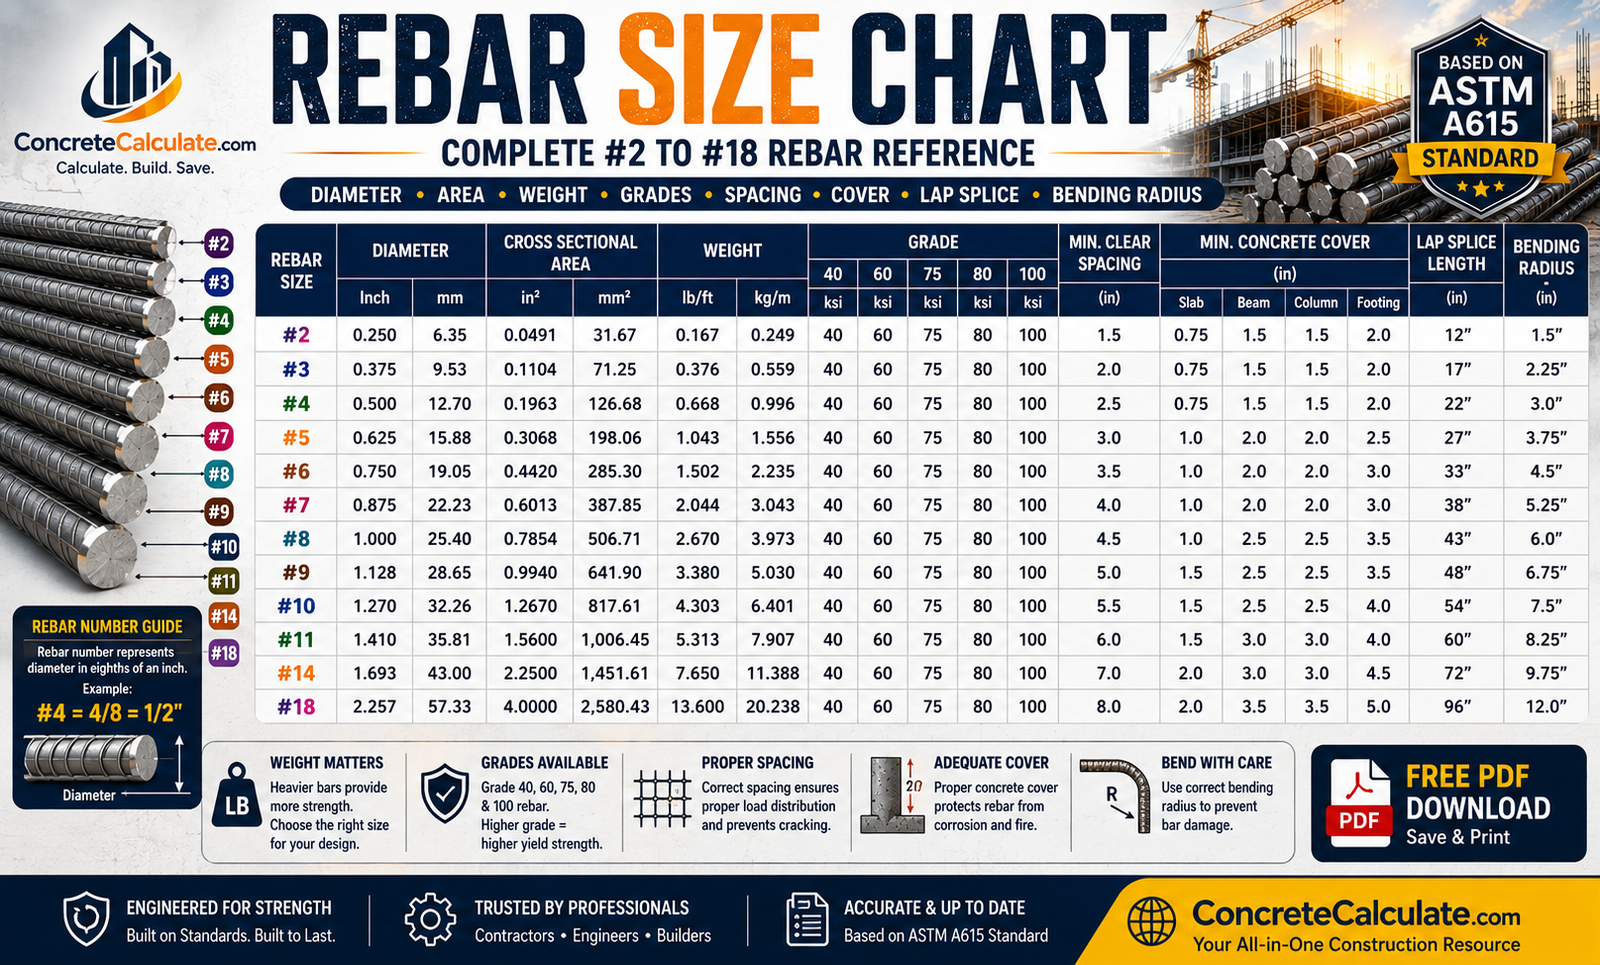
⭐ Master Rebar Size Chart – #2 to #18
Complete diameter, area, weight, and imperial/metric reference for all US standard rebar sizes.
How to Read This Chart
The bar number equals the diameter in eighths of an inch. So #4 = 4/8 = ½ inch. Need exact material quantities? Use our Rebar Calculator.
| Bar Size | Soft Metric | Diameter (in) | Diameter (mm) | Area (in²) | Weight (lb/ft) | Weight (kg/m) |
|---|---|---|---|---|---|---|
| #2 | #6 | 0.250 | 6.35 | 0.05 | 0.167 | 0.249 |
| #3 | #10 | 0.375 | 9.525 | 0.11 | 0.376 | 0.561 |
| #4 | #13 | 0.500 | 12.70 | 0.20 | 0.668 | 0.996 |
| #5 | #16 | 0.625 | 15.875 | 0.31 | 1.043 | 1.556 |
| #6 | #19 | 0.750 | 19.05 | 0.44 | 1.502 | 2.240 |
| #7 | #22 | 0.875 | 22.225 | 0.60 | 2.044 | 3.049 |
| #8 | #25 | 1.000 | 25.40 | 0.79 | 2.670 | 3.982 |
| #9 | #29 | 1.128 | 28.65 | 1.00 | 3.400 | 5.071 |
| #10 | #32 | 1.270 | 32.26 | 1.27 | 4.303 | 6.418 |
| #11 | #36 | 1.410 | 35.81 | 1.56 | 5.313 | 7.924 |
| #14 | #43 | 1.693 | 43.00 | 2.25 | 7.650 | 11.410 |
| #18 | #57 | 2.257 | 57.30 | 4.00 | 13.600 | 20.284 |
★ Highlighted rows (#3–#5) are most common in residential construction. Source: ASTM A615 Standard Specification for Deformed and Plain Carbon-Steel Bars.
Rebar Diameter Chart
Nominal diameter in inches and millimeters for each standard bar size.
| Nominal Size | Diameter (in) | Diameter (mm) |
|---|---|---|
| #2 | 0.250 | 6.35 |
| #3 | 0.375 | 9.53 |
| #4 | 0.500 | 12.70 |
| #5 | 0.625 | 15.88 |
| #6 | 0.750 | 19.05 |
| #7 | 0.875 | 22.23 |
| #8 | 1.000 | 25.40 |
| #9 | 1.128 | 28.65 |
| #10 | 1.270 | 32.26 |
| #11 | 1.410 | 35.81 |
| #14 | 1.693 | 43.00 |
| #18 | 2.257 | 57.30 |
Rebar Cross-Sectional Area Chart
Cross-sectional area in square inches and square millimeters — used for reinforcement ratio calculations.
| Bar Size | Area (in²) | Area (mm²) |
|---|---|---|
| #3 | 0.11 | 71 |
| #4 | 0.20 | 129 |
| #5 | 0.31 | 200 |
| #6 | 0.44 | 284 |
| #7 | 0.60 | 387 |
| #8 | 0.79 | 509 |
| #9 | 1.00 | 645 |
| #10 | 1.27 | 819 |
| #11 | 1.56 | 1,006 |
| #14 | 2.25 | 1,452 |
| #18 | 4.00 | 2,581 |
Rebar Weight Chart
Weight per foot and per meter for each bar size. For 20 ft/40 ft bar totals and bundle weights, see our dedicated Rebar Weight Chart.
| Bar Size | Weight/Ft (lb) | Weight/m (kg) |
|---|---|---|
| #3 | 0.376 | 0.561 |
| #4 | 0.668 | 0.996 |
| #5 | 1.043 | 1.556 |
| #6 | 1.502 | 2.240 |
| #8 | 2.670 | 3.982 |
| #10 | 4.303 | 6.418 |
Rebar Dimensions Chart
Diameter, circumference, radius, and cross-sectional area combined for quick geometric reference.
| Bar Size | Diameter (in) | Radius (in) | Circumference (in) | Area (in²) |
|---|---|---|---|---|
| #3 | 0.375 | 0.1875 | 1.178 | 0.11 |
| #4 | 0.500 | 0.250 | 1.571 | 0.20 |
| #5 | 0.625 | 0.3125 | 1.963 | 0.31 |
| #6 | 0.750 | 0.375 | 2.356 | 0.44 |
| #8 | 1.000 | 0.500 | 3.142 | 0.79 |
| #10 | 1.270 | 0.635 | 3.990 | 1.27 |
US Rebar Size vs Metric Rebar Size Chart
Soft metric sizes are direct conversions of US imperial sizes — no physical change to the bar, only the naming.
| US Bar | Metric Equivalent | Diameter (mm) |
|---|---|---|
| #3 | #10 | 9.5 |
| #4 | #13 | 12.7 |
| #5 | #16 | 15.9 |
| #6 | #19 | 19.1 |
| #7 | #22 | 22.2 |
| #8 | #25 | 25.4 |
| #9 | #29 | 28.7 |
| #10 | #32 | 32.3 |
| #11 | #36 | 35.8 |
| #14 | #43 | 43.0 |
| #18 | #57 | 57.3 |
Rebar Grade Comparison Chart
Yield strength, tensile strength, and typical applications for each ASTM A615/A706 grade.
| Grade | Yield Strength (psi) | Tensile Strength (psi) | Common Applications |
|---|---|---|---|
| Grade 40 | 40,000 | 60,000 | Light residential, older codes, stirrups |
| Grade 60 | 60,000 | 90,000 | US construction standard — slabs, footings, columns |
| Grade 75 | 75,000 | 100,000 | Heavy structural, coils, higher-load applications |
| Grade 80 | 80,000 | 105,000 | High-rise, seismic zones, weldable (A706) |
| Grade 100 | 100,000 | 115,000 (min ratio 1.15×) | High-strength structural, reduced bar congestion |
Source: ASTM A615/A615M (Grades 40, 60, 75, 100) and ASTM A706 (Grade 60, 80 — weldable low-alloy steel).
Standard Rebar Length Chart
Common stock lengths available from US suppliers.
| Length | Typical Availability | Common Use |
|---|---|---|
| 20 ft | Standard stock length | Most residential and commercial work |
| 30 ft | Special order (select suppliers) | Larger spans, reduced splicing |
| 40 ft | Standard stock length | Commercial, large slabs, reduced waste |
| 60 ft | Special order / mill direct | Long-span bridge and industrial work |
| Custom | Cut-to-length service | Precast, prefabricated cages, tight tolerances |
⭐ Rebar Size by Construction Application
Quick-reference table matching bar size to common structural elements.
| Application | Recommended Bar Size |
|---|---|
| Footings | #4–#5 |
| Slabs | #3–#4 |
| Driveways | #3–#4 |
| Sidewalks | #3 |
| Retaining Walls | #4–#6 |
| Beams | #5–#8 |
| Columns | #6–#11 |
| Bridge Decks | #5–#8 |
| High-Rise Buildings | #8–#18 |
Rebar Spacing Guide
Typical center-to-center spacing for common applications — always confirm against structural drawings.
| Application | Typical Spacing (in) |
|---|---|
| Slabs | 12–18 |
| Footings | 12–16 |
| Walls | 12–16 |
| Foundations | 12–18 |
| Driveways | 12–18 |
Plan exact spacing with our Rebar Spacing Calculator.
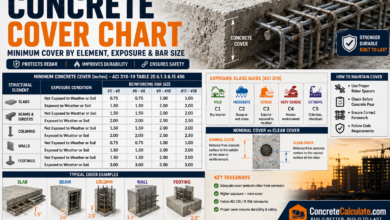
Rebar Cover Requirements Chart
Minimum concrete cover recommendations per ACI 318 exposure category.
| Exposure Condition | Minimum Cover |
|---|---|
| Interior (slabs, walls) | 3/4 in |
| Exterior (exposed to weather) | 1.5–2 in |
| Cast Against Soil | 3 in |
| Marine Environments | 3 in (often more with epoxy coating) |
Per ACI 318 Chapter 20. Always verify against project-specific structural drawings and local building codes.
Rebar Development & Lap Splice Size Chart
Quick reference for Grade 60 Class B tension lap splice lengths at common concrete strengths.
| Bar Size | Lap Splice @ 3,000 PSI | Lap Splice @ 4,000 PSI | Lap Splice @ 5,000 PSI |
|---|---|---|---|
| #3 | 22″ | 19″ | 17″ |
| #4 | 29″ | 25″ | 23″ |
| #5 | 36″ | 31″ | 28″ |
| #6 | 43″ | 37″ | 34″ |
| #7 | 63″ | 54″ | 49″ |
| #8 | 72″ | 62″ | 56″ |
Need More Detail?
Class B lap splice = 1.3 × development length (ACI 318 25.5.2), Grade 60, uncoated, normal-weight, “other than top” bars. For top bars, epoxy coating, or other grades, see our dedicated Rebar Lap Splice Chart for full modification factors.
Rebar Bending Radius Chart
Minimum inside bend diameter per ACI 318 for main reinforcing bars (without hooks).
| Bar Size | ACI 318 Rule | Min. Bend Diameter (approx) |
|---|---|---|
| #3–#8 | 6 × db | 1.5″–6″ |
| #9–#11 | 8 × db | 9″–11.3″ |
| #14 | 10 × db | 16.9″ |
| #18 | 10 × db | 22.6″ |
Stirrups/ties use a smaller 4×db minimum. Values shown are for main bars bent without hooks, per ACI 318.
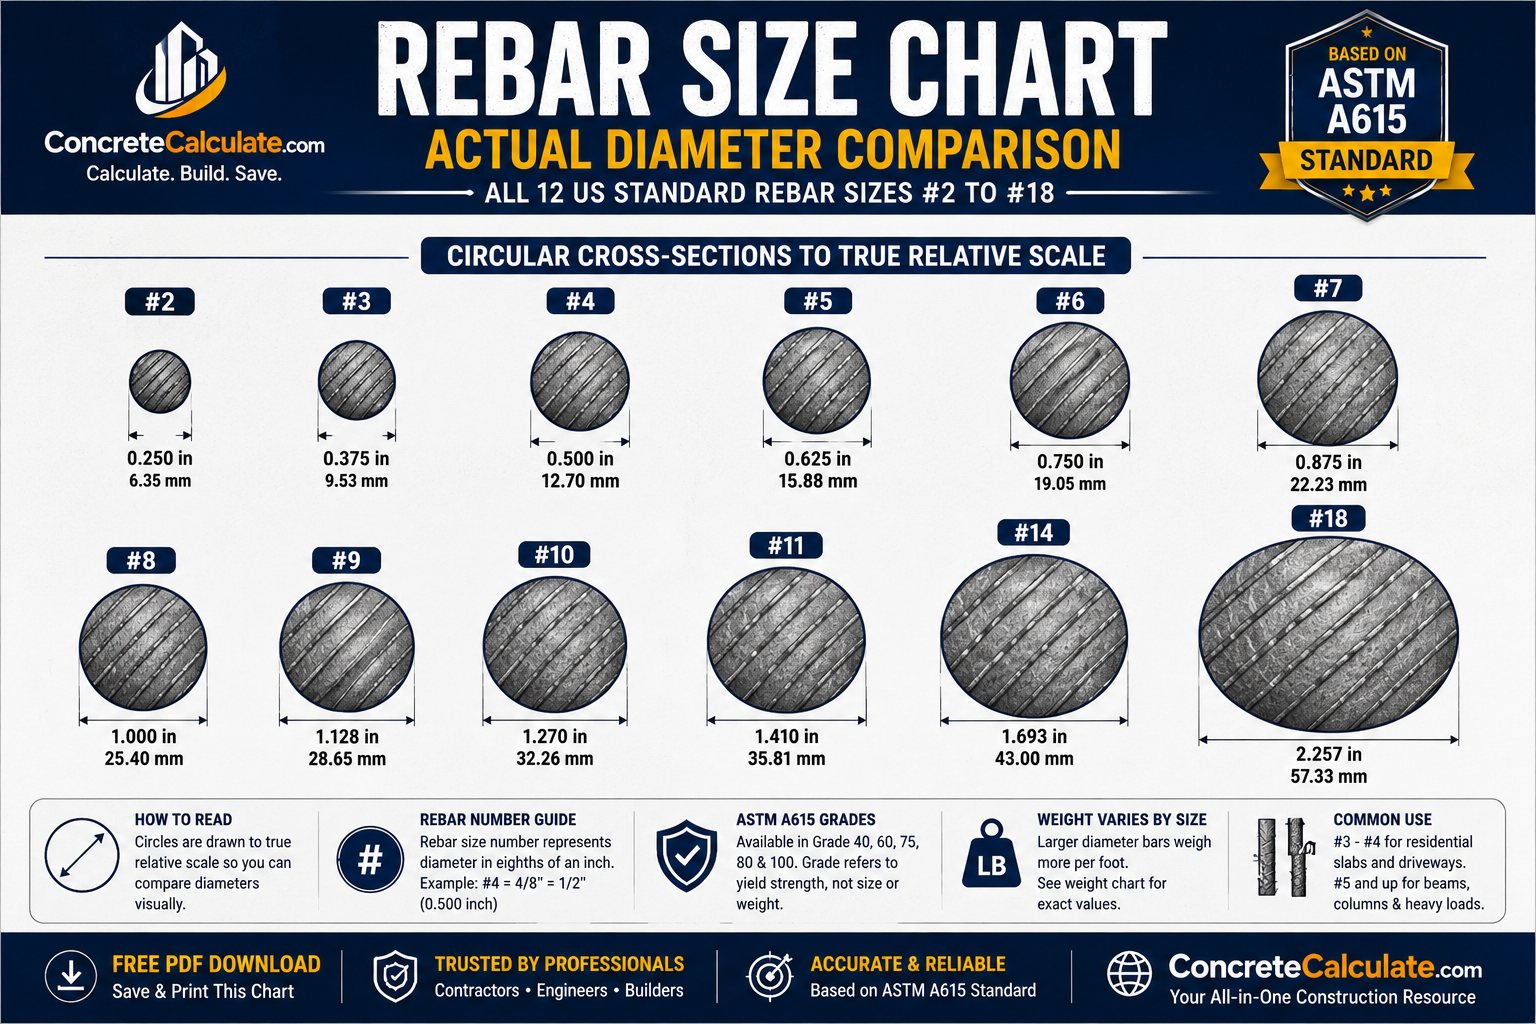
⭐ Visual Rebar Size Comparison Chart
Relative diameter comparison across all standard bar sizes, at a glance.
Common Residential Rebar Sizes
Most frequently specified bar sizes for home construction projects.
| Application | Common Bar Size |
|---|---|
| Patios | #3 |
| Sidewalks | #3 |
| Driveways | #3–#4 |
| Garage Floors | #3–#4 |
| Foundations | #4–#5 |
| Pool Decks | #3–#4 |
Common Commercial Rebar Sizes
Typical bar sizes used in commercial and industrial structures.
| Application | Common Bar Size |
|---|---|
| Warehouses | #4–#6 |
| Bridges | #5–#8 |
| High-Rise Buildings | #8–#18 |
| Industrial Slabs | #4–#6 |
| Parking Structures | #5–#7 |
Rebar Size Selection Guide
Decision table for choosing the right bar size for your project.
| Project | Recommended Bar Size | Reason |
|---|---|---|
| Backyard patio | #3 | Light foot traffic, minimal load |
| Standard driveway | #4 | Balances cost with vehicle load capacity |
| House footing | #4–#5 | Supports foundation load per soil bearing capacity |
| Retaining wall (under 4 ft) | #4–#5 | Resists lateral soil pressure |
| Suspended slab/beam | #6–#8 | Handles tension and bending loads |
| High-rise column | #10–#18 | Maximum load capacity with reduced bar count |
Contractor Worked Examples
Real-world rebar sizing decisions for common job scenarios.
House Footing — Selecting Bar Size
Driveway Slab — Bar Size and Spacing
Retaining Wall — Vertical Reinforcement
Suspended Slab — Beam Reinforcement
Column Reinforcement — High-Rise
Frequently Asked Questions
📥 Download Rebar Size Chart PDF
Use your browser’s print function to instantly save this page as a PDF. This avoids broken file links and gives you an always up-to-date printable version for jobsite binders, estimating folders, and contractor reference kits.