How to Repair Large Cracks in a Concrete Driveway (Step by Step 2026)
A large crack in your concrete driveway is not just cosmetic – open cracks let water in, and water is what turns a $75 repair into a $7,500 replacement. The good news: most wide and deep concrete driveway cracks are a straightforward DIY repair for under $100 in materials. The catch is that most homeowners fill them wrong – using the wrong product, skipping prep, or sealing over the crack without fixing it first. This guide covers exactly how to repair large cracks in a concrete driveway the right way, from crack assessment through final sealing.
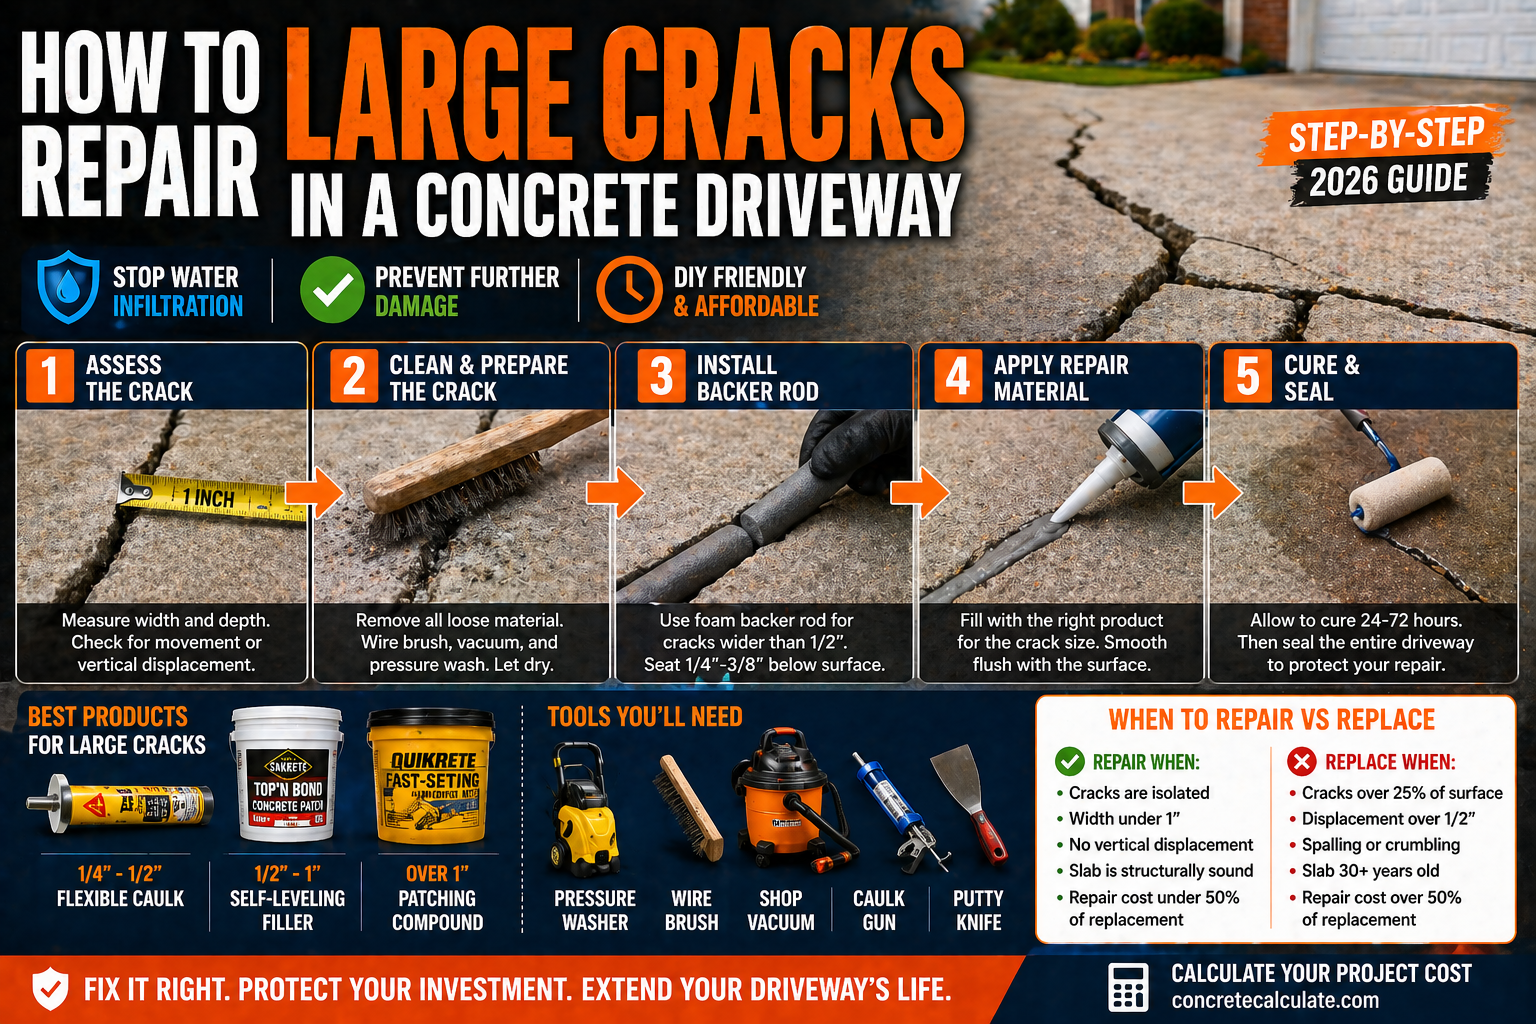
Step 1 – Assess the Crack Before Buying Anything
Not every large-looking crack needs the same repair. Buying the wrong product and starting work is the most common mistake homeowners make. Spend five minutes assessing the crack first and you will save hours of wasted effort.
Measure the crack at its widest point and estimate its depth. Use a screwdriver to probe how deep it goes. Then check for vertical displacement – place a straight edge across the crack and see if one side is higher than the other. This single check changes the repair approach entirely.
- Crack width under 1/4 inch: Surface crack filler or flexible polyurethane caulk
- Crack width 1/4 to 1/2 inch: Flexible caulk or self-leveling filler, possibly with backer rod
- Crack width over 1/2 inch: Backer rod plus concrete patching compound or self-leveling filler
- Crack width over 1 inch or full-depth voids: Gravel-based patching compound, applied in layers
- Vertical displacement of 1/4 inch or more: Professional leveling (foam injection or mudjacking) before surface repair
If one side of the crack sits higher than the other, the subgrade beneath the slab has settled unevenly. Filling the crack surface without fixing the underlying issue means the repair will re-crack within one season. Foam injection (polyurethane slab lifting) or mudjacking can level the slabs for $500-$1,500 – far less than replacement. Always level before you repair. See why cracks form in our guide on why concrete cracks.
Types of Cracks and What They Mean
Identifying the crack type tells you whether the cause is still active – and whether your repair will last or fail again in one season.
| Crack Type | Appearance | Common Cause | Repair Approach |
|---|---|---|---|
| Shrinkage crack | Thin, random pattern across the slab | Concrete cured too fast or was too wet when poured | Surface filler or polyurethane caulk |
| Expansion / control joint crack | Straight crack along a joint line | Thermal expansion moved to an uncut joint | Flexible polyurethane sealant – must stay flexible |
| Settlement crack | Crack with one side higher than the other | Subgrade settled or eroded beneath slab | Level slab first, then fill crack with flexible filler |
| Tree root crack | Raised, buckled section near a tree | Root growth lifted concrete from below | Remove root, patch void, pour replacement section if needed |
| Freeze-thaw crack | Wide, often with spalled edges | Water infiltrated, froze, expanded, and opened the crack | Patch with polymer-modified compound, then seal entire driveway |
| Overload crack | Wide crack with crushed or crumbled edges | Heavy vehicle exceeded slab load capacity | Full-depth patch; consider slab reinforcement if repeated |
Understanding what caused the crack helps you choose the right product. A rigid patching compound in an active expansion joint will crack again immediately – that joint needs a flexible sealant that can move with the concrete. Read more about crack causes in our guide on why concrete cracks.
Choose the Right Repair Product
This is where most DIY concrete repairs fail. Using the wrong product for the crack size or application is the top reason repairs look bad and fail within a year.
| Crack Width | Best Product Type | US Brand Examples | Key Property |
|---|---|---|---|
| Under 1/4 inch | Liquid crack filler / surface sealer | Quikrete Concrete Crack Seal, RadonSeal | Flows into hairline cracks, flexible when cured |
| 1/4 to 1/2 inch | Flexible polyurethane caulk | Sikaflex Concrete Fix, DAP Concrete Filler & Sealant | Flexible, waterproof, paintable, stays bonded |
| 1/2 to 1 inch (with backer rod) | Self-leveling polyurethane or cementitious mix | NP1 Self-Leveling Sealant, Sika Self-Leveling Sealant | Flows level, flexible for joint movement |
| Over 1 inch / voids | Polymer-modified concrete patching compound with aggregate | Quikrete FastSet Repair Mortar, SAKRETE Top’N Bond, Sika MonoTop | Structural strength, bond to existing concrete, feather edges |
| Structural cracks | Epoxy injection | Sika Injection-451, Simpson Strong-Tie ET-HP | Bonds crack faces together, restores tensile strength |
Active joints – cracks along expansion joints, control joints, or between slab sections that move seasonally – must be filled with a flexible polyurethane or silicone-based product. Using rigid cement-based patch at an active joint guarantees the repair will crack again with the first temperature change. Only use rigid patching compounds for static cracks with no ongoing movement and solid concrete on both sides.
Tools and Materials Needed
You do not need specialized equipment to repair most large driveway cracks. Here is what to gather before starting:
- Pressure washer (minimum 1,500 PSI) or strong garden hose – for deep crack flushing
- Wire brush – for scrubbing loose concrete from crack walls
- Masonry chisel and hammer – for removing loose, crumbling edges
- Angle grinder with crack-chaser blade – optional but highly recommended for widening the crack mouth to create clean bonding walls (per Prosoco industry guidance)
- Shop vacuum – for removing dust and debris after cleaning
- Foam backer rod – for any crack wider than 1/2 inch; buy rod 25-50% wider than the crack
- Caulk gun – for applying polyurethane sealant products
- Margin trowel or putty knife – for applying and smoothing patching compound
- Concrete bonding adhesive – strongly recommended for polymer-modified patching on wide or deep repairs
- Sand – for texture matching on smooth-faced repairs
- Concrete sealer – for the final protective coat over the entire driveway
Step 2 – Clean and Prepare the Crack
Every repair product bonds to concrete. None of them bond to dirt, dust, oil, old caulk, or loose crumbles. Surface prep is the single most important factor in whether a crack repair lasts 10 years or fails in one season.
Start by removing all loose material from inside and along the edges of the crack. Use a masonry chisel and hammer to knock off any crumbling or spalled concrete. The crack walls need to be solid. Anything that feels loose or soft will prevent adhesion and needs to come out.
Scrub the crack walls with a stiff wire brush. This removes laitance – the thin, weak layer of cement paste that forms on concrete surfaces and kills adhesion. After wire brushing, use a shop vacuum to pull out all dust and debris from the crack interior.
If there is oil or grease near the crack – common on driveways – scrub with a concrete degreaser (trisodium phosphate substitute or Rust-Oleum Cleaner & Degreaser) before the final rinse. Oil contamination in or near a crack prevents polyurethane and epoxy products from bonding.
Finish with a pressure washer. Flush the crack thoroughly at high pressure, forcing out any remaining material. Then – and this is critical – allow the crack to dry completely before applying any repair material. Most repair products will not bond to wet concrete unless the product is specifically rated for damp conditions. Drying time is typically 2-6 hours in warm conditions.
For cracks that have smooth, hard walls – especially older cracks that have already been partially filled – use an angle grinder with a crack-chaser blade to cut a slight undercut into both sides of the crack opening. This creates a “V” or “U” shaped channel. Repair material bonds to this mechanically cut surface far better than to a smooth crack face. Prosoco, a leading US concrete repair chemical manufacturer, lists this as a standard prep step for successful long-term crack repair.
Step 3 – Install Backer Rod (For Cracks Wider Than 1/2 Inch)
Backer rod is a closed-cell foam rope that fills the bottom of a wide crack, creating a defined depth for the repair material above it. Without backer rod, repair material poured into a deep crack fills the entire void – wasting product, preventing proper curing in deep zones, and creating a fill that cannot flex properly.
Choose foam backer rod that is 25-50% wider than the crack opening so it compresses and holds firmly without falling through. For a 3/4-inch wide crack, use 1-inch or 1.25-inch backer rod.
Press the backer rod into the crack using a screwdriver or dowel. Push it to a depth so that it sits 1/4 to 3/8 inch below the concrete surface. This leaves room for the repair filler to sit at the correct depth – deep enough to flex and seal, shallow enough to bond to the crack walls properly.
For cracks deeper than 2 inches but narrower than 1 inch where backer rod will not fit: fill with clean dry sand to within 1/2 inch of the surface, then apply the filler over the sand base. This accomplishes the same function as backer rod for deep narrow cracks. Home Depot’s concrete repair guidance specifically recommends backer rod or sand for any deep or wide crack before applying filler compound.
Step 4 – Apply the Repair Material
Apply repair material in a controlled sequence: firm pressure, no air pockets, flush with the surrounding surface, and the correct depth over the backer rod.
For Cracks 1/4 to 1/2 Inch Wide
Load a tube of flexible polyurethane concrete caulk (Sikaflex Concrete Fix or equivalent) into a caulk gun. Cut the nozzle at a 45-degree angle slightly narrower than the crack width. Apply in a steady bead along the length of the crack, working the nozzle slightly into the opening to prevent air pockets. Smooth with a wet putty knife or a gloved finger dipped in soapy water. Sprinkle dry sand over the wet sealant to match the surrounding concrete texture.
For Cracks 1/2 to 1 Inch Wide (Over Backer Rod)
Use a self-leveling polyurethane sealant poured directly into the crack over the backer rod. The product flows to its own level. Fill to 1/4 inch above the backer rod and just below the concrete surface – the sealant will level itself. Do not overfill; self-leveling products cannot be sanded flush after curing without risking damage to the flexible material.
For Cracks Wider Than 1 Inch or Full-Depth Voids
This category requires a polymer-modified concrete patching compound with gravel aggregate. Apply concrete bonding adhesive (Quikrete Bonding Adhesive or SAKRETE Concrete Bonding Adhesive) to all crack walls before filling – this dramatically improves adhesion between the old concrete and the patch material.
Mix the patching compound per the manufacturer instructions. Apply in layers no deeper than 1/2 inch if the repair depth exceeds 2 inches – thicker layers trap moisture and prevent proper curing. Press each layer firmly with a margin trowel to eliminate air pockets and ensure full contact with the crack walls. Allow each layer to cure to the touch before adding the next. Finish the final layer flush or very slightly proud of the surrounding surface, then trowel smooth.
💼 Example: Repairing a 3/4-Inch Wide, 4-Inch Deep Settlement Crack (20 Linear Feet)
Crack assessment: 3/4-inch wide, 4 inches deep, no vertical displacement – subgrade stable
Backer rod needed: 1-inch foam backer rod x 20 linear feet – press to 3/8 inch below surface
Product selected: NP1 Self-Leveling Polyurethane Sealant (flexible, durable, UV-stable)
Product quantity: 1 tube per 5-8 linear feet at 3/4-inch wide x 5/8-inch deep = approx 3 tubes
Texture: Sprinkle clean dry sand over wet sealant, brush off excess after 24 hours
Cure time before traffic: 48-72 hours depending on temperature and humidity
Final step: Apply penetrating concrete sealer over entire driveway 48 hours after repair cure
Total DIY material cost: $60-$90
Use our concrete sealer calculator to estimate sealer quantity for your full driveway.
Step 5 – Cure and Seal the Driveway
The repair is only complete when both the patch and the surrounding driveway are sealed. Skipping the final sealer is like fixing a roof leak and leaving the rest of the roof bare.
Allow the repair product to cure fully before any vehicle traffic. Polyurethane sealants typically need 24-48 hours at 70°F. Concrete patching compounds need 24-72 hours depending on the product and temperature. Cold temperatures (below 50°F) significantly extend cure times. Check our guide on when you can drive on concrete for temperature-adjusted timing.
Once the repair is cured and the driveway surface is dry, apply a penetrating concrete sealer over the entire driveway – not just the repaired section. Penetrating sealers (silane-siloxane type) are the best choice for driveways because they bond chemically into the concrete surface rather than sitting on top, where they peel and flake over time.
Sealing locks in the repair and prevents water infiltration into the surrounding concrete. Without sealer, water will find its way back in through the existing concrete surface, not just through your repaired crack, and the cycle of freeze-thaw damage starts again. Apply sealer every 3-5 years as maintenance. Use our concrete sealer calculator to estimate product coverage for your driveway area.
Most concrete repair products and sealers require surface temperatures between 50°F and 90°F during application and the first 24-48 hours of curing. Applying below 50°F prevents proper curing and bond development. Applying above 90°F causes products to cure too quickly, trapping bubbles and reducing flexibility. Check your local forecast before starting the repair – you need at least 48 hours of weather in this range after application. See our concrete temperature limits guide for seasonal repair timing guidance.
When to Resurface Instead of Patch
If your driveway has multiple large cracks spread across the surface, patching each one individually may leave a driveway that looks worse than before – a patchwork of different-colored repair compounds across the slab.
Concrete resurfacing is the right move when: you have more than 4-6 cracks across the driveway, the surface is scaled or spalled in addition to cracked, the slab structure is sound but the surface finish is badly deteriorated, or you want a uniform appearance after repairs.
Resurfacing involves applying a thin (1/8 to 1/4-inch) polymer-modified overlay across the entire driveway surface after all structural cracks are patched. Products like Quikrete Concrete Resurfacer cost $0.75-$1.50 per square foot in materials, or $3-$7 per square foot professionally installed. The result is a uniform surface that looks close to new.
Important: resurfacing does not fix structural cracks or subgrade problems – it covers them cosmetically. Fill and repair all cracks before resurfacing. Use our concrete resurfacing calculator to estimate product quantity and cost for your driveway dimensions.
When to Replace Instead of Repair
Some driveways are past the repair threshold. Knowing when to stop spending money on patches and commit to replacement saves you from throwing good money after bad.
Replace rather than repair when:
- Cracks cover 25-30% or more of the total driveway area
- Multiple slab sections have vertical displacement of 1/2 inch or more
- The concrete is spalling, crumbling, or disintegrating across large sections – not just at crack edges
- The driveway is 30+ years old and at the end of its structural service life
- A structural engineer or concrete contractor identifies active subgrade failure that cannot be corrected
- Repair estimates exceed 50-60% of new driveway installation cost
A new 600 sq ft concrete driveway costs $3,600-$9,000 installed in 2026. If professional repairs are quoted at $2,500+, replacement with a properly built new slab at 4-5 inches thickness on a fresh compacted base is often the better investment. Use our concrete driveway cost calculator to build your replacement cost estimate, and our concrete dumpster calculator to factor in demolition and removal.
Repair or Replace? Quick Decision Guide
- 1-3 cracks, no displacement, sound slab – REPAIR with patching compound and sealer
- Multiple cracks with good slab structure – RESURFACE after patching
- Displacement of 1/4 inch or more – LEVEL FIRST (foam injection), then repair
- Cracks on 25%+ of surface, crumbling edges, 30+ year old slab – REPLACE
- Repair quote over 55% of new driveway cost – REPLACE
Repair Cost: DIY vs Professional (2026)
Here is what concrete driveway crack repair actually costs in 2026, from DIY surface sealing through full professional replacement.
| Repair Type | DIY Cost | Professional Cost | Best For |
|---|---|---|---|
| Surface crack sealing (polyurethane caulk) | $30-$75 | $3-$5 per linear foot | Cracks under 1/2 inch, no displacement |
| Wide crack patching with backer rod | $50-$120 | $5-$10 per linear foot | Cracks 1/2 to 1 inch wide |
| Full-depth patching (gravel compound) | $75-$200 | $8-$20 per linear foot | Cracks over 1 inch wide or deep voids |
| Foam injection leveling | Not DIY | $500-$1,500 per section | Displaced slabs before surface repair |
| Full resurfacing overlay | $200-$600 (materials only) | $1,000-$4,000 (600 sq ft) | Widespread surface cracking on sound slab |
| Full driveway replacement | Not recommended DIY | $3,600-$9,000 (600 sq ft) | End-of-life slab with structural failure |
Use our concrete pour cost calculator and concrete cost calculator to model the full replacement scenario before making your decision.
🎯 Key Takeaways: How to Repair Large Cracks in a Concrete Driveway
- Always assess crack width, depth, and vertical displacement before buying any product – the wrong product is the top reason repairs fail
- Cracks with vertical displacement (one side higher) need professional leveling first – filling without leveling guarantees the repair re-cracks
- Use flexible polyurethane caulk for cracks 1/4 to 1/2 inch wide, never rigid cement-based patch at active joints
- Install foam backer rod in any crack wider than 1/2 inch – it controls fill depth and allows proper flex of the repair material
- For cracks wider than 1 inch: use a polymer-modified concrete patching compound with gravel aggregate, applied in 1/2-inch layers
- Surface prep is the most critical step – clean, degreased, dry crack walls are the difference between a repair that lasts 10 years and one that fails in one season
- Apply concrete bonding adhesive to crack walls before filling with cementitious patching compounds
- Apply the repair only when temperatures are between 50°F and 90°F and expected to stay there for 48 hours
- Seal the entire driveway – not just the repaired section – after the patch cures; sealing prevents water from reaching the concrete through the intact surface
- If cracks cover 25%+ of the driveway, resurface after patching rather than patching each crack individually
- Replace rather than repair when the slab has structural failure, is 30+ years old, or when repair estimates exceed 55% of new installation cost
- DIY crack repair costs $30-$200 in materials; professional patching costs $3-$20 per linear foot depending on crack depth and width
Frequently Asked Questions
🔧 Plan Your Driveway Repair or Replacement
Use our free calculators to estimate material quantities, sealer coverage, resurfacing cost, and full replacement cost before calling a contractor.
Explore Repair Calculators →