How Much Does a 12×12 Concrete Patio Cost? 2026 Price Guide
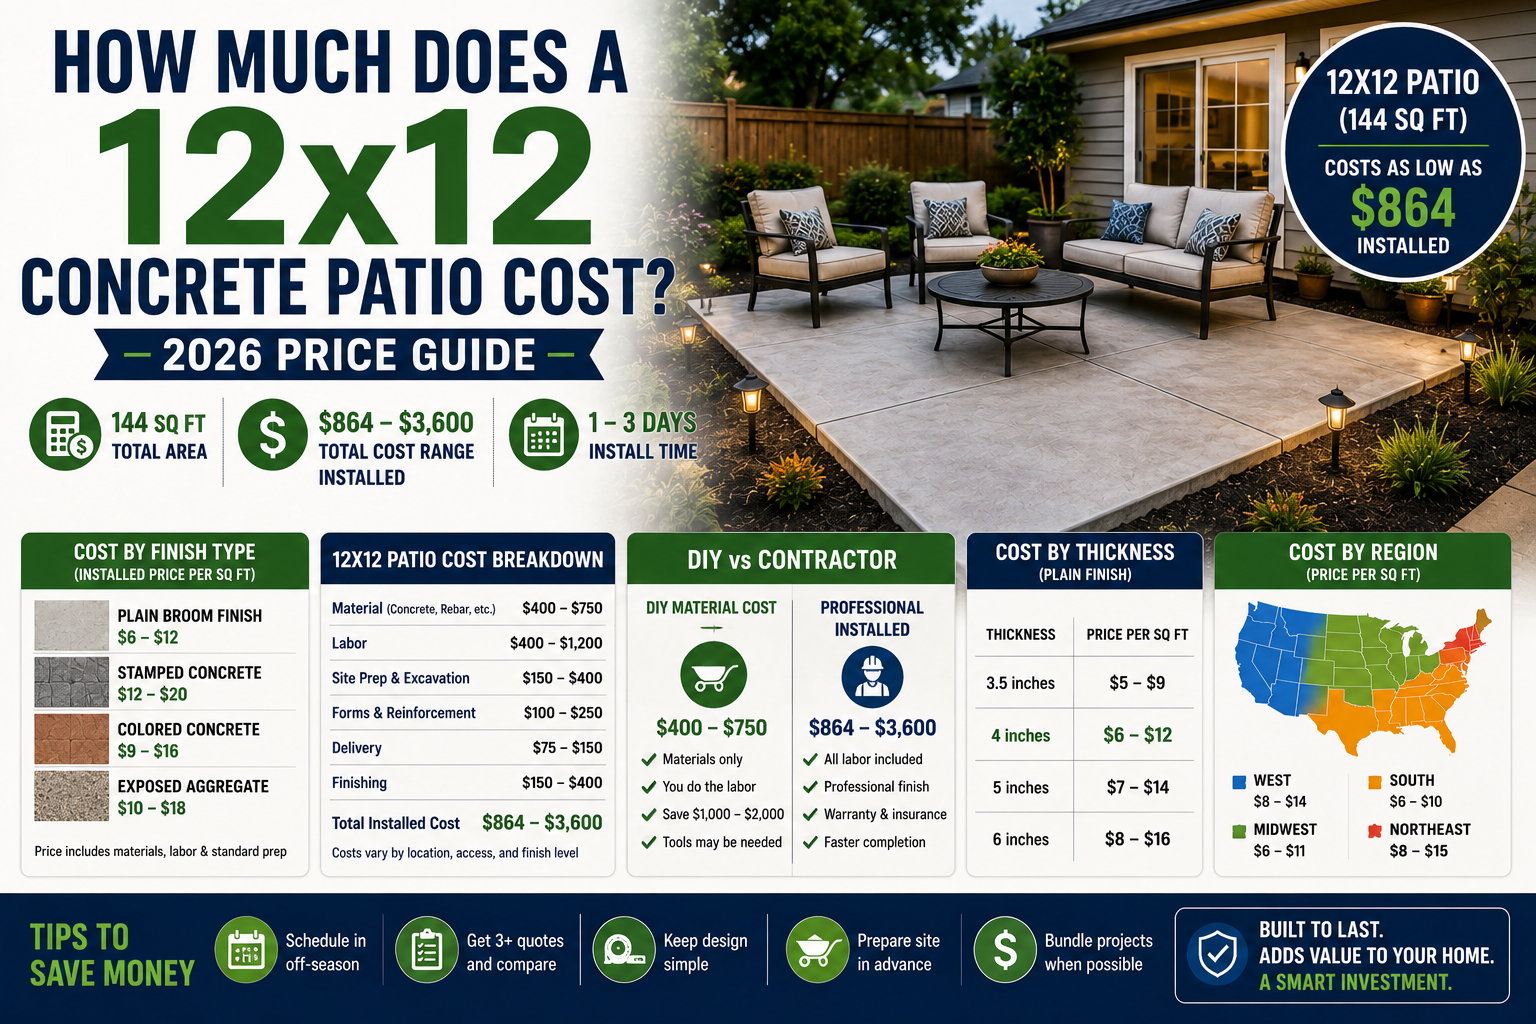
A 12×12 concrete patio costs $864 to $1,728 for a plain finish and $1,728 to $3,600 for stamped or colored concrete in 2026. At 144 square feet, a 12×12 patio fits comfortably in most backyards, handles a 4-person dining set, and can be poured in a single day by a professional crew or by a motivated DIYer with two helpers and solid prep work. This guide gives you everything you need: concrete volume, full cost breakdown, finish-by-finish pricing, regional cost differences, a real DIY vs. contractor comparison, and six ways to bring the total cost down without cutting corners.
12×12 Cost Summary
Here are the four key price points for a fully installed 12×12 concrete patio in 2026. All figures include materials, delivery, base prep, forming, pouring, finishing, and a first sealer coat.
Plain Broom Finish
$6–$12/sq ft — standard gray concrete, wire mesh, broom texture
Exposed Aggregate
$8–$15/sq ft — washed surface revealing decorative stone
Colored Concrete
$10–$18/sq ft — integral color or acid stain applied after cure
Stamped Concrete
$12–$25/sq ft — pattern stamps, two-tone color, decorative border
Confirm your concrete volume and get a full installed cost estimate before talking to contractors. Use the 12×12 Concrete Slab Calculator for the volume and the Concrete Patio Cost Calculator for the full installed price at any finish level.
How Much Concrete You Need for a 12×12 Patio
Before you call a contractor or a concrete supplier, know your exact cubic yard requirement. This protects you from over-ordering (wasted money) or under-ordering (a pour that stops short and creates a cold joint).
12 × 12 × (4 ÷ 12) ÷ 27 = 48 ÷ 27 = 1.78 cubic yards
+ 10% waste = 1.96 yards → order 2.0 yards
| Thickness | Cubic Yards (12×12) | Order Amount (+ 10%) | Concrete Cost (approx.) |
|---|---|---|---|
| 3 inches | 1.33 yards | 1.5 yards | $190 – $265 |
| 3.5 inches | 1.56 yards | 1.72 yards | $220 – $300 |
| 4 inches (standard) | 1.78 yards | 2.0 yards | $250 – $350 |
| 5 inches | 2.22 yards | 2.45 yards | $310 – $430 |
| 6 inches | 2.67 yards | 2.94 yards | $375 – $515 |
For exact calculations at any thickness, use the 12×12 Concrete Slab Calculator or the Concrete Slab Calculator for non-standard shapes. The Concrete Cubic Yard Calculator works for any dimensions you plug in.
Cost by Finish Type
The finish is the biggest cost variable beyond the base pour. Here is how each popular concrete patio finish performs, costs, and ages on a 12×12 slab.
Plain Broom Finish — $6 to $12/sq ft ($864–$1,728 total)
The contractor drags a stiff broom across the freshly screeded and floated surface while it is still plastic, creating a light linear texture. This improves traction in wet conditions and is the standard residential concrete finish across the US. It is the fastest to apply, requires no special skill beyond standard concrete work, and costs the least. The result is a clean, functional, gray slab. This is the right choice if your budget is the priority or if you plan to cover the patio with outdoor rugs or furniture.
Exposed Aggregate — $8 to $15/sq ft ($1,152–$2,160 total)
After screeding, the top layer of cement paste is washed away with a surface retarder and a pressure wash while the concrete is still green, exposing the decorative aggregate (pea gravel, river stone, or crushed granite) embedded in the mix. The result is a naturally textured surface with visible color variation from the aggregate. Exposed aggregate hides stains and tire marks better than plain concrete, ages gracefully, and is slip-resistant. It costs more than broom finish due to the retarder application and washing step but less than stamped or colored work.
Colored Concrete — $10 to $18/sq ft ($1,440–$2,592 total)
Color can be added two ways. Integral color is pigment mixed directly into the concrete at the plant, tinting the entire slab uniformly — tan, buff, terra cotta, charcoal, and slate gray are the most popular residential colors. Acid stain is applied after the slab has cured, creating translucent, marbled color effects that penetrate the surface. Either way, colored concrete on a 12×12 patio requires a sealer to maintain vibrancy and is resealed every 2 to 3 years. Integral color adds $15 to $40 per cubic yard to the concrete cost — about $30 to $80 on a 2-yard pour — making it one of the most affordable visual upgrades on a small slab.
Stamped Concrete — $12 to $25/sq ft ($1,728–$3,600 total)
Rubber stamps pressed into the plastic concrete surface create patterns that mimic natural stone, brick, slate, or wood. Stamping requires a skilled decorative concrete crew, a release agent for two-tone color, and a sealer. On a 12×12 patio specifically, the square footage is small enough that some contractors have a minimum project charge of $1,500 to $2,000 regardless of size — meaning the effective per-square-foot rate can be high on very small stamped pours. Always confirm whether a contractor has a project minimum before comparing quotes on a 12×12 stamped job. Use the Stamped Concrete Cost Calculator for a full decorative estimate.
| Finish Type | Cost Per Sq Ft | 12×12 Total (144 sq ft) | Reseal Frequency | Best For |
|---|---|---|---|---|
| Plain broom finish | $6 – $12 | $864 – $1,728 | Every 3–5 years | Budget-conscious, functional patios |
| Exposed aggregate | $8 – $15 | $1,152 – $2,160 | Every 3–5 years | Natural look, stain hiding, durability |
| Colored (integral) | $10 – $18 | $1,440 – $2,592 | Every 2–3 years | Curb appeal upgrade, color coordination |
| Stamped concrete | $12 – $25 | $1,728 – $3,600 | Every 1–3 years | Maximum decorative impact, outdoor living spaces |
Full Installed Cost Breakdown
Here is how the total cost of a professional 12×12 patio installation breaks down into individual components. This level of detail helps you verify contractor quotes and understand exactly what you are paying for.
| Cost Component | Estimated Cost (12×12) | Notes |
|---|---|---|
| Concrete material | $250 – $360 | ~2.0 yards x $125–$175/yard (short-load rate) |
| Short-load delivery fee | $75 – $150 | Standard on orders under 5–7 cubic yards |
| Excavation and grading | $75 – $300 | Flat sites: low end; sloped or overgrown: high end |
| Gravel sub-base (4 in) | $70 – $200 | Compacted crushed stone; critical for drainage and stability |
| Wire mesh reinforcement | $45 – $110 | 6×6 welded wire fabric; adequate for foot traffic patio |
| Forming and stripping | $70 – $145 | Wood forms set and removed; 48 linear feet of perimeter |
| Labor — pour and finish | $290 – $720 | $2–$5/sq ft for screed, float, broom finish, edge, cure |
| Control joints (saw cuts) | $35 – $70 | 2 cuts x 12 ft x $1.50/lf — placed every 10–12 ft |
| Curing compound | $15 – $45 | Spray-applied; retains moisture for proper strength gain |
| Sealer (first coat) | $70 – $220 | $0.50–$1.50/sq ft applied; acrylic or penetrating sealer |
| TOTAL — plain finish | $995 – $2,320 | $6.91–$16.11/sq ft fully installed |
Real-World Example: 12×12 Plain Patio in Nashville, TN
Size: 12×12 ft = 144 sq ft, 4 inches thick = 1.78 yards
Concrete (2.0 yards x $135/yard): $270
Short-load delivery fee: $100
Excavation and grading (flat lot): $120
Gravel sub-base (4 inches compacted): $110
Wire mesh reinforcement: $65
Forming and stripping: $95
Labor — pour and broom finish ($3.20/sq ft): $461
Control joints (2 cuts x 12 ft x $1.50): $36
Curing compound: $25
Acrylic sealer applied: $130
Total: $1,412
Per square foot: $9.81
For sealer quantity, use the Concrete Sealer Calculator. For sub-base volume, use the Subbase Calculator. For wire mesh quantity, use the Concrete Wire Mesh Calculator.
DIY vs. Professional Installation
A 12×12 patio is one of the most popular DIY concrete pours in the US — and for good reason. At 1.78 cubic yards, it is at the low end of what a ready-mix truck delivers, it fits in a single working day, and the savings are real. Here is the honest comparison.
| Cost Item | DIY Cost | Contractor Cost |
|---|---|---|
| Concrete material (2 yards) | $250 – $360 | $250 – $360 |
| Delivery fee | $75 – $150 | $75 – $150 |
| Gravel sub-base | $60 – $120 | $70 – $200 |
| Wire mesh | $25 – $50 | $45 – $110 |
| Lumber for forms | $30 – $60 | Included in labor |
| Tool rental (screed, float, edger, broom) | $80 – $160 | Included in labor |
| Sealer | $30 – $60 | $70 – $220 |
| Labor | $0 (your time + 2 helpers) | $290 – $720 |
| Total | $550 – $960 | $995 – $2,320 |
DIY saves $445 to $1,360 on a 12×12 patio. For a project this size, that is a 45 to 60% savings — genuinely significant. The trade-off is time, physical effort, and quality risk if the timing goes wrong during the pour.
When to Hire a Contractor Instead
- You want a stamped or colored finish — decorative work requires experienced hands
- Your site has significant slope or drainage challenges
- You are removing an old patio or slab first
- You want a warranty on the workmanship
- You do not have 2 to 3 capable helpers available on pour day
How Thickness Affects Your 12×12 Patio Cost
Every extra inch of thickness adds more concrete — the most expensive single line item in any slab project. On a 12×12 patio, each additional inch of thickness adds approximately $50 to $90 in concrete material cost. That is a small incremental amount but the right thickness choice matters for long-term performance.
| Thickness | Concrete Volume | Added Cost vs. 4 in | Right For |
|---|---|---|---|
| 3 inches | 1.33 yards | Save $50–$80 | Not recommended — prone to cracking under furniture loads |
| 3.5 inches | 1.56 yards | Save $25–$40 | Acceptable for light foot traffic in mild climates only |
| 4 inches ✅ | 1.78 yards | Baseline | Standard for all residential patios — recommended for most uses |
| 5 inches | 2.22 yards | +$55–$80 | Freeze-thaw climates, riding mower or golf cart use |
| 6 inches | 2.67 yards | +$110–$160 | Heavy vehicles, RV pads, or very poor soil conditions |
For a backyard 12×12 patio used for outdoor furniture and foot traffic, 4 inches is the correct spec in all but the most extreme conditions. In freeze-thaw states, pair 4 inches with an air-entrained 4,000 PSI mix for the best surface durability. Use the Concrete Slab Thickness Calculator for a recommendation based on your specific use case and soil type, and review the Concrete PSI Guide for the right mix strength.
How Does a 12×12 Compare to Other Patio Sizes?
A 12×12 is on the smaller end of residential patios. If you are deciding whether to go larger, here is how the cost and usability compare across the most common sizes in 2026, using the plain broom-finish installed price.
| Patio Size | Square Feet | Plain Finish Cost | Stamped Finish Cost | Fits |
|---|---|---|---|---|
| 10×10 | 100 sq ft | $600 – $1,200 | $1,200 – $2,500 | 2 chairs + side table |
| 12×12 ✅ | 144 sq ft | $864 – $1,728 | $1,728 – $3,600 | 4-person dining set |
| 12×16 | 192 sq ft | $1,150 – $2,300 | $2,300 – $4,800 | 6-person dining set |
| 14×14 | 196 sq ft | $1,180 – $2,350 | $2,350 – $4,900 | 6-person dining + grill |
| 16×16 | 256 sq ft | $1,540 – $3,070 | $3,070 – $6,400 | Dining + seating area |
| 20×20 | 400 sq ft | $2,400 – $4,800 | $4,800 – $10,000 | Full outdoor living room |
Going from a 12×12 to a 12×16 adds only 48 square feet but gives you noticeably more room for a grill and a larger table. The cost difference is approximately $300 to $575 for a plain finish — a relatively small premium for significantly more usable space. If your budget allows it and your yard has the room, a 12×16 is typically the better value for anyone who entertains. Use the Concrete Patio Cost Calculator to compare costs at multiple sizes side by side.
Cost by State and Region
Labor rates are the primary regional variable in concrete patio pricing. The same 12×12 patio that costs $1,100 installed in rural Ohio costs $1,900 to $2,400 in Seattle or Los Angeles. Here is the installed cost range by region for a standard plain broom-finish 12×12 patio.
| Region | 12×12 Plain Finish Cost | 12×12 Stamped Cost | Key States |
|---|---|---|---|
| California | $1,600 – $2,600 | $2,900 – $5,200 | LA, Bay Area, San Diego |
| New York / Northeast | $1,400 – $2,400 | $2,600 – $4,900 | NYC metro, Boston, NJ |
| Pacific Northwest | $1,300 – $2,200 | $2,400 – $4,600 | Seattle, Portland |
| Florida | $1,100 – $1,800 | $2,000 – $3,800 | Miami, Orlando, Tampa |
| Texas | $950 – $1,650 | $1,800 – $3,500 | Dallas, Houston, Austin |
| Illinois / Midwest Urban | $1,100 – $1,900 | $2,000 – $4,000 | Chicago, Minneapolis |
| Georgia / Southeast | $900 – $1,600 | $1,700 – $3,400 | Atlanta, Charlotte, Nashville |
| Ohio / Midwest Rural | $864 – $1,440 | $1,600 – $3,100 | OH, IN, IA, MO, KS |
| Arizona | $1,000 – $1,750 | $1,900 – $3,700 | Phoenix, Tucson |
For a project-specific estimate in your state, use the dedicated state cost calculators: California, Texas, Florida, New York, Ohio, Georgia, and Arizona.
What Drives the Cost Up or Down
Beyond size, finish, and location, several project-specific factors move the quote on a 12×12 patio up or down from the average ranges.
- Site access. If a concrete truck can back directly to the pour site, no pump is needed. If the backyard is gated, fenced, or landscaped in a way that blocks truck access, a concrete pump adds $300 to $800, nearly doubling the cost of this small project. Always check access before getting quotes and mention it to contractors.
- Existing slab removal. Removing an old concrete patio adds $1 to $3 per square foot in demolition and haul-off costs — $145 to $430 for a 12×12. Use the Concrete Removal Cost Calculator for a demo estimate before finalizing your overall budget.
- Sloped or uneven grade. A flat, well-drained lot is the best-case scenario for a low prep cost. A site that slopes significantly may require fill material, compaction, or retaining edging to achieve a level slab. Even minor grading work can add $200 to $500 to the project.
- Contractor minimum project size. Many concrete contractors have a minimum job charge of $1,000 to $2,000 regardless of the square footage. On a 12×12 patio, this can push the effective per-square-foot cost well above the typical range. This is one of the strongest arguments for DIY or for bundling the 12×12 patio with a walkway or step pour at the same visit.
- Decorative add-ons. A contrasting stamped border, an integrated step, or a curved edge each add cost on top of the base finish price. A single step at the door adds $300 to $700. A decorative border adds $5 to $10 per linear foot — approximately $240 to $480 for a 12×12 perimeter.
- Season. Concrete poured in winter in northern states requires heating measures that add $1 to $3 per square foot. Fall pours (September through November) are often cheaper than spring and summer because contractor demand is lower. This seasonal discount can reduce a 12×12 project cost by $100 to $350.
- Permits. A freestanding backyard patio usually does not require a building permit in most jurisdictions. However, some HOAs and municipalities require them for any concrete work. Permit fees range from $50 to $200. Always verify with your local building department before pouring.
6 Ways to Save Money on a 12×12 Concrete Patio
- 1. Do the sub-base prep yourself. Excavating 4 to 6 inches across 144 square feet and placing and compacting a gravel base is heavy but straightforward work. Renting a plate compactor costs $60 to $100 per day. Doing this yourself saves $150 to $400 in contractor prep labor and gives you confidence in the base quality.
- 2. Bundle with another concrete pour. If you need a front walkway, a side path, or a small step repaired, add it to the same concrete order and contractor visit. You avoid a second mobilization fee, share the short-load delivery surcharge, and typically get a lower per-square-foot rate on combined work.
- 3. Skip stamping on a 12×12 — use color instead. Integral color at $15 to $40 per cubic yard adds $30 to $80 in material cost to a 12×12 pour, yet it visually transforms the slab. The cost premium over plain is minimal. Stamped concrete on a 12×12 often hits a contractor minimum charge, making the effective per-foot rate very high. Color plus broom finish delivers 80% of the visual impact at 30% of the stamped cost.
- 4. Get three itemized quotes. On a small project like this, quotes can differ by $400 to $800 between contractors in the same zip code. Always request itemized quotes showing material, labor, base prep, and sealer separately. The cheapest quote is not always the best — look for completeness of spec, not just total price.
- 5. Seal it yourself. A first sealer coat is often included in contractor quotes but all future applications are out-of-pocket. Sealing a 144 sq ft patio yourself takes 30 to 45 minutes with a pump sprayer and costs $20 to $40 in materials per application. A contractor charges $150 to $300 for the same job. Over 20 years of biennial sealing, that is $900 to $2,200 in savings.
- 6. Pour it yourself. As detailed above, DIY on a 12×12 saves $445 to $1,360 versus professional installation. If you are comfortable with physical work, have two capable helpers, and can prep the site and forms the day before, this is one of the most accessible DIY concrete projects available. Use the 12×12 Concrete Slab Calculator to confirm your order, and the Concrete Bag Calculator to compare bagged vs. ready-mix cost before ordering.
Calculate Your 12×12 Patio Cost Before You Call Anyone
Build an accurate budget in 5 minutes using these tools:
- 12×12 Concrete Slab Calculator — Exact cubic yards at any thickness
- Concrete Patio Cost Calculator — Full installed cost by size and finish
- Stamped Concrete Cost Calculator — Decorative patio estimate
- Concrete Slab Thickness Calculator — Right thickness for your climate and use
- Concrete Bag Calculator — Bagged concrete vs. ready-mix comparison
- Concrete Wire Mesh Calculator — Mesh quantity for 144 sq ft
- Subbase Calculator — Gravel base volume and cost
- Concrete Sealer Calculator — How much sealer to buy
- Concrete Delivery Cost Calculator — Delivery fee and short-load estimate
- Concrete Removal Cost Calculator — Old slab demo and haul-off