How Much Does Concrete Cost Per m2? 2026 Price Guide (AUD, USD, GBP, CAD)
Concrete costs AUD $190 to $230 per m2 for plain installed concrete in Australia, USD $65 to $110 per m2 in the USA, and GBP £70 to £110 per m2 in the UK in 2026. Decorative finishes like stamped or honed concrete push prices 30 to 100% higher in every market. This guide gives you the real installed cost per square metre by country, finish type, and project – plus a unit conversion reference so you can compare any quote no matter which measurement system it uses.
m2 vs Square Foot: The Conversion Reference
The square metre (m2) and square foot (sq ft) are the two most common units used to price concrete work globally. Australia, the UK, Canada, South Africa, and New Zealand use m2. The USA uses square feet. If you are comparing quotes from different contractors or looking up prices across countries, this conversion table is your reference point.
| Price Per m2 | Equivalent Per Sq Ft | Price Per Sq Ft | Equivalent Per m2 |
|---|---|---|---|
| $50/m2 | $4.65/sq ft | $4/sq ft | $43.06/m2 |
| $75/m2 | $6.97/sq ft | $6/sq ft | $64.58/m2 |
| $100/m2 | $9.29/sq ft | $8/sq ft | $86.11/m2 |
| $125/m2 | $11.61/sq ft | $10/sq ft | $107.64/m2 |
| $150/m2 | $13.94/sq ft | $12/sq ft | $129.17/m2 |
| $175/m2 | $16.26/sq ft | $15/sq ft | $161.46/m2 |
| $200/m2 | $18.58/sq ft | $18/sq ft | $193.75/m2 |
| $250/m2 | $23.23/sq ft | $20/sq ft | $215.28/m2 |
| $300/m2 | $27.87/sq ft | $25/sq ft | $269.10/m2 |
| $400/m2 | $37.16/sq ft | $30/sq ft | $322.92/m2 |
Quick conversion formula: multiply per-sq-ft price by 10.764 to get per-m2. Divide per-m2 price by 10.764 to get per-sq-ft. This works for any currency – just keep the same currency on both sides of the conversion.
Use the concrete calculator to get your exact project area and volume in both metric and imperial units. Enter your dimensions in metres or feet – the calculator outputs both cubic metres and cubic yards so you can compare any quote regardless of which unit system your supplier uses.
🇦🇺 Concrete Cost Per m2 – Australia (AUD)
Australia uses AUD per m2 as the standard pricing unit for all concrete work. Prices include GST and cover the full installed cost: site preparation, base compaction, forming, reinforcement (mesh or rebar), concrete supply and delivery, pour labour, and a standard finish. Concrete pump costs are listed separately when applicable.
| Finish Type | AUD Per m2 | 20 m2 Total | 50 m2 Total |
|---|---|---|---|
| Plain broom / flat finish | $190 to $230 | $3,800 to $4,600 | $9,500 to $11,500 |
| Coloured concrete (integral) | $230 to $250 | $4,600 to $5,000 | $11,500 to $12,500 |
| Exposed aggregate | $250 to $290 | $5,000 to $5,800 | $12,500 to $14,500 |
| Stamped / pattern imprinted | $290 to $380 | $5,800 to $7,600 | $14,500 to $19,000 |
| Honed concrete | $370 to $420 | $7,400 to $8,400 | $18,500 to $21,000 |
| Polished concrete (high-gloss) | $400 to $500 | $8,000 to $10,000 | $20,000 to $25,000 |
Australian Prices by City
| City | Plain Concrete AUD/m2 | Exposed Aggregate AUD/m2 | Labour Rate/hr |
|---|---|---|---|
| Sydney | $210 to $260 | $270 to $320 | $65 to $80 |
| Melbourne | $200 to $250 | $260 to $310 | $60 to $75 |
| Brisbane | $195 to $240 | $255 to $305 | $58 to $72 |
| Perth | $195 to $240 | $255 to $300 | $58 to $72 |
| Adelaide | $190 to $235 | $248 to $295 | $55 to $68 |
| Canberra | $200 to $248 | $258 to $308 | $60 to $75 |
| Regional / Rural | $170 to $210 | $225 to $270 | $49 to $65 |
Australia has experienced persistent fuel cost pressures since 2022 that have added 10 to 20% to quoted concrete prices compared to pre-2022 rates. Unlike material supply disruptions during COVID-19 where prices later stabilised, industry sources indicate that elevated fuel costs have been largely absorbed into standard pricing. Always request an itemised quote and ask whether a fuel surcharge is included or added separately.
🇺🇸 Concrete Cost Per m2 – USA (USD)
The USA uses square feet as the standard unit, but many homeowners and international buyers need m2 prices for comparison. All figures below are converted from verified 2026 USD per-square-foot pricing using the 10.764 conversion factor. These are fully installed prices including all labour, base prep, reinforcement, and standard finish.
| Finish Type | USD Per Sq Ft | USD Per m2 | 50 m2 Project Total |
|---|---|---|---|
| Plain broom finish (4 in slab) | $6 to $10 | $65 to $108 | $3,230 to $5,382 |
| Coloured / integral colour | $7 to $11 | $75 to $118 | $3,769 to $5,919 |
| Exposed aggregate | $7 to $12 | $75 to $129 | $3,769 to $6,459 |
| Stamped – basic (1 pattern) | $10 to $13 | $108 to $140 | $5,382 to $6,997 |
| Stamped – mid-range (2 colours) | $13 to $17 | $140 to $183 | $6,997 to $9,152 |
| Stamped – premium / custom | $17 to $25 | $183 to $269 | $9,152 to $13,455 |
| Foundation slab (6 in thick) | $8 to $15 | $86 to $161 | $4,306 to $8,073 |
| Driveway (5 to 6 in thick) | $7 to $12 | $75 to $129 | $3,769 to $6,459 |
USA Prices by Region (Per m2)
| Region | Plain Slab USD/m2 | Stamped USD/m2 |
|---|---|---|
| South / Southeast (TX, GA, FL) | $59 to $86 | $108 to $161 |
| Midwest (OH, IL, IN, MI) | $70 to $97 | $118 to $172 |
| Mountain / Southwest (AZ, CO) | $65 to $97 | $118 to $172 |
| Northeast (NY, MA, CT, NJ) | $86 to $140 | $151 to $226 |
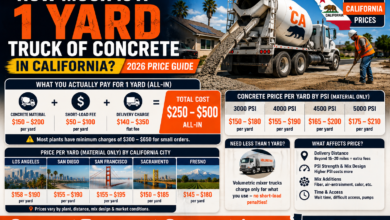
| California | $97 to $161 | $172 to $258 |
🇬🇧 Concrete Cost Per m2 – UK (GBP)
UK concrete pricing uses GBP per m2 as the standard quote unit. Prices include VAT at 20% where applicable on new residential construction, and typically cover excavation, sub-base, reinforcement, concrete supply, pour, and a standard finish. Pump hire and decorative finishes are commonly quoted as line-item additions.
| Finish Type | GBP Per m2 | 20 m2 Total | 50 m2 Total |
|---|---|---|---|
| Plain concrete (C20 to C25 mix) | £70 to £110 | £1,400 to £2,200 | £3,500 to £5,500 |
| Coloured concrete | £90 to £130 | £1,800 to £2,600 | £4,500 to £6,500 |
| Exposed aggregate | £100 to £150 | £2,000 to £3,000 | £5,000 to £7,500 |
| Pattern-imprinted / block effect | £120 to £200 | £2,400 to £4,000 | £6,000 to £10,000 |
| Polished / honed interior slab | £150 to £220 | £3,000 to £4,400 | £7,500 to £11,000 |
| Foundation / structural slab | £90 to £140 | £1,800 to £2,800 | £4,500 to £7,000 |
UK Prices by Region
| Region | Plain Slab GBP/m2 | Pattern Imprinted GBP/m2 | Labour Rate/day |
|---|---|---|---|
| London | £95 to £140 | £155 to £250 | £280 to £380 |
| South East England | £85 to £125 | £135 to £220 | £240 to £320 |
| Midlands | £75 to £115 | £125 to £205 | £200 to £280 |
| North England | £70 to £108 | £118 to £195 | £190 to £265 |
| Scotland | £72 to £110 | £120 to £198 | £195 to £270 |
| Wales | £68 to £105 | £115 to £190 | £185 to £255 |
🇨🇦 Concrete Cost Per m2 – Canada (CAD)
Canadian concrete pricing follows m2 in most provinces, though some contractors in Ontario and Alberta quote in square feet due to proximity to US practices. All prices below include labour, materials, delivery, base preparation, and standard reinforcement.
| Finish Type | CAD Per m2 | 20 m2 Total | 50 m2 Total |
|---|---|---|---|
| Plain concrete slab | CAD $120 to $175 | $2,400 to $3,500 | $6,000 to $8,750 |
| Coloured concrete | CAD $145 to $200 | $2,900 to $4,000 | $7,250 to $10,000 |
| Exposed aggregate | CAD $155 to $215 | $3,100 to $4,300 | $7,750 to $10,750 |
| Stamped concrete | CAD $180 to $285 | $3,600 to $5,700 | $9,000 to $14,250 |
| Driveway (130mm thick) | CAD $130 to $185 | $2,600 to $3,700 | $6,500 to $9,250 |
| Heated driveway (in-slab heating) | CAD $250 to $380 | $5,000 to $7,600 | $12,500 to $19,000 |
Canadian Prices by Province
| Province | Plain Slab CAD/m2 | Stamped CAD/m2 |
|---|---|---|
| Ontario (Toronto) | $145 to $185 | $210 to $295 |
| British Columbia (Vancouver) | $150 to $195 | $220 to $305 |
| Alberta (Calgary / Edmonton) | $135 to $175 | $195 to $275 |
| Quebec (Montreal) | $125 to $168 | $185 to $262 |
| Saskatchewan / Manitoba | $118 to $160 | $175 to $250 |
🇿🇦 Concrete Cost Per m2 – South Africa (ZAR)
South African concrete pricing uses ZAR per m2. Labour costs are significantly lower than in Australia, the UK, or Canada, which results in lower installed prices per m2. Material costs have risen sharply in recent years due to fuel and logistics pressures. All prices include labour, river sand, stone aggregate, Portland cement, and a standard finish.
| Finish Type | ZAR Per m2 | 20 m2 Total | 50 m2 Total |
|---|---|---|---|
| Spray-on concrete (plain) | R550 to R825 | R11,000 to R16,500 | R27,500 to R41,250 |
| Plain poured concrete | R660 to R935 | R13,200 to R18,700 | R33,000 to R46,750 |
| Coloured concrete | R825 to R990 | R16,500 to R19,800 | R41,250 to R49,500 |
| Exposed aggregate / ornamental | R1,100 to R1,650 | R22,000 to R33,000 | R55,000 to R82,500 |
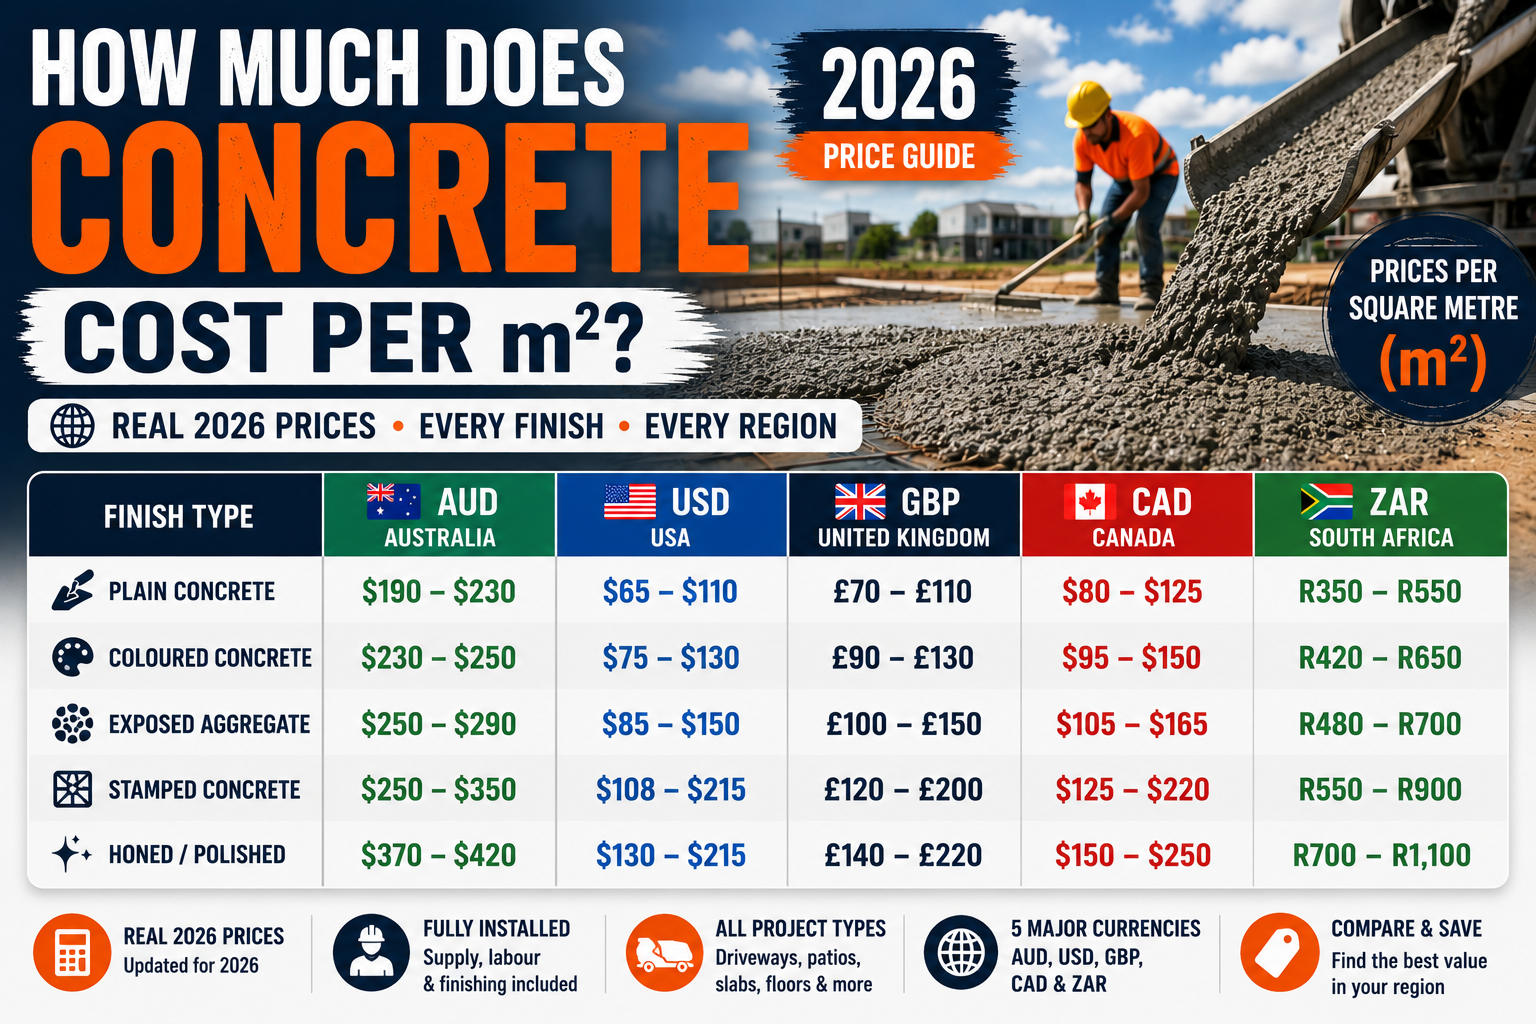
Cost Per m2 by Finish Type: All Countries
This master comparison table shows what the same finish types cost across all five markets in their local currency. Use it to understand how each country’s labour and material cost structure positions concrete pricing globally.
| Finish Type | AUD/m2 | USD/m2 | GBP/m2 | CAD/m2 |
|---|---|---|---|---|
| Plain concrete | $190-$230 | $65-$108 | £70-£110 | $120-$175 |
| Coloured / integral | $230-$250 | $75-$118 | £90-£130 | $145-$200 |
| Exposed aggregate | $250-$290 | $75-$129 | £100-£150 | $155-$215 |
| Stamped / pattern | $290-$380 | $108-$269 | £120-£200 | $180-$285 |
| Honed / polished | $370-$500 | $130-$215 | £150-£220 | $210-$310 |
| Foundation slab | $220-$280 | $86-$161 | £90-£140 | $145-$210 |
The large price gap between USD/m2 and AUD/m2 for the same finish type reflects the significant labour rate differential between the two countries. A concrete finisher in Australia earns AUD $49 to $80 per hour. In the USA, the equivalent role earns USD $25 to $75 per hour – with the lower end of that range (in southern US markets) explaining the lower floor on US pricing.
Cost Per m2 by Project Type
Beyond finish type, the project application drives a different price per m2 because of thickness requirements, reinforcement specs, and forming complexity.
| Project | Thickness | AUD/m2 | USD/m2 | GBP/m2 |
|---|---|---|---|---|
| Footpath / walkway | 75 to 100mm | $175 to $220 | $60 to $97 | £65 to £100 |
| Patio – plain | 100mm | $190 to $230 | $65 to $108 | £70 to £110 |
| Patio – exposed aggregate | 100mm | $250 to $290 | $75 to $129 | £100 to £150 |
| Driveway – plain | 125 to 150mm | $200 to $250 | $75 to $129 | £80 to £125 |
| Driveway – coloured | 125 to 150mm | $240 to $290 | $90 to $140 | £95 to £145 |
| Garage floor | 100 to 125mm | $195 to $245 | $75 to $129 | £75 to £120 |
| Pool deck – plain | 100mm | $200 to $255 | $75 to $118 | £80 to £120 |
| Pool deck – exposed aggregate | 100mm | $260 to $310 | $86 to $140 | £105 to £160 |
| House slab / foundation | 150 to 200mm | $220 to $280 | $86 to $161 | £90 to £140 |
| Shed / utility pad | 75 to 100mm | $165 to $210 | $54 to $86 | £55 to £90 |
📐 Real Cost Example: 40 m2 Driveway in Three Markets
Project: 40 m2 plain concrete driveway, 125mm thick, broom finish
Australia (Sydney): 40 m2 x $225/m2 (AUD) = AUD $9,000
USA (Ohio): 40 m2 x $86/m2 (USD) = USD $3,440
UK (Midlands): 40 m2 x £93/m2 (GBP) = GBP £3,720
Canada (Alberta): 40 m2 x $155/m2 (CAD) = CAD $6,200
The same physical project costs dramatically different amounts across markets. The difference is almost entirely labour rates, not material costs.
m2 to Cubic Metres: How Much Concrete You Need
Once you know your project area in m2, calculating the concrete volume in cubic metres (m3) is straightforward. Knowing your volume lets you get accurate quotes from concrete suppliers and check whether your contractor’s estimate is reasonable.
Area (m2) × Thickness (m) = Volume (m3)
| Area | At 75mm (3 in) | At 100mm (4 in) | At 125mm (5 in) | At 150mm (6 in) |
|---|---|---|---|---|
| 10 m2 | 0.83 m3 | 1.10 m3 | 1.38 m3 | 1.65 m3 |
| 20 m2 | 1.65 m3 | 2.20 m3 | 2.75 m3 | 3.30 m3 |
| 30 m2 | 2.48 m3 | 3.30 m3 | 4.13 m3 | 4.95 m3 |
| 50 m2 | 4.13 m3 | 5.50 m3 | 6.88 m3 | 8.25 m3 |
| 75 m2 | 6.19 m3 | 8.25 m3 | 10.31 m3 | 12.38 m3 |
| 100 m2 | 8.25 m3 | 11.00 m3 | 13.75 m3 | 16.50 m3 |
| 150 m2 | 12.38 m3 | 16.50 m3 | 20.63 m3 | 24.75 m3 |
| 200 m2 | 16.50 m3 | 22.00 m3 | 27.50 m3 | 33.00 m3 |
All volumes above should have 10% added for waste and variation before ordering. Use the concrete calculator for precise volumes on any shape including circular slabs, L-shaped areas, and multiple sections poured together. To confirm the right thickness for your specific application, use the slab thickness calculator before approving any contractor’s specification.
Calculate Your Concrete Volume in m3 or Cubic Yards
Enter your dimensions in metres or feet – instant results in both metric and imperial.
Use the Concrete CalculatorWhat Drives the Cost Per m2 on Any Job
Whether you are in Sydney, Chicago, London, or Calgary, the same core factors move the price per m2 up or down. Understanding each one lets you evaluate any quote much more critically.
1. Labour Rate (Biggest Factor in Every Market)
Labour represents 50 to 65% of any installed concrete cost. This is why the same plain concrete driveway costs AUD $220/m2 in Sydney, USD $85/m2 in Ohio, and GBP £80/m2 in northern England. The concrete material itself costs only USD $12 to $20 per m2 regardless of location. Everything above that is labour, equipment, and overhead – and those vary dramatically by market.
2. Thickness and Concrete Mix Strength
Every additional 25mm of thickness adds approximately AUD $15 to $25/m2, USD $5 to $8/m2, or GBP £6 to £10/m2 in material cost. Upgrading from a standard 20 MPa (C20) mix to a 32 MPa (C32) or 4000 PSI mix adds a smaller amount – roughly USD $2 to $4/m2 – but is almost always worth it for driveways, garage floors, and any exposed slab. See the concrete PSI guide for the right mix strength by application.
3. Reinforcement Type
Steel mesh adds AUD $8 to $15/m2 in Australia, USD $3 to $5/m2 in the USA, and GBP £4 to £8/m2 in the UK. Rebar at standard spacing adds roughly double those figures. Engineered rebar for structural slabs and foundations adds more. Always confirm what reinforcement is included in any per-m2 quote – two identical-looking prices can include completely different reinforcement specs.
4. Site Access and Preparation
Difficult access adds cost in all markets at roughly similar proportional rates. Concrete pump hire: AUD $800 to $2,000 per project in Australia, USD $500 to $1,500 in the USA, GBP £400 to £900 in the UK. Excavation and removal of existing material is typically charged per cubic metre of material removed – AUD $80 to $150/m3, USD $40 to $80/m3, GBP £50 to £100/m3.
5. Decorative Finish Complexity
Plain broom finish is the cheapest. Every upgrade from that baseline adds cost: colour adds 15 to 25%. Exposed aggregate adds 30 to 40%. Stamped pattern adds 50 to 150% depending on pattern complexity and number of colour applications. Honed or polished finishes double or more the plain concrete price in every market because of the specialised grinding, sealing, and finishing equipment required.
6. Project Size
Contractors price smaller jobs at a higher per-m2 rate to cover mobilisation costs – truck, crew, equipment, and travel time. A 10 m2 shed pad costs more per m2 than a 100 m2 driveway from the same contractor. Most contractors price a break in rate at around 20 to 30 m2 for patios and 50 m2 for driveways and larger slabs.
Concrete Calculators: Metric and Imperial
- Concrete Calculator – volume in m3 and cubic yards
- Concrete Slab Calculator – slab volume and material quantities
- Slab Thickness Calculator – correct thickness by application
- Concrete Cost Per Square Foot Calculator – USA project pricing
- Concrete Cost Estimator – full project budget
- Concrete Patio Cost Calculator – patio full estimate
- Concrete Driveway Cost Calculator – driveway full budget
- Stamped Concrete Cost Calculator – decorative finish pricing
- Foundation Slab Cost Calculator – structural slab estimate
- Ready-Mix Truck Calculator – truckloads from m3 or cubic yards
Key Takeaways
- Plain concrete costs AUD $190 to $230/m2 in Australia, USD $65 to $108/m2 in the USA, GBP £70 to £110/m2 in the UK, and CAD $120 to $175/m2 in Canada in 2026.
- Exposed aggregate costs AUD $250 to $290/m2, stamped concrete AUD $290 to $380/m2, and honed concrete AUD $370 to $420/m2 in Australia – the most expensive finish in every market.
- To convert per-sq-ft to per-m2, multiply by 10.764. To convert per-m2 to per-sq-ft, divide by 10.764.
- One cubic metre of concrete covers 10 m2 at 100mm thick, 8 m2 at 125mm, and 6.67 m2 at 150mm.
- Labour is 50 to 65% of installed cost in every market – the labour rate difference between countries explains most of the price gap, not material cost differences.
- Decorative finishes add 15 to 100% or more over plain concrete pricing in every country.
- Always add 10% to your calculated concrete volume before ordering to account for waste and subgrade variation.